 Skip to Navigation
Index administration
RavenDB indexes can be administrated easily from the consumer end using either code or the studio.
Resetting an index
An index usually need to be reset because it has reached its error quota and been disabled. Resetting an index means forcing RavenDB to re-index all documents matched by the index definition, which can be a very lengthy process.
You can reset an index in one of the following ways:
- Using the client API, by calling:
store.DatabaseCommands.ResetIndex("IndexName"); - Using the HTTP API, by issuing a HTTP call to the index with RESET as the method name:
curl -X RESET http://localhost:8080/databases/DB1/indexes/indexName
This operation can be also easily accomplished from the studio. You can right click on a index name and select an action:
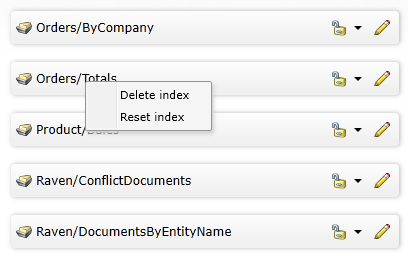
Deleting an index
You can delete an index by calling:
store.DatabaseCommands.DeleteIndex("IndexName");curl -X DELETE http://localhost:8080/databases/DB1/indexes/indexNameThe same way like performing the index reset operation you can delete the index using the studio (see the image above).
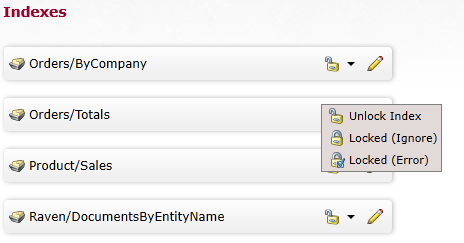
Index locking
This feature allows you to change an index definition on the production server. You can lock an index for changes, either in such a way that gives you the ability ignore changes to this index
or by raising an error when someone tries to modify the index. You can update the index definition on the server, next update it on the codebase and deploy the application to match them. While the index is locked
at any time when IndexCreation.CreateIndexes() on start up is called will not revert the change that you did.
It is important to note that this is not a security feature, you can unlock the index at any time.
To lock the index you need to create a HTTP call:
curl -X POST http://localhost:8080/databases/DB1/indexes/indexName?op=lockModeChange&mode=LockedIgnoreThe available modes are:
- Unlock
- LockedIgnore
- LockedError
In the studio this options are available on the Indexes page:
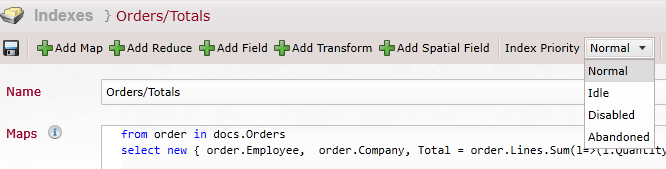
Index Prioritization
RavenDB's index can have a priority that controls how much power of the indexing process it is allowed to consume. The database automatically manages indexes and the default logic is as follows:
- An auto index can be set to idle if it has not been queried for a time
- An index that was automatically set to idle will be set to normal on its first query.
However an index priority can be forced by the user. There are five available values that you can set:
- Normal
- Idle
- Disabled
- Abandoned
What do these priorities actually mean? The idle index will not be indexed by RavenDB during the normal course of things. Only when the database is idle for a period of time (by default, about 10 minutes with no writes) will we actually get it indexing. Idle indexing will continue indexing as long as there is no other activity that require their resources. When that happens, they will complete their current run and continue to wait for the database to become idle again.
The disabled index will use no system resources and will never take part in the indexing. This is mostly there so you can manually shut down a single index. For example, maybe it is a very expensive one and you want to stop it while you are doing an import.
Even idle indexes can take some system resources, so we have added another level beyond that, the abandoned index is one that has not been queried in 72 hours. At that point, RavenDB is going to avoid indexing it even during idle periods. It will still get indexed, but only if there has been a long enough time passed since the last time it was indexed.
In order to set the priority of the index to idle for example, you can either create a HTTP request like following:
curl -X POST local:8080/databases/DB1/indexes/set-priority/IndexName?priority=Idleor use the studio. If so you need to go to Indexes and Edit selected index and there set up the priority:
All of the time settings used by RavenDB to automatically manage the priorities of indexes you will find on the configuration options page (look for options that starts with TimeToWaitBefore).
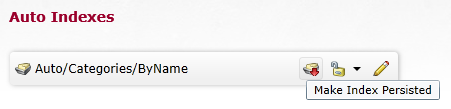
Persistence of an auto index
When auto indexes are created then they are kept in memory until they won't reach a given size from the configuration. You can force to write indexed data to a disk by using Make index persisted option:
From the HTTP API perspective, it can be accomplished by calling the following address:
curl -X POST http://localhost:8080/databases/DB1/indexes/IndexName?op=forceWriteToDisk