
Integrate RavenDB into SvelteKit app
In this article we will explore SvelteKit, a framework for rapidly developing robust, performant web applications using Svelte, and build step by step a sample web application for ordering beverages between a wholesaler and a bar to see the advantages of using this framework. As a database, RavenDB will be used along with our Node.js ravendb client API. Everything in this tutorial will be wrapped up in a GitHub repository for easier access.
Create Database
In order to begin, we need to set up a RavenDB database server, there are a few options available here, starting from Demo instances (beware that the data is public there, this is just a playground server), Free RavenDB Cloud instances and with a local installation. It is up to you to pick the one that you need, nevertheless we are leaving links to each type of them for quicker few-minute setup.
- Demo Server: Go to live-test.ravendb.net
- Free Cloud Instance: Go to cloud.ravendb.net, create account and then create free product
- Local server: Go to ravendb.net/download, get RavenDB for your system and run it
For more details, visit the ravendb.net/try.
Create SvelteKit project
Used Node.js version: 22.13.0
Init SvelteKit project
After the RavenDB database is installed, we need to create an initial project structure. Fortunately, the authors of the SvelteKit framework did a great job and created a wonderful template that through a set of questions will create for us exactly what we want.
In order to start the template generator execute:
npx sv create ravendb-sveltekit-exampleAnd what do we actually want? We would recommend using TypeScript for type safety and enhanced code maintainability, ESLint is also important because it ensures code quality and consistency, with Tailwind CSS we will be able to quickly style our components with utility classes.
To make it shorter, our recommendation would be to answer as follows:
  ◇  Which template would you like?
  │  SvelteKit minimal
  │
  ◇  Add type checking with Typescript?
  │  Yes, using Typescript syntax
  │
  ◇  What would you like to add to your project? (use arrow keys / space bar)
  │  prettier, eslint, tailwindcss
  │
  ◇  tailwindcss: Which plugins would you like to add?
  │  none
  │
  ◇  Which package manager do you want to install dependencies with?
  │  npm
Install ravendb package
Our next step, since we want to store our data in RavenDB, would be to add a Node.js RavenDB Client API.
cd ravendb-sveltekit-examplenpm install ravendbExample app
Now that we are good to go, and since we are building an application that lists orders between a wholesaler and a bar, our new system needs basic functionality so we can order the Beverage we want with desired quantity. Once we place an order, it must be marked in some way, so we will add the option of crossing-out or completely removing the item from the list.
Since our solution is using Tailwind CSS, we will take advantage of it and use it for CSS styling purposes.
Setting up database
What is an application nowadays without data storage? Let’s set up in few steps the database connection.
Create a store.ts file inside src/lib/.
We need to import DocumentStore from the ravendb package. Then we create a new store object.
As the first parameter, we provide the address under which our server is running.
- If you created a database on the demo server, it will be http://live-test.ravendb.net.
- In the case of a cloud instance, you will find the address in the cloud portal.
- For a server running locally, enter the one you have set (default is http://127.0.0.1:8080/)
The second parameter is the name of the database you created.
Now we can initialize the store, and export it.
// store.ts
import { DocumentStore } from "ravendb";
import { BeerOrder } from "$lib/models";

// Change it to your url and database name
const store = new DocumentStore("http://live-test.ravendb.net", "beer-order-database");

// Avoid class name minification in production build
store.conventions.findCollectionName = constructorOrTypeChecker => {
    if (constructorOrTypeChecker === BeerOrder) {
        return "BeerOrders";
    }

    return constructorOrTypeChecker.name;
}

store.initialize();

export { store };
Models
Before diving into creating pages, it’s crucial to define models for our data entities. Models provide a structured way to interact with the database, ensuring type safety and consistency throughout the application.
With these models in place, we’re equipped to seamlessly integrate RavenDB into our SvelteKit application, ensuring a smooth flow of data between frontend and database.
In the ravendb client, you can represent entities as either classes or object literals.
We will use the class approach here.
Let’s create a models.ts file in the src/lib directory. For our application, we will need a document in which we store information about added orders. We’ll call it BeerOrder.
// models.ts
export class BeerOrder {
    constructor(
        public id: string | null = null,
        public beerType: string = "",
        public liters: number = 0,
        public isDone: boolean = false,
        public createDate: Date = new Date()
    ) {}
}
Styling
We will start a little differently. Let’s add all the css classes needed for this project, so that we won’t have to look at them later and focus on the more important stuff. Let’s go to the src/routes/+page.svelte file, remove everything, and paste in these styles.
// +page.svelte

<style>
  	.beer-order-page {
  		@apply mx-auto mt-8 w-96 rounded-md bg-gray-800 p-4 text-white;

  		.title {
  			@apply mb-4 text-center text-2xl font-bold;
  		}

  		.add-form {
  			@apply flex flex-col gap-4;

  			label {
  				@apply flex flex-col;
  			}

  			input {
  				@apply p-1 text-black;
  			}

  			.add-button {
  				@apply w-full rounded-md bg-blue-500 p-2 transition-colors hover:bg-blue-600;
  			}
  		}

  		.order-item {
  			@apply mt-4 flex items-center justify-between rounded-md bg-gray-700 p-2 transition-colors hover:bg-gray-600;

  			.liters-text {
  				@apply text-gray-400;
  			}

  			.delete-button {
  				@apply w-full rounded-md bg-red-500 p-2 transition-colors hover:bg-red-600;
  			}
  		}

  		.error {
  			@apply text-red-500;
  		}
  	}
</style>
Main page
In this section, we’ll focus on the main page of our SvelteKit application. Navigate to src/routes/+page.svelte.
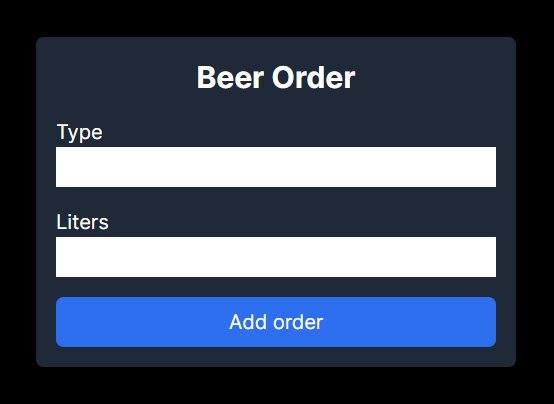
The form will include input fields for the beer type and the quantity in liters, along with a submit button labeled “Add order”. We can progressively enhance our form interactions to provide a better user experience by adding use:enhance.
With this main page set up, users will be able to interact with our application by submitting beer orders through the form. In the subsequent sections, we’ll enhance this functionality by integrating RavenDB for storing and managing these orders efficiently.
// +page.svelte

<script lang="ts">
  	import { enhance } from '$app/forms';
</script>

<main class="beer-order-page">
  	<h1 class="title">Beer Order</h1>
  	<form method="POST" action="?/addOrder" use:enhance class="add-form">
  		<label>
  			Type
  			<input type="text" name="beerType" required />
  		</label>
  		<label>
  			Liters
  			<input type="number" name="liters" required min="1" />
  		</label>
  		<button class="add-button">Add order</button>
  	</form>
</main>

<style>
...
</style>
Now in the terminal run
npm run dev
and open http://localhost:5173 in the browser. Your component should look like this.
Form actions
For form submission we will use form actions.
We already defined our form action to point to ?/addOrder, so now let’s create this action. Create the +page.server.ts file in the src/routes/ directory. From here we will export an object containing all actions. For now let’s focus on addOrder.
From formData we can get value by input name.
Inside our function we can just simply use the RavenDB database store.
  // +page.server.ts
  import type { Actions } from './$types';
  import { store } from '$lib/store';
  import { BeerOrder } from '$lib/models';

  export const actions: Actions = {
  	addOrder: async ({ request }) => {
  		const data = await request.formData();
  		const beerType = String(data.get('beerType'));
  		const liters = Number(data.get('liters'));

  		const session = store.openSession();

  		await session.store<BeerOrder>(new BeerOrder(null, beerType, liters));
  		await session.saveChanges();
  	},
  };
Now let’s try to add an order. Fill the form with some values and hit “Add order”.
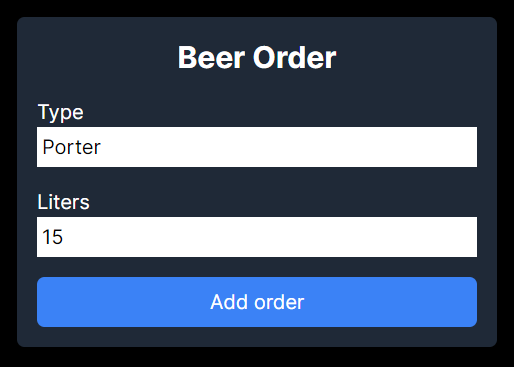
New documents should be added to your database.
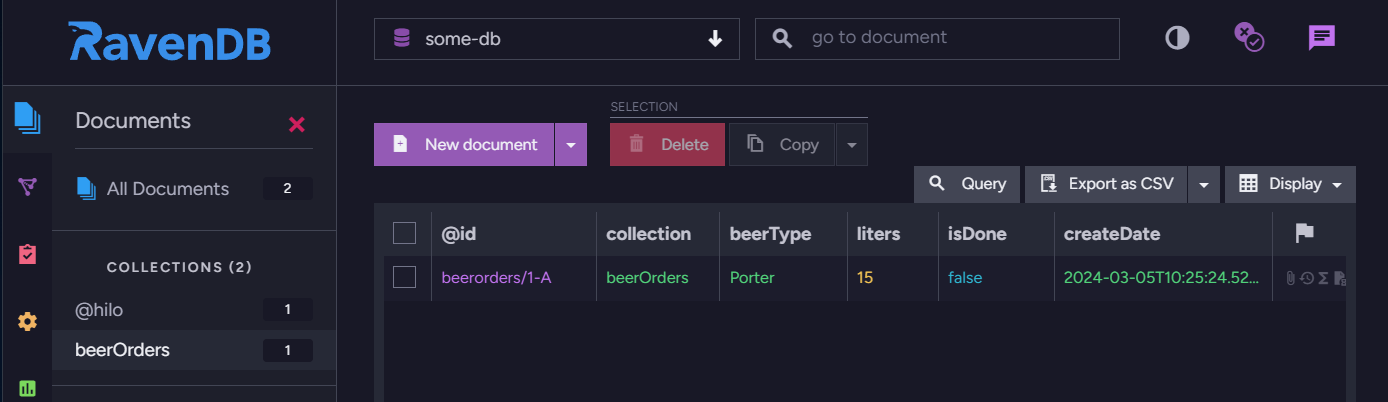
Getting data from database
As you can see, our order is in the database, but nothing has changed in the application.
In SvelteKit we can load data to our page by exporting the load function from +page.server.ts. This function must return data that can be serialized with devalue (e.g. JSON). Your data can also include promises, in which case it will be streamed to browsers. This is perfect for us because we will be able to display the status of loading our query from the database.
Since our query will return a list of deeply nested objects, we need to serialize the data appropriately. For this purpose, we will add the serializeNonPOJOs function.
// +page.server.ts
import type { Actions, PageServerLoad } from './$types';
import { store } from '$lib/store';
import { BeerOrder } from '$lib/models';
export const load: PageServerLoad = async () => {
return {
beerOrder: store
.openSession()
.query<BeerOrder>({ collection: 'BeerOrders' })
.orderBy('createDate')
.all()
.then((data) => serializeNonPOJOs(data))
};
};
function serializeNonPOJOs<T>(value: T): T {
return JSON.parse(JSON.stringify(value));
}
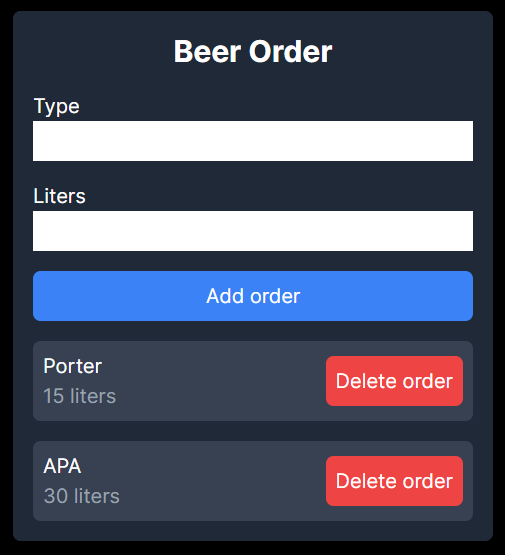
...Time to show the list on the UI. We can get our promise from page props. By the way, we will prepare a button for crossing-out and removing from the list. The final form of the page should look like this.
  // +page.svelte

  <script lang="ts">
  	import { enhance } from '$app/forms';
  	const { data } = $props();
  </script>

  <main class="beer-order-page">
  	<h1 class="title">Beer Order</h1>
  	<form method="POST" action="?/addOrder" use:enhance class="add-form">
  		<label>
  			Type
  			<input type="text" name="beerType" required />
  		</label>
  		<label>
  			Liters
  			<input type="number" name="liters" required min="1" />
  		</label>
  		<button class="add-button">Add order</button>
  	</form>
  	{#await data.beerOrder}
  		<p>Loading...</p>
  	{:then beerOrder}
  		{#each beerOrder as order}
  			<div class="order-item">
  				<div>
  					<form method="POST" use:enhance action="?/toggleOrder&id={order.id}">
  						<button>
  							<span class={`${order.isDone ? 'line-through' : ''}`}>
  								{order.beerType}
  							</span>
  						</button>
  					</form>
  					<span class="liters-text">{order.liters} liters</span>
  				</div>
  				<form method="POST" use:enhance action="?/deleteOrder&id={order.id}">
  					<button class="delete-button">Delete order</button>
  				</form>
  			</div>
  		{/each}
  	{:catch error}
  		<p class="error">{error.message}</p>
  	{/await}
  </main>

  <style>
  ...
  </style>
I added another order. Now the app should look like this.
Delete / Modify data
We’ve already shown the delete buttons, now let’s write logic for it. We will also add an option to click on a type of beer from the list to mark it as ordered. Let’s go to the +page.server.ts file.
We will add the deleteOrder and toggleOrder functions here. To make a change in the database, we only need the id.
  // +page.server.ts

  ...
  export const actions: Actions = {
  	...
  	deleteOrder: async ({ url }) => {
  		const id = String(url.searchParams.get('id'));

  		const session = store.openSession();

  		await session.delete<BeerOrder>(id);
  		await session.saveChanges();
  	},
  	toggleOrder: async ({ url }) => {
  		const id = String(url.searchParams.get('id'));

  		const session = store.openSession();

  		const order = await session.load<BeerOrder>(id);
  		if (!order) {
  			throw new Error(`Order (${id}) not found`);
  		}

  		order.isDone = !order.isDone;
  		await session.saveChanges();
  	}
  };
Now everything should work.
Summary
In this tutorial, we successfully integrated RavenDB into a SvelteKit project to create a beverage ordering application. We’ve covered database setup, project initialization, data handling, and UI development.
For the complete code, visit the GitHub repository. Happy coding!
Woah, already finished? 🤯
If you found the article interesting, don’t miss a chance to try our database solution – totally for free!


