Skip to Navigation
RavenDB Clusters
You might be familiar with the term "murder of crows" as a way to refer to a group of crows.1 It's been used in literature and the arts many times. Of less renown is the group term for ravens, which is "unkindness." Personally, in the name of all ravens, I'm torn between being insulted and amused.
Professionally, setting up RavenDB as a cluster on a group of machines is a charming exercise (though the term "charm" is actually reserved for finches) that brings a sense of exaltation (a term that's also taken, this time by larks) by how pain-free it is. I'll now end my voyage into the realm of ornithology's etymology and stop speaking in tongues.
On a more serious note, the fact that RavenDB clustering is easy to set up means that it's much more approachable. You don't need an expert on hand at all times to set up a cluster, and it should mostly self-manage. That means the decision to go from a single server to a cluster is much easier, and you can get the benefit of that sooner.
An overview of a RavenDB cluster
A RavenDB cluster is three or more machines2 that have been joined together.
But what's the point of doing that? Well, you can create databases on a RavenDB cluster, and you can specify that the cluster should manage them on its own. A database can live on a single node, some number of the nodes or even all the nodes. Each node will then hold a complete copy of the database and will be able to serve all queries, operations and writes.
The cluster will also distribute work among the various nodes automatically, handle failures and recovery and in general act to make sure that everything is humming along merrily.
Operations in RavenDB are usually divided into cluster-wide operations (including cluster-wide operations that impact only a single database) and internal database operations. For example, creating a new database is a cluster-wide operation, while writing a document to a database only impacts that particular database.
The reason this distinction is important is because RavenDB actually operates two distinct layers in its distributed system. The first, at the cluster level, is composed of nodes working together to achieve the same goal. This is done by using the Raft consensus protocol and having the cluster members vote to select a strong leader among themselves.
This leader, in turn, is responsible for such things as monitoring the cluster's health, selecting the preferred node that clients will use for each database, configuring the databases and making sure there's a consistent way to make decisions at the cluster level. But at the database level, instead of selecting a leader, the nodes are all working together, cooperatively and as equals.
Why would we want that? Wouldn't it be better to have just a single mode of operation? The answer is that it probably would be simpler but not necessarily better. Let's examine the pros and cons of each approach and how they're used by RavenDB.
Cluster consensus with a strong leader (Raft algorithm) provides strong consistency. The leader ensures that, as long as a majority of the nodes are functioning and can talk to one another, we'll remain in operation. The strong consistency mode is quite nice since it means the cluster can make a decision (such as add a database to a node), and we can be sure this decision will either be accepted by the entire cluster (eventually) or we fail to register that decision. That means that each node can operate on its own internal state for most operations, resulting in a more robust system.
The CAP theorem and database design
The CAP theorem, also called Brewer's theorem, states that given consistency, availability and partition tolerance, a system must choose two out of the three. It's not possible to provide all three options.
In practice, since all production systems are vulnerable to partitions, it means you can elect to be either CP (consistent and partition tolerant) or AP (available and partition tolerant). Different database systems have decided to take different design directions to handle this issue.
RavenDB has opted to be CP and AP. That isn't quite as impossible as it sounds. It's just that it isn't trying to be CP and AP on the same layer. With RavenDB, the cluster layer is CP (it's always consistent but may not be available in the presence of a partition), but the database layer is AP (it's always available, even if there's a partition, but it's eventually consistent).
However, if a majority of the nodes aren't available, we can't proceed. This is pretty much par for the course for consensus algorithms. Another issue with consensus algorithms is that they incur additional network round trips for each operation. For cluster maintenance and the configuration of databases, RavenDB uses the Raft consensus protocol. The RavenDB implementation of Raft is codenamed Rachis.3
Databases, on the other hand, are treated quite differently. Each node in the cluster has a full copy of the topology, which specifies which nodes host which databases. That information is managed by Rachis, but each node is able to act upon it independently.
The connections between the databases in different nodes do not go through Rachis or any other consensus protocol. Instead, they're direct connections among the various nodes that hold a particular database, and they form a multi-master mesh. A write to any of those nodes will be automatically replicated to all the other nodes.
This design results in a robust system. First, you define your cluster, distribute your databases among the nodes, assign work, etc. Once the cluster is set up, each database instance on the various nodes is independent. That means it can accept writes without consulting the other instances of the same database.
The design of RavenDB was heavily influenced by the Dynamo paper, and one of the key features was the notion that writes are important. If a user is writing to the database, you really want to hold on to that data. In order to achieve that, RavenDB uses multi-master replication inside a database, and it's always able to accept writes.
In other words, even if the majority of the cluster is down, as long as a single node is available, we can still process reads and writes.
This is a lot to digest. At this point, it's probably all a bit theoretical for you. We'll get back to the different layers that compose the RavenDB distributed architecture later on. For now, let's get ready to set up our first cluster.
Your first RavenDB cluster
We've worked with RavenDB before, but only with a single node. What you might not be aware of is that we actually worked with a single node cluster, and it isn't that interesting from the point of view of distributed systems. However, even a single node instance is always running as a cluster. That has the advantage of the same codepaths always being used and exercised.
Another major benefit is that you don't need any special steps to get to a cluster. All you need to do is add a few
nodes. Let's see how it works in practice. To do this, close any RavenDB server instances you currently have running
and open the command line terminal at the RavenDB folder. We want to reduce the amount of work we have to do per node, so open the settings.json file and ensure that it has the following properties:
    "Setup.Mode": "None",
    "License.Eula.Accepted": true
These are needed to skip the setup wizard and EULA acceptance screens, which happen by default when you start a new instance of RavenDB.
Downloading RavenDB
In "Zero To Hero," we went over how to download and set up RavenDB for various environments. If you skipped that step, you can go to the RavenDB download page at https://ravendb.net/download and download the package for your platform. The rest of this chapter assumes that you'll run all commands inside the uncompressed RavenDB directory, after you have updated the
settings.jsonfile.
The first thing we want to do is run an instance of RavenDB. I suggest running each RavenDB instance in its own terminal window, since that makes it easy to see the behavior of individual nodes:
./Server/Raven.Server.exe `
	--ServerUrl=http://127.0.0.1:8080 `
	--Logs.Path=Logs/A `
	--DataDir=Data/A
This command will run a RavenDB instance listening to 127.0.0.1 on port 8080, logging to the Logs/A directory and
storing the data in the Data/A directory.
You can point your browser to http://127.0.0.1:8080 and see the familiar Studio. Let's create a new database and call
it "Spade." The result should look like Figure 6.1.

Let's go into the database and create a couple of documents: "users/1" and "users/2," with your first and last name as the name. We're creating this database and those documents simply so we can see how we can grow a RavenDB cluster.
Now, we need to bring up another RavenDB node. Typically, you'd do that on a separate machine, but to make the demo easier, we'll just run it on the same machine. Open a new terminal session and run the following command:
./Server/Raven.Server.exe `
	--ServerUrl=http://127.0.0.2:8080 `
	--Logs.Path=Logs/B `
	--DataDir=Data/B
This time, we run the RavenDB instance bound to 127.0.0.2 (note there's a "2" at the end, not a "1") and with the same
8080 port. Logs go to Logs/B, and the data is stored in the Data/B directory. By utilizing the 127.*.*.* local IP range,
we can easily run distinct RavenDB instances on the same machine and tell them apart.
You can go to http://127.0.0.2:8080 and see the Studio, as well. However, unlike the instance running in 127.0.0.1:8080, there are no databases in the 127.0.0.2:8080's Studio.
Another difference between the two nodes can be seen at the bottom right, as shown in Figure 6.2.
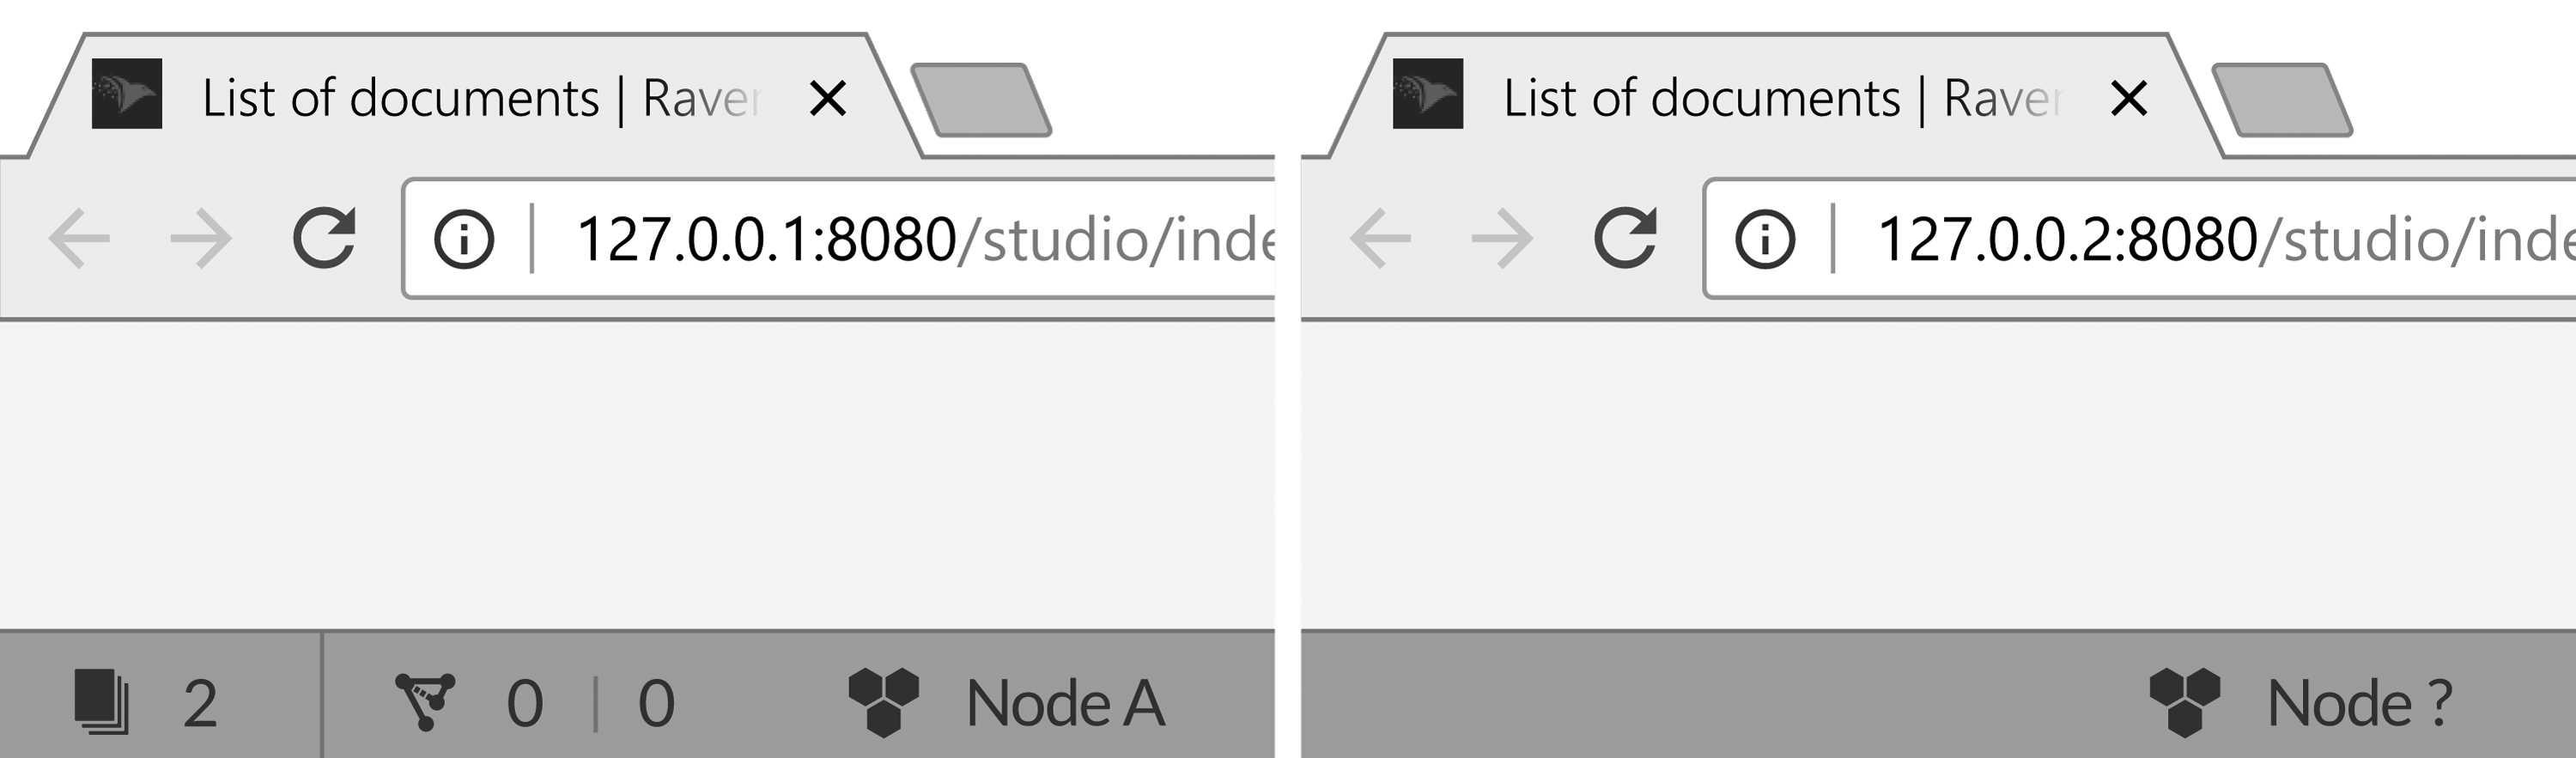
You can see in 127.0.0.2:8080 that the node is marked with a question mark, indicating an unknown node.
That's because this is a new node that didn't have any operations made on it. On the other hand, the 127.0.0.1:8080
node had a database created on it and, as such, is a single node cluster marked with the node tag A.
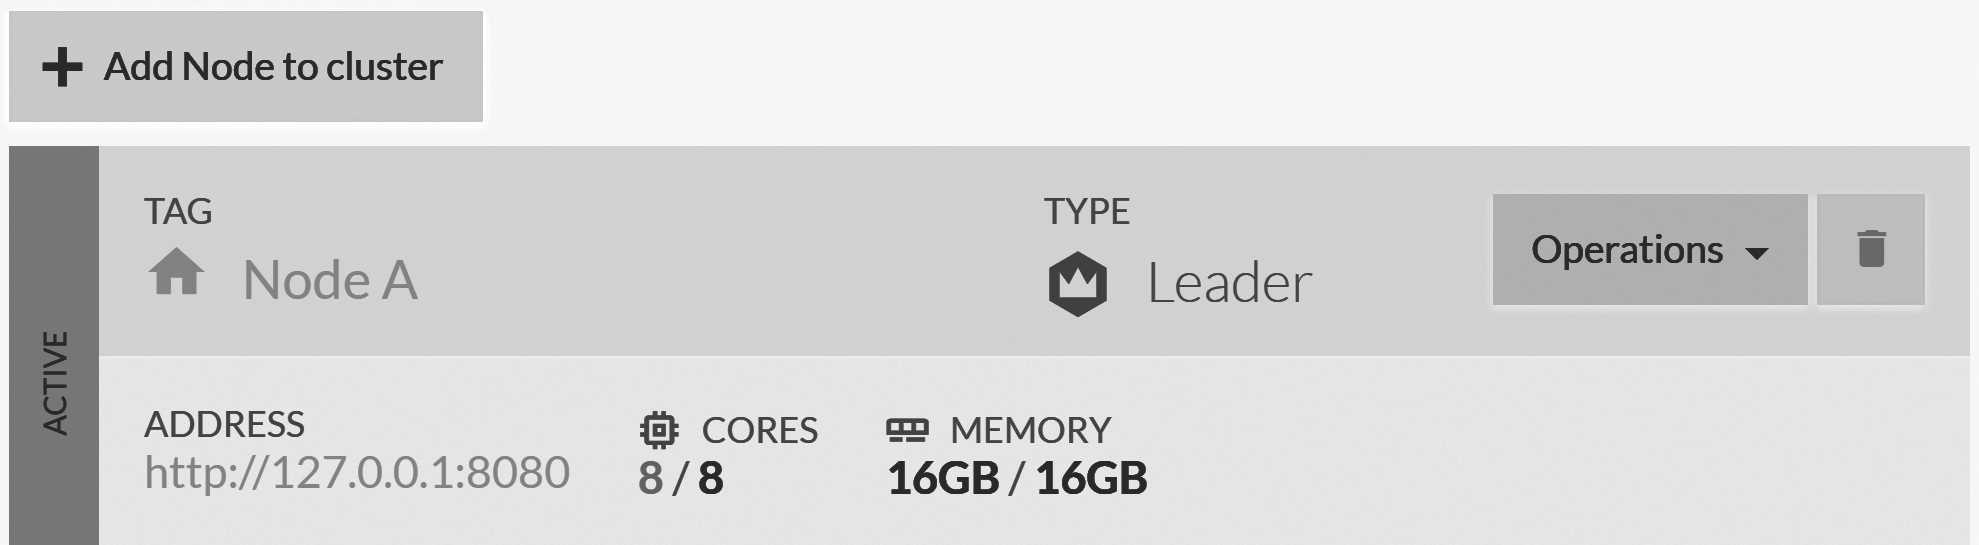
Now, let's add a node to our cluster. Go to 127.0.0.1:8080, Manage server and then to Cluster. The
cluster management screen is shown in Figure 6.3.
Click Add Node to Cluster and enter http://127.0.0.2:8080. The new node will show up as a cluster member, as shown in Figure 6.4.
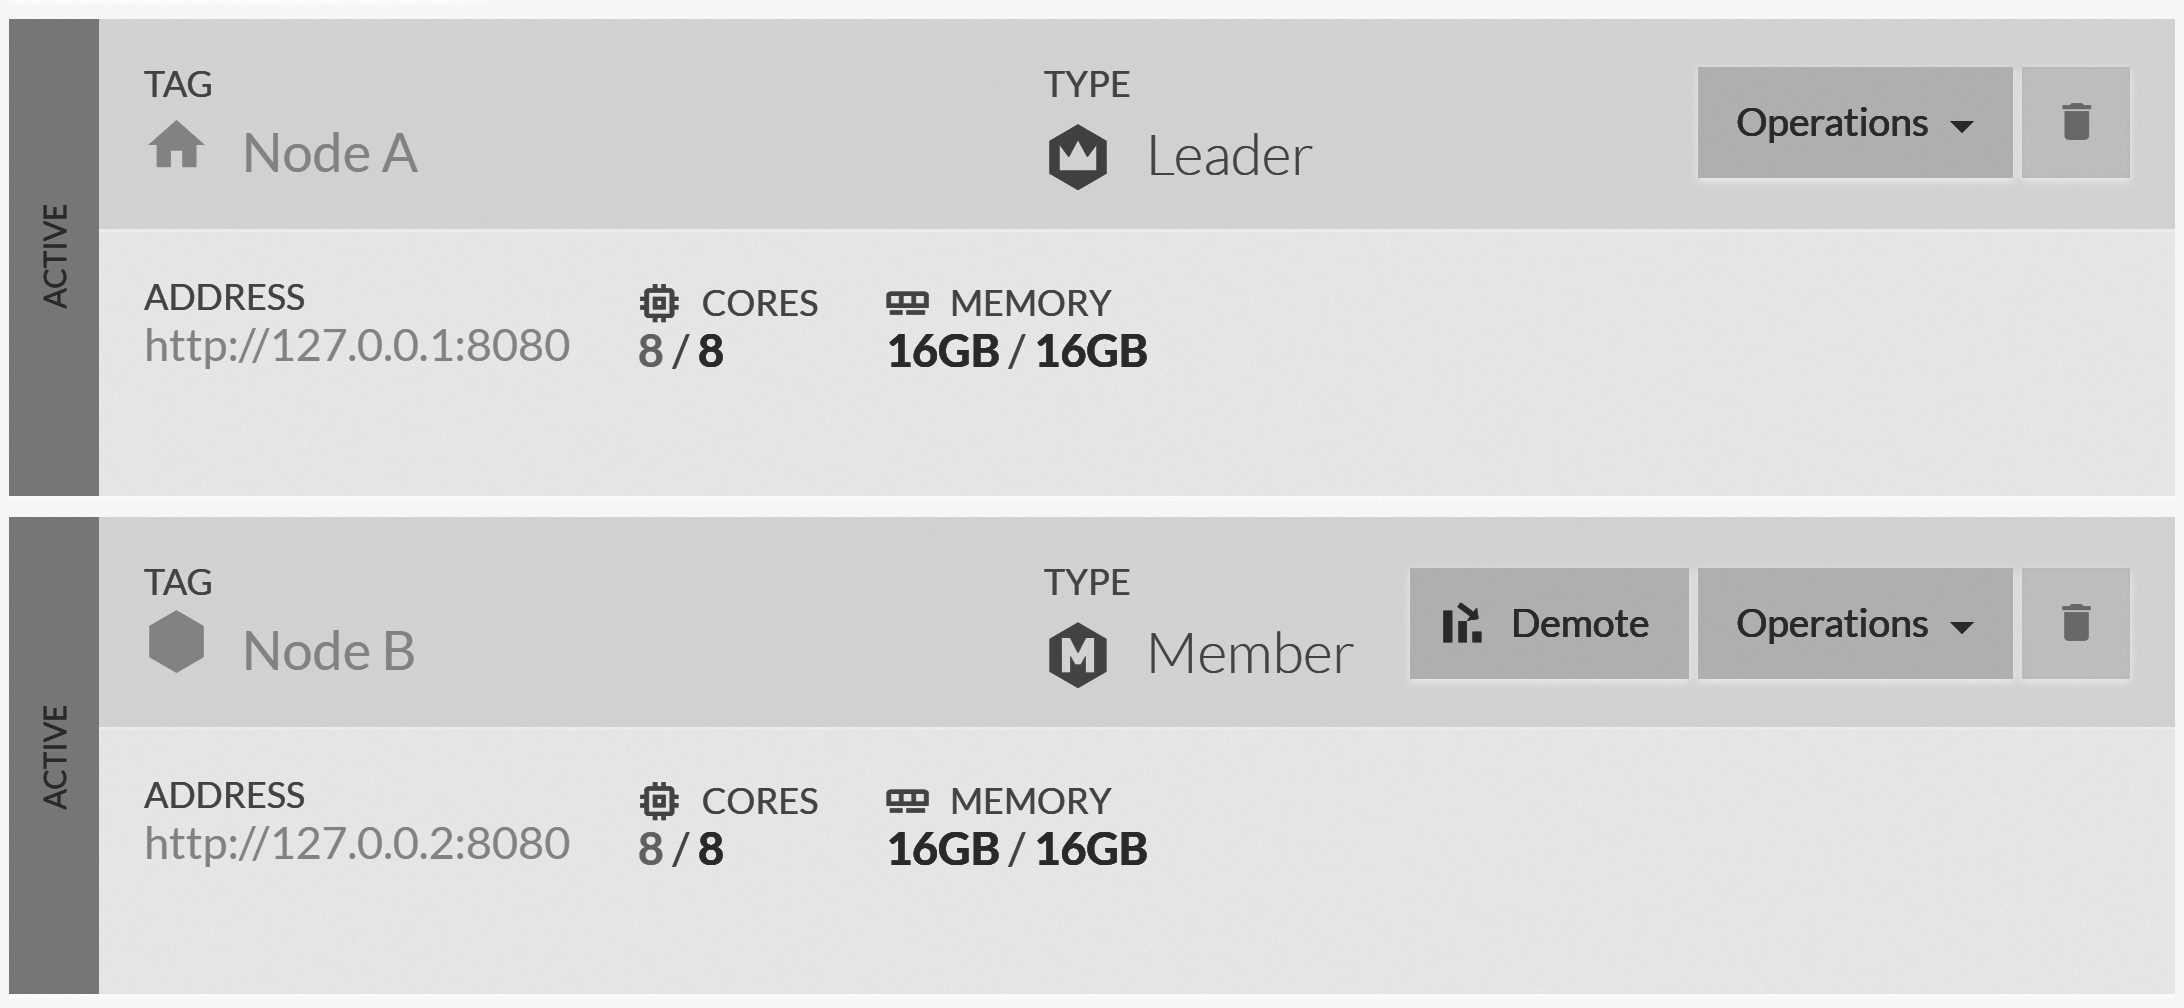
If you visit 127.0.0.2:8080 in the browser, you'll observe several interesting things. First, at the bottom, you can see 127.0.0.2:8080 is no longer an unknown node. Instead, it has been designated as node B.
Node tags and readability
To simplify matters, RavenDB assigns each node in the cluster a tag. Those tags are used to identify the nodes. They don't replace the node URLs but rather supplement them. Being able to say node
Binstead of127.0.0.2:8080or evenWIN-U0RFOJCTPUUis quite helpful. This also helps in more complex network environments where a node may be accessed via several hosts, IPs and names. From now on, I'm going to refer to nodes by their tags instead of continuing to write theIP:Portover and over.
On the databases list view, you can also see that the "Spade" database is marked as offline on node B. This is because this database
is only set up to be held on node A. To spread the "Spade" database to node B, click the "Manage group" button
on the "Spade" database, which will take you to a page allowing you to add a node to the database. Click the "Add node to group" button and select node B.
HTTP, TCP and the firewall, oh my!
In the configuration we've used so far, we used
ServerUrlto specify what interface and port we'll be listening to. However, this applies only to the HTTP interface of RavenDB. There is also a TCP interface, mostly used for direct communication between RavenDB nodes. Because we haven't explicitly specified aServerUrl.Tcpsetting, RavenDB will use theServerUrlconfiguration with a random port. As long as you are running on the local machine (or if you are running in a trusted environment without firewalls blocking connections), that would just work.When setting up a cluster on multiple machines, remember to set
ServerUrl.Tcp(you can specify just the port, or a hostname or IP and the port). For example, we could add--ServerUrl.Tcp=38080to the server command line. In this case, it will use127.0.0.1:38080for TCP communication for nodeA. For nodeB, it will use127.0.0.2:38080, etc.You can also set
ServerUrl.Tcpto a hostname/port combination, such asrvn-srv-01:38080or28.12.4.22:38080in which case RavenDB will use these. Such a configuration can be a good idea if you are running in the cloud and want to expose HTTP traffic to external parties (binding to the external IP), but intra-cluster communication can be routed through internal IPs (allowing you to use the lower cost network traffic inside the same data center).
That's it. You now have a database that spans two nodes. You can go to node B and see that the status of the "Spade" database
has moved from Offline to Online, and you can enter into the database and see the users/1 and users/2 documents
that we previously created on node A. RavenDB has automatically moved them to the secondary node.
You can play around for a bit with this setup. Create and update documents on both nodes and see how they flow between the two database instances. Next, we're going to take our cluster and poke it until it squeals, just to see how it handles failure conditions.
Kicking the tires of your RavenDB cluster
Running on two nodes is an interesting experience. On the one hand, we now have our data on two separate nodes, and assuming that we've actually run them on two separate machines, we're safe from a single machine going up in flames. However, two nodes aren't actually enough to handle most failure cases.
Let's consider a situation where a node goes down. We can simulate that by killing the RavenDB process running node A (the one
running the server on 127.0.0.1:8080). Now, go to node B (127.0.0.2:8080), Manage Server and then to Cluster. You'll
see that both nodes are there but none of them is marked as leader. This is because node B is unable to communicate with node A, since
we took node A down, and there isn't anyone else in the cluster that it can talk to.
At this point, the cluster is unable to proceed. There's no leader to be found, and there's no way to select one. The database, on the
other hand, can function just fine. If you go to the "Spade" database on node B and add a new document (users/3),
you'll observe there's no issue with this at all. The new document was created normally and without issue. This is because
each database is independent. Each database instance will cooperate with the other instances, but it isn't dependent on them.
How do clients respond to node failures?
When a node fails, the clients will transparently move to another node that holds the database they're connected to. One of the tasks of the cluster's leader is to maintain the database topology, which clients fetch as part of their initialization (and then keep current). We'll talk more about failover from the client side later in this chapter.
Now, you can re-start the first node by using the following command:
./Server/Raven.Server.exe `
	--ServerUrl=http://127.0.0.1:8080 `
	--Logs.Path=Logs/A `
	--DataDir=Data/A
The node will start and reconnect into the cluster. If you check the cluster state, you'll see something similar to Figure 6.5.
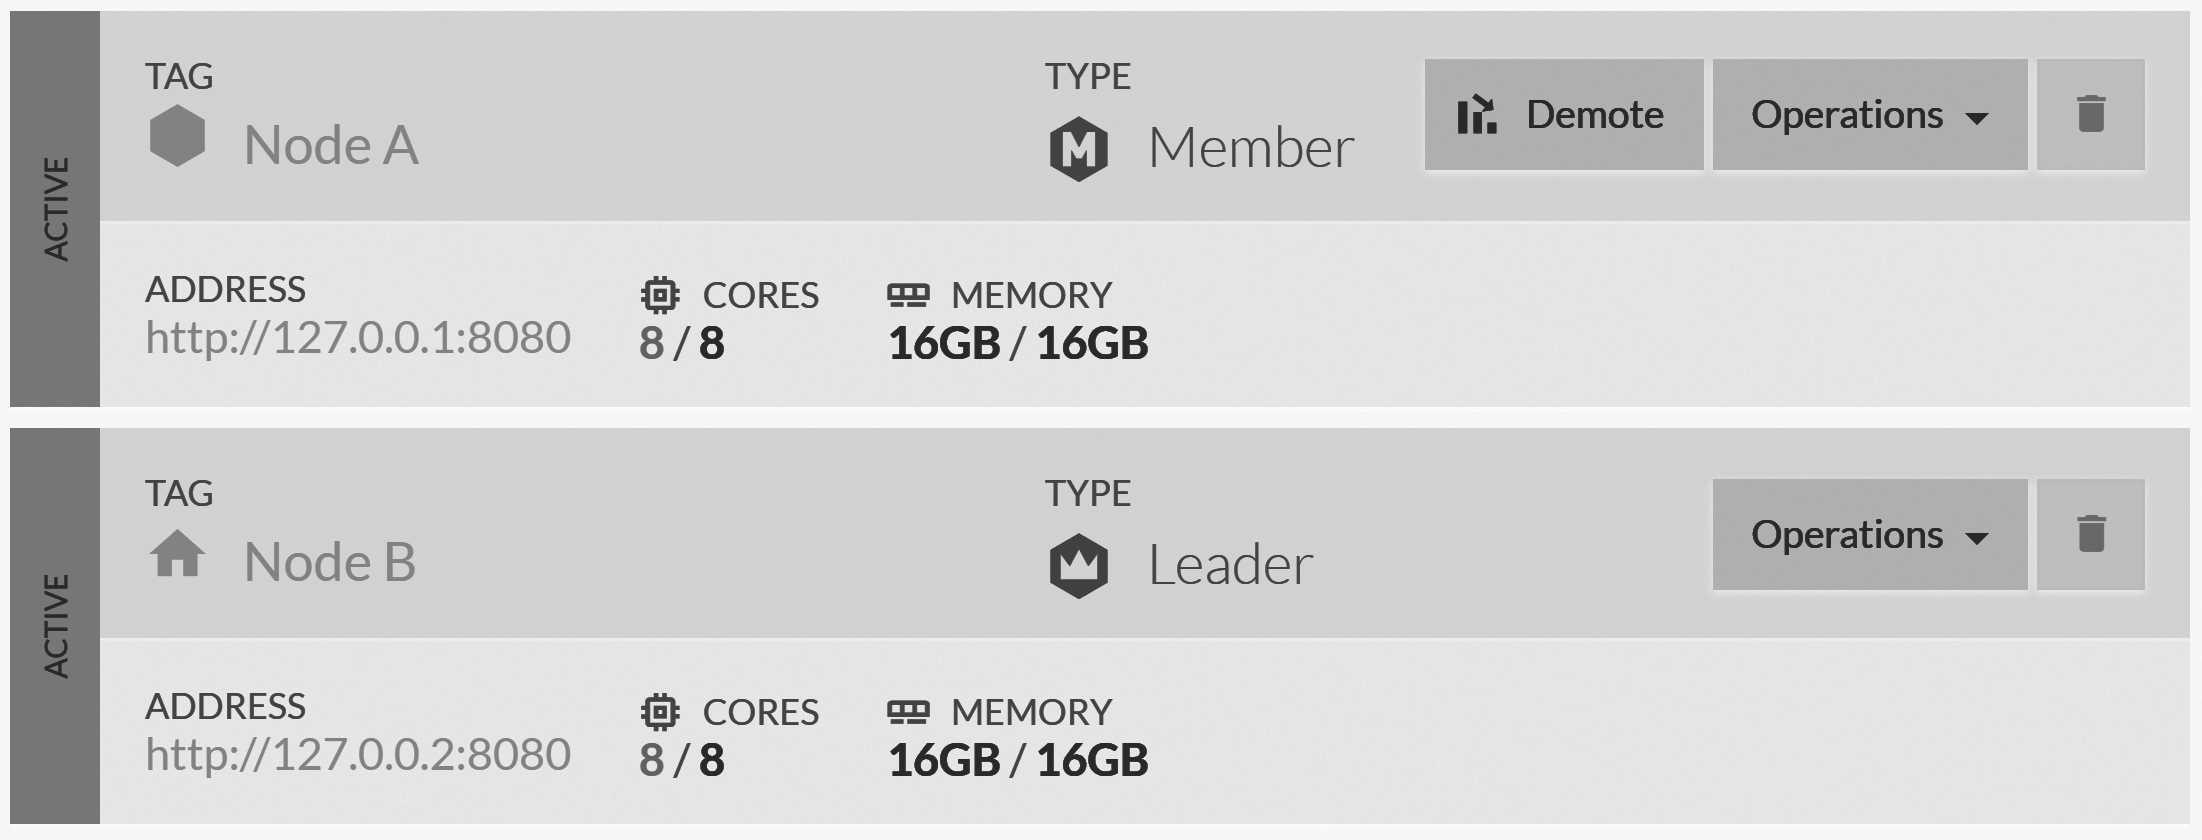
It's possible that in your case, the leader will be node A. There are no guarantees about who the leader will be.
Next, you can check the "Spade" database inside node A. You should see document users/3 inside, as it was replicated from node B.
So, our database remained operational even when we had just a single node available. Our cluster was down since it
couldn't elect a leader. But what does this mean? Well, it means that during the time we only had node B, weren't able to do any cluster-wide operations.
Cluster-wide operations include creating a new database and monitoring the health of other nodes. But a lot of database-specific configuration (anything that impacts all instances of a database) goes through the cluster as well. For example, we won't be able to schedule a backup task with the cluster down,4 and you'll not be able to deploy new indexes or modify database configurations.
Operations in a failed cluster
The list of operations that you can't perform if the cluster as a whole is down (but isolated nodes are up) seems frightening. However, a closer look at those operations will show you that they're typically not run-of-the-mill operations. These are one-time operations (creating indexes, setting a backup schedule, creating databases, adding nodes to a cluster, etc.).
Normal read/write/query operations from each database instance will proceed normally, and your applications shouldn't failover automatically and immediately. On the other hand, background operations, such as subscriptions or ETL, won't be able to proceed until the cluster is back up, which requires a majority of the nodes to be able to talk to one another.
Remember when I mentioned that running with two nodes in a cluster is strange? That's because any single node going down will result in this half-and-half state. Normally, you'll run three or more nodes, so let's expand our cluster even further.
Expanding your cluster
You can probably guess what we're going to do now. In exactly the same way that we previously added node B, we're going to add
three new nodes. To do this, execute the following commands:
./Server/Raven.Server.exe `
	--ServerUrl=http://127.0.0.3:8080 `
	--Logs.Path=Logs/C `
	--DataDir=Data/C

./Server/Raven.Server.exe `
		--ServerUrl=http://127.0.0.4:8080 `
		--Logs.Path=Logs/D `
		--DataDir=Data/D

./Server/Raven.Server.exe `
		--ServerUrl=http://127.0.0.5:8080 `
		--Logs.Path=Logs/E `
		--DataDir=Data/E
Now go to Manage Server, Cluster, in the Studio and add the new nodes (http://127.0.0.3:8080,
http://127.0.0.4:8080, http://127.0.0.5:8080). The end result is shown in Figure 6.6.
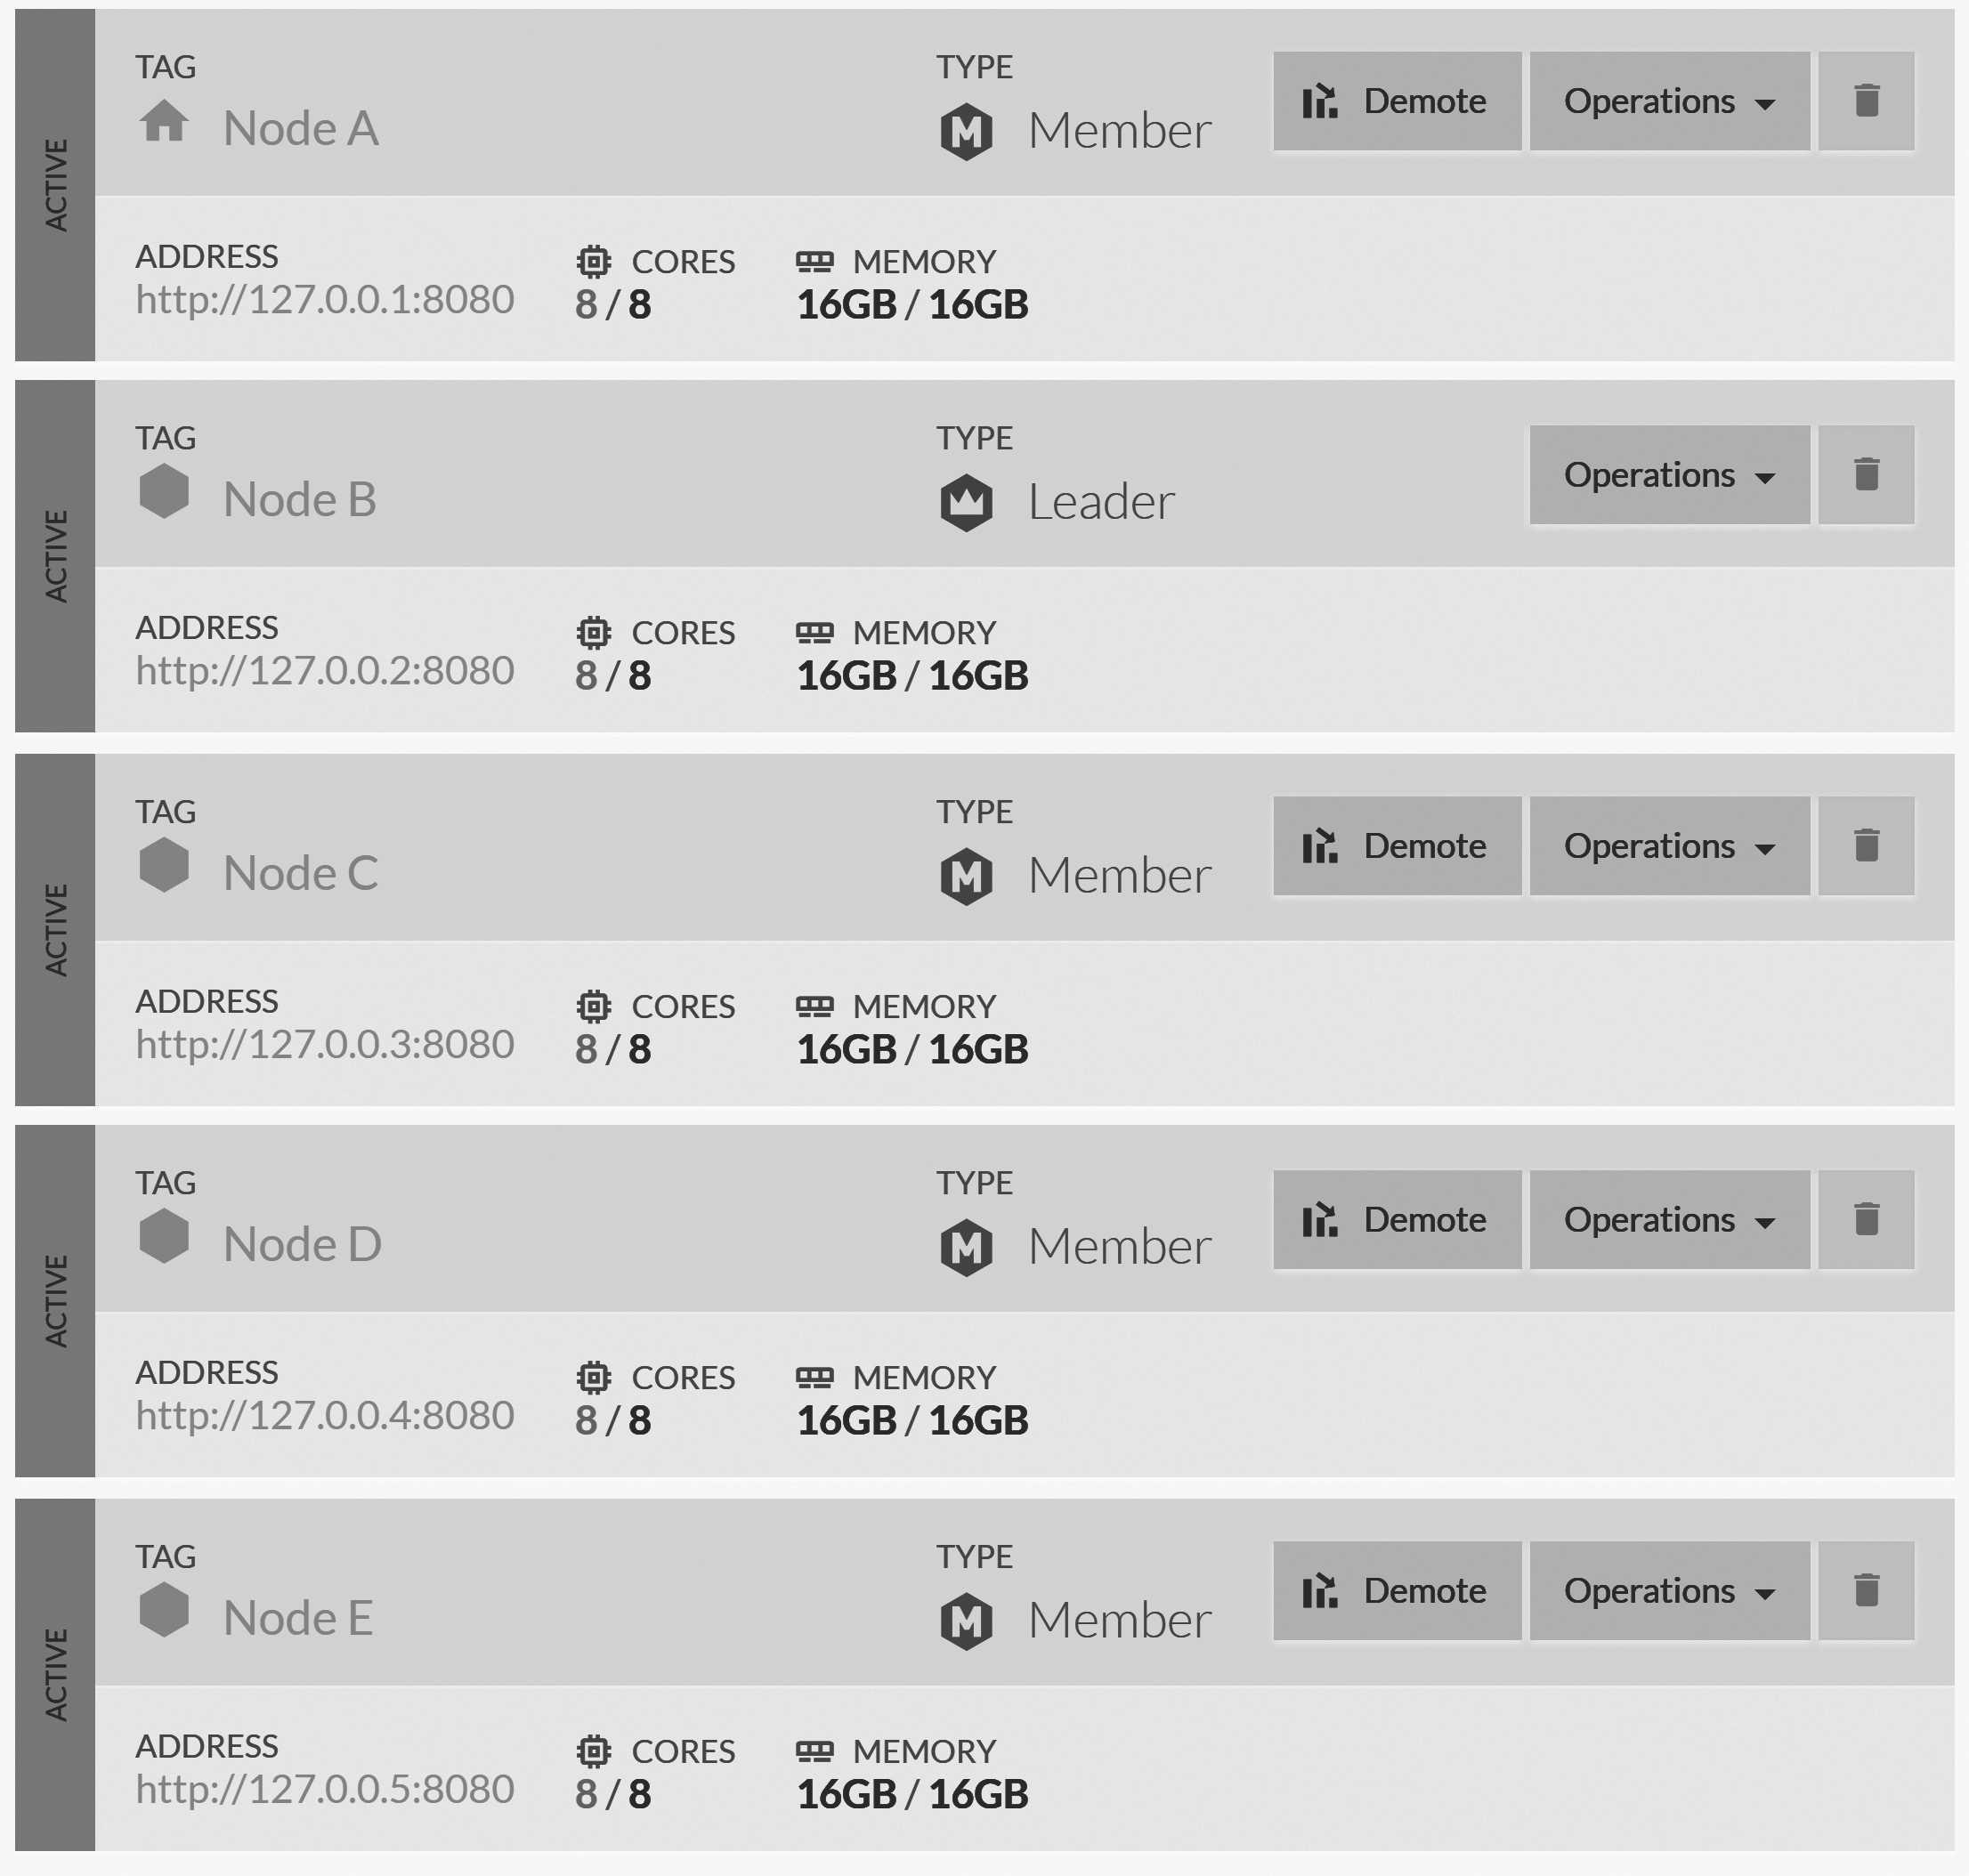
You can click on the nodes in the cluster to open the Studio on each node. When you do so, look at the tab headers. It will tell you which node you're on, as you can see in Figure 6.7.

Now that we have our cluster, we still need to understand the layout of the databases in it. Here's what it looks like when we
open the Studio on node D, as shown in Figure 6.8.
D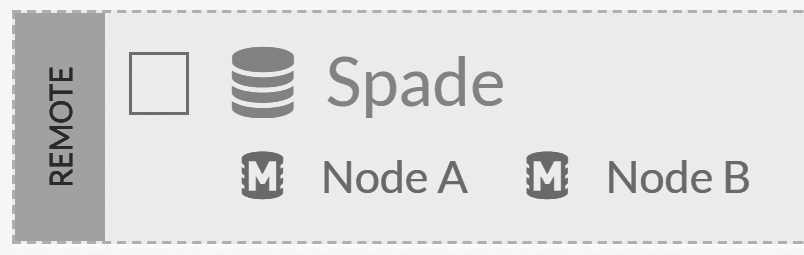
The "Spade" database is marked as remote because it doesn't reside on this node. This leads us to a few important discoveries. For one thing, databases that we manually configured are going to remain on the nodes they've been configured to run on. It also appears that we can see the entire cluster topology from every node.
Now, let's actually use our cluster and create a new database. We'll call it "Pitchfork."5 Everyone knows that a proper pitchfork has three tines; the four-tine pitchfork is used for shoveling, while a novel three-tine pitchfork is the favorite tool of Poseidon. As such, it's only natural that our "Pitchfork" database will have a replication factor of three. Once that's done, we'll just create the database and observe the results.
Since we didn't explicitly specify the nodes on which the new database will reside, the cluster will distribute the database to three nodes of its choice. This means we now have a five-node cluster with two databases, as you can see in Figure 6.9.
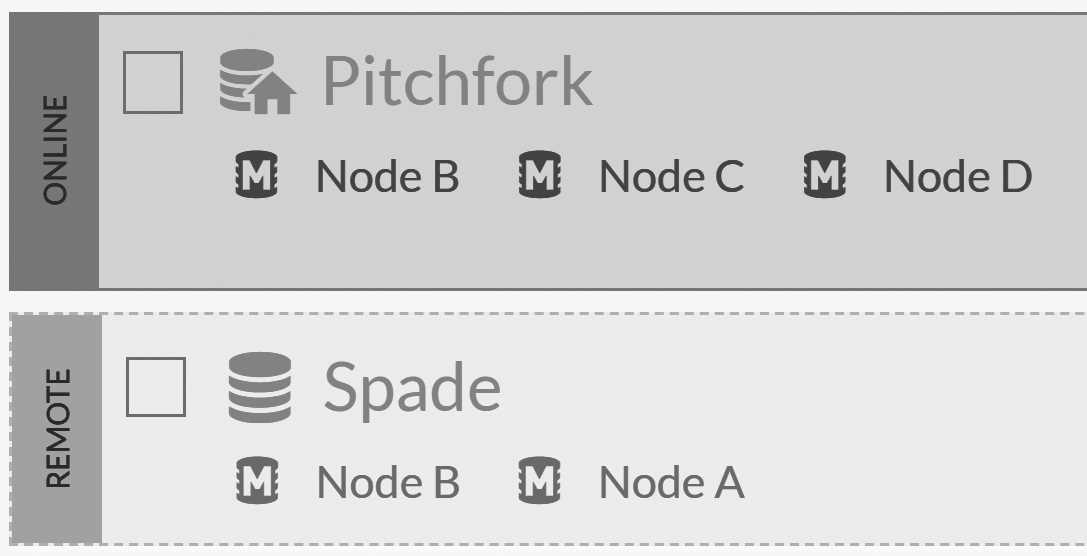
Figure 6.9 shows the databases from the Studio in node D. So we have Pitchfork on three nodes and Spade on two. You can go ahead and
create a few documents on the Pitchfork database and observe how they're spread to the rest of the database instances in the
cluster.
Appropriate utilization of your cluster
Setting up a five-node cluster just to run a couple of databases seems pretty wasteful. node E doesn't even have a
single database to take care of. Why would we do something like this?
Typically, production clusters are set up with either three or five nodes. When a cluster size exceeds five nodes, it'll typically have dozens of databases running in tandem. We'll discuss large clusters later in this chapter. If you have one or two databases, you'll typically deploy a three-node cluster and make sure that the database(s) on it are spread across all the nodes in the cluster.
Sometimes you'll have a five-node cluster with the data replicated five times among the nodes. This is for maximum survivability. But in most cases, when you go to five nodes or higher, you're running a number of databases on the cluster. For instance, consider the situation in Figure 6.10.
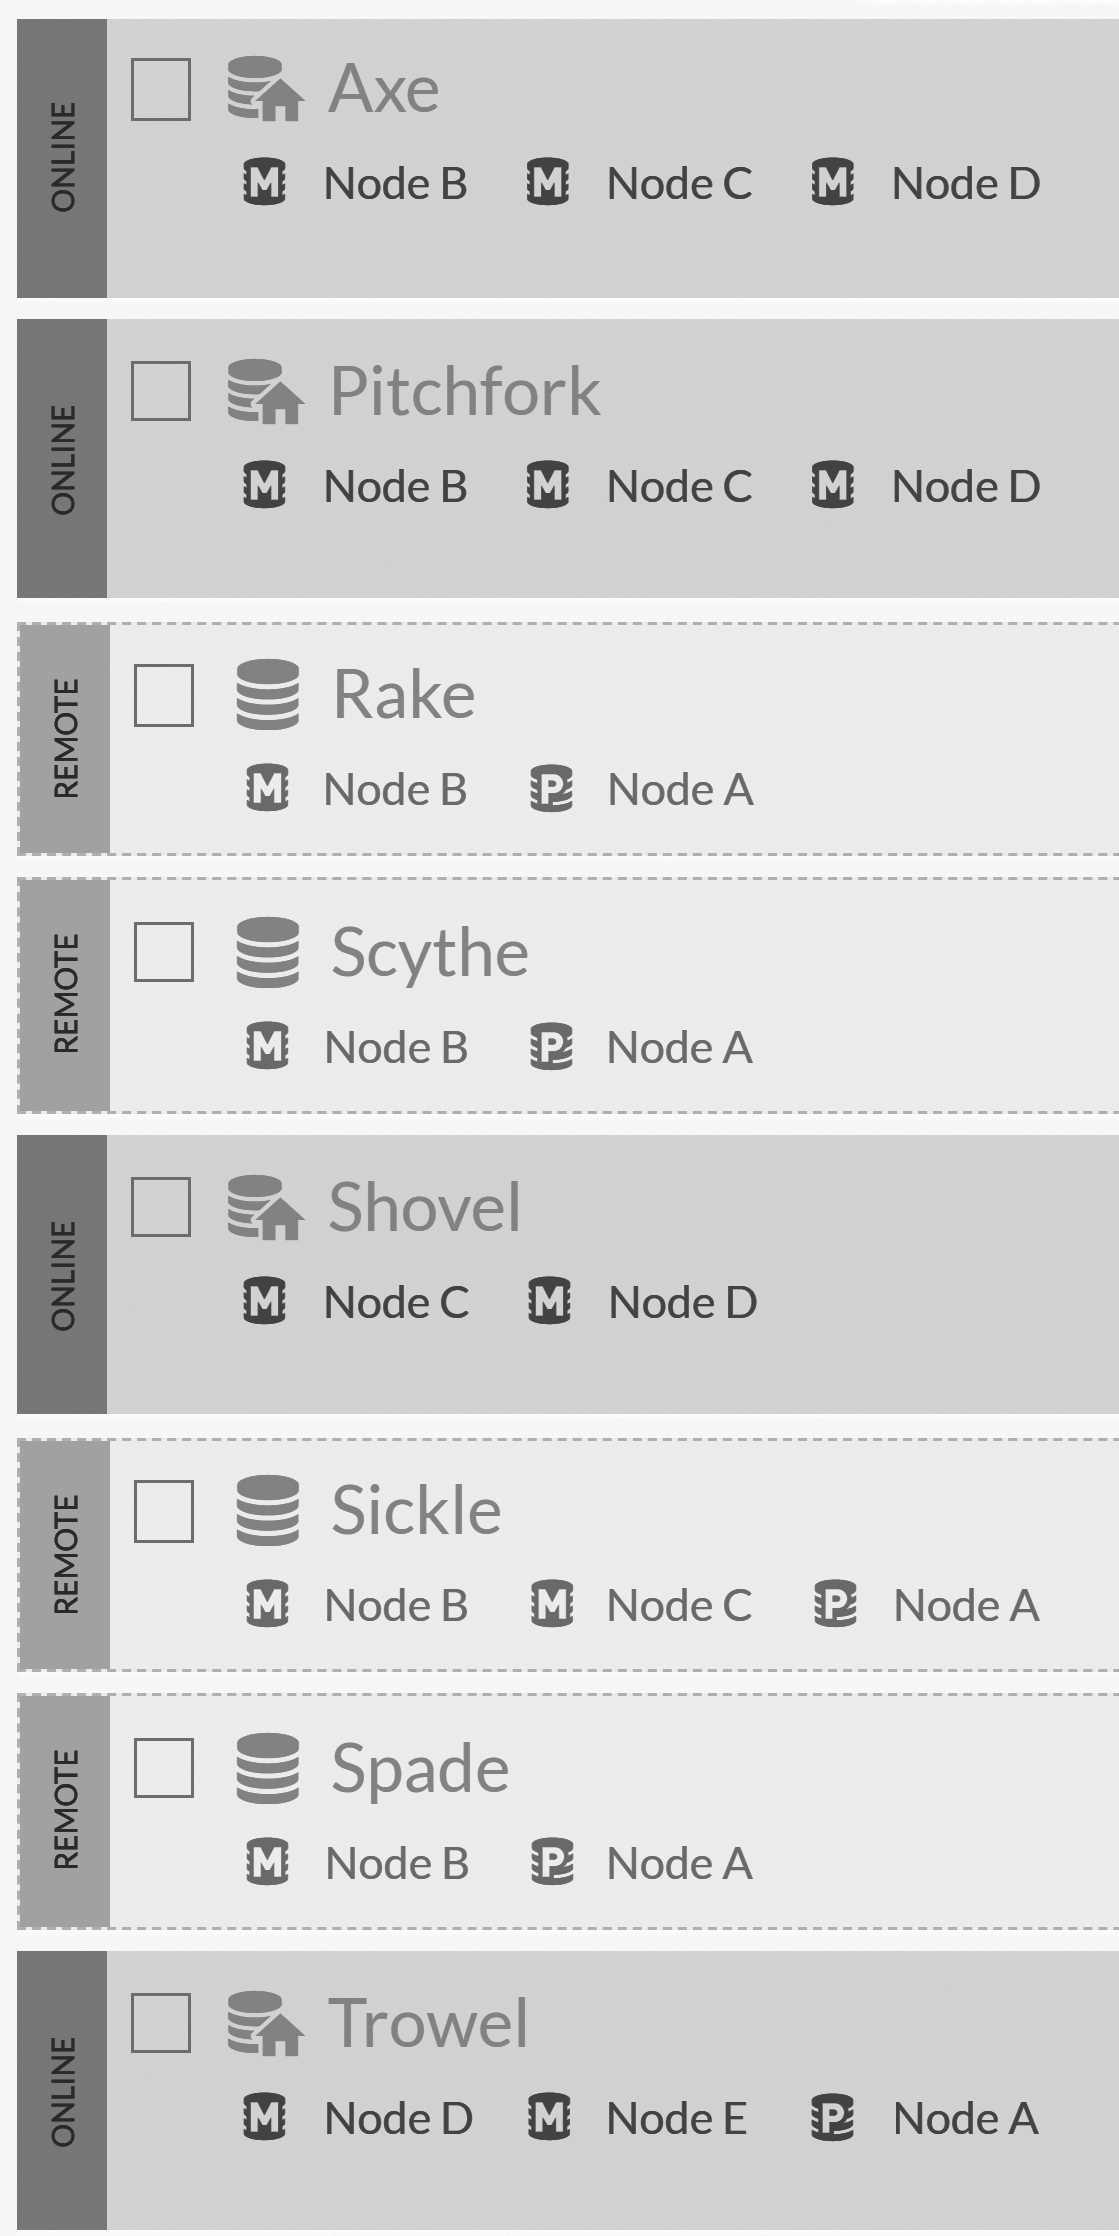
In Figure 6.10, you can see that we created eight databases and that they're all spread out throughout the cluster. This means that there's no single point of failure for the cluster. In fact, we can lose any node in the cluster and still remain in full operation.
I intentionally defined some of the databases so they'll only run on two nodes instead of three. In this configuration, it's
possible to lose access to a few databases if we kill node A and node B. A proper configuration will have each database reside
on three nodes, so you'll have to lose more than half of your servers to lose access to a database.
Typical deployment in a cluster
The normal approach to deployment in a cluster is to decide how important your data is. It's common to require the data to reside on three separate nodes, regardless of the cluster size. In more critical systems, you'll either have this spread out across multiple data centers or have a copy (or copies) of the database being maintained by the cluster in a second data center. We'll discuss this feature in Chapter 7, which covers external replication.
It's important to note that, so far, we're running completely open to the world. This is possible because we're listening on the loopback device, so no external actor can get to those RavenDB servers. This obviously isn't how you'll run in production, and you ought to read about proper deployment and security of your cluster in Chapter 13, before you expose a cluster to the wild wild web.
The role of the database group
We saw what a cluster looks like and how we can distribute databases among the different nodes in the cluster. This is all well and good, but we still need to understand what we're doing with all this data as it's spread out among those nodes. First and foremost, we need to define some shared terminology.
A database can refer to all the individual instances of the database in the cluster, to a specific instance or just to the abstract concept of storing your system data in a database. Because this is confusing, we'll use the following terms to make it clear to what we refer:
- Database instance — exists on a single node, usually part of a larger database group. Typically referred to as "the database instance
on node
A." - Database group — the grouping of all the different instances, typically used to explicitly refer to its distributed nature. For example, "The 'Spade' database group is spread over five servers for maximum availability."
- Database topology — the specific nodes that all the database instances in a database group reside on in a particular point in time. For example, "The 'Spade' topology is [B, A]."
- Database — the named database we're talking about, regardless of whether we're speaking about a specific instance or the whole group. For example, "We use the 'Spade' database to store that information."
Now that we have a shared vocabulary, let's see if I can explain exactly what's going on. A database group is composed of one or more database instances, each of which holds a full copy of the data in the database. The replication factor on the database group will determine how many copies we hold for that database.
The primary reason for this duplication of data is to allow us high availability. If a node goes down, we still have a copy (and usually two) of the data, and the cluster can shuffle things around so clients can talk to another node without really noticing that anything happened.
Client interaction with a database group
We'll spend some time exploring the interaction between clients and the database instances because that's usually what you'd be concerned about. We'll describe the behavior of the nodes a bit later. Many elements connected to this topic are intermingled, with both client and server cooperating to get to the best result. We'll start our exploration with the code in Listing 6.1.
Listing 6.1 Creating a document store to talk to a cluster
var store = new DocumentStore
{
    Urls =
    {
        "http://127.0.01:8080", "http://127.0.02:8080",
        "http://127.0.03:8080", "http://127.0.04:8080",
        "http://127.0.05:8080"
    },
    Database = "Spade"
};

store.Initialize();
The code in Listing 6.1 lists all the nodes in our cluster and will talk with the "Spade" database. This is interesting because the "Spade" database only exists on nodes B and A. (You can see the database topology in Figure 6.10.) Why are we listing all the nodes in this manner?
As it turns out, we don't actually need to do so. Listing any node in the cluster is enough to be able to properly
connect to the "Spade" database. Each node in the cluster contains the full topology of all the databases hosted in the cluster. And the
very first thing that a client will do upon initialization is to query the defined Urls and figure out what are the actual nodes
that it needs to get for the "Spade" database.
Why list all the nodes in the cluster, if any will do?
By listing all the nodes in the cluster, we can ensure that if a single node is down and we bring a new client up, we'll still be able to get the initial topology. If the cluster size is small (three to five nodes), you'll typically list all the nodes in the cluster. But for larger clusters, you'll usually just list enough nodes that having them all go down at once will mean that you have more pressing concerns than a new client coming up.
For extra reliability, the client will also cache the topology on disk, so even if the document store was initialized with a single node that was down at the time the client was restarted, the client will still remember where to look for our database. It's only a completely new client that needs to have the full listing. But it's good practice to list at least a few nodes, just in case.
Once the client gets the database topology, it will use that to talk to the actual database instances themselves. We talked about the different layers of the RavenDB distributed machinery earlier in this chapter. We're now moving from the cluster layer to the database layer, where each database instance works on its own, without relying on its siblings in the group.
That has a lot of implications on how RavenDB works. On the client side, if the client is unable to talk to a node (TCP error, HTTP 503, timeouts, etc.), it will assume that this particular node is down and will switch to the next node in the list. All the clients get their topology from the cluster, and the cluster ensures that we'll always report the same topology to the clients.6
By default, all the clients will talk to the first node in the database group topology. We usually call this the preferred node, and any of the other nodes in the topology are called the alternates. A failure of any of the alternates wouldn't even register for the typical client configuration since the client will only talk directly with the preferred node.
A failure of the preferred node will mean that all clients will failover to the same alternate. The cluster will also notice that the node is down and update the topology accordingly. The clients will get the updated topology, which will now have the first alternate as the preferred node in the topology. The failed node would be demoted to a standby mode since the cluster doesn't know what state it's in.
Once the failed node comes back up, the cluster will wait for it to catch up and then add it back to the bottom pool of active nodes for this database. Because the failed node is added as the last option in the pool, it won't be usurping the role of the preferred node. This ensures that if the failed node experiences further failures, the cluster won't have to cycle the preferred node each and every time.
The simplest failure mode
While it may seem that an alternate failing (the client isn't even going to notice) or the preferred node failing (cluster will demote, clients will automatically switch to the first alternate) is all that we need to worry about, those are just the simplest and most obvious failure modes that you need to handle in a distributed environment.
More interesting cases include a node that was split off from the rest of the cluster, along with some (but not all) of the clients. In that case, different clients have very different views about who they can talk to. That's why each client is able to failover independently of the cluster. By having the database topology, they know about all the database instances and will try each in turn until they're able to find an available server that can respond to them.
This is completely transparent to your code, and an error will be raised only if we can't reach any of the database instances. While this ensures that we'll always have someone to talk to, it can cause some interesting behavior for our system. We'll discuss this later in this chapter, in the section about conflicts.
From the client's point of view, there isn't really much to be said about the cluster. As far as your code is concerned, you operate normally, and RavenDB will take care of everything behind the scenes. However, there are still a few things you need to concern yourself with.
Write assurances for high value data
Here's how a database group works. Whenever a write is made to any of the database instances, it will disseminate that write to all the other instances in the group. This happens in the background and is continuously running. Most of the time, you don't need to think about it. You write the data to RavenDB, and it shows up in all the nodes on its own.
You do need to think about it, however, if you have some writes that are important. It isn't enough to ensure that you wrote that value
to a single node (and made sure it hit the disk). You need to be sure that this value resides in more than one machine. You can
do that using write assurance, which is available using the WaitForReplicationAfterSaveChanges method. An example of that is shown in Listing 6.2.
Listing 6.2 Saving a very important task to RavenDB, ensuring it resides in multiple nodes
using (var session = store.OpenSession())
{
    var task = new ToDoTask
    {
        DueDate = DateTime.Today.AddDays(1),
        Task = "Buy milk"
    };
    session.Store(task);
    session.Advanced
        .WaitForReplicationAfterSaveChanges(replicas: 1);
    session.SaveChanges();
}
The code in Listing 6.2 should look familiar. There isn't much to change when you move from a single node to a cluster. But here we are asking the database instance we wrote to not to confirm that write until it has been replicated at least once.
This increases the time it takes to get a reply from RavenDB, sometimes significantly so. You're now not only paying for the network round trip
to the server and then the writing of the data to disk. You're also paying for another network round trip and the disk write cost per each additional replica.
Using this frivolously will likely slow your application and introduce problems when you don't have enough replicas.
While RavenDB will happily deal with going down to a single node and your application can use that, if you use
WaitForReplicationAfterSaveChanges, an error will be raised.
An important aspect of this feature to remember is that when WaitForReplicationAfterSaveChanges is used, it doesn't involve a distributed
transaction. In other words, even if we haven't been able to write your value to the number of replicas you wanted, we still
wrote it to some of them. In the case of Listing 6.2 and the "Spade" database, if node A is down, we'll be able to write to node B. But
we'll later fail because we can't replicate the write to node A. The client is going to get an error, but the data was written to
node B. This is a powerful feature, but you need to be aware of the possible pitfalls of using it.
Load balancing and service level agreements
Earlier in this chapter, I said that by default we have a single preferred node and a few alternates just standing by. This can be a big waste. Our nodes are typically quite similar, and doubling or tripling our processing power just to let most of it go idle is not a good use of resources.
RavenDB allows you to change that behavior as well. Instead of all the clients talking to only the preferred node, you can ask them to load balance all the reads between every node in the group. It's even possible to take timing into account and have each node prefer to read from the fastest node it observed.
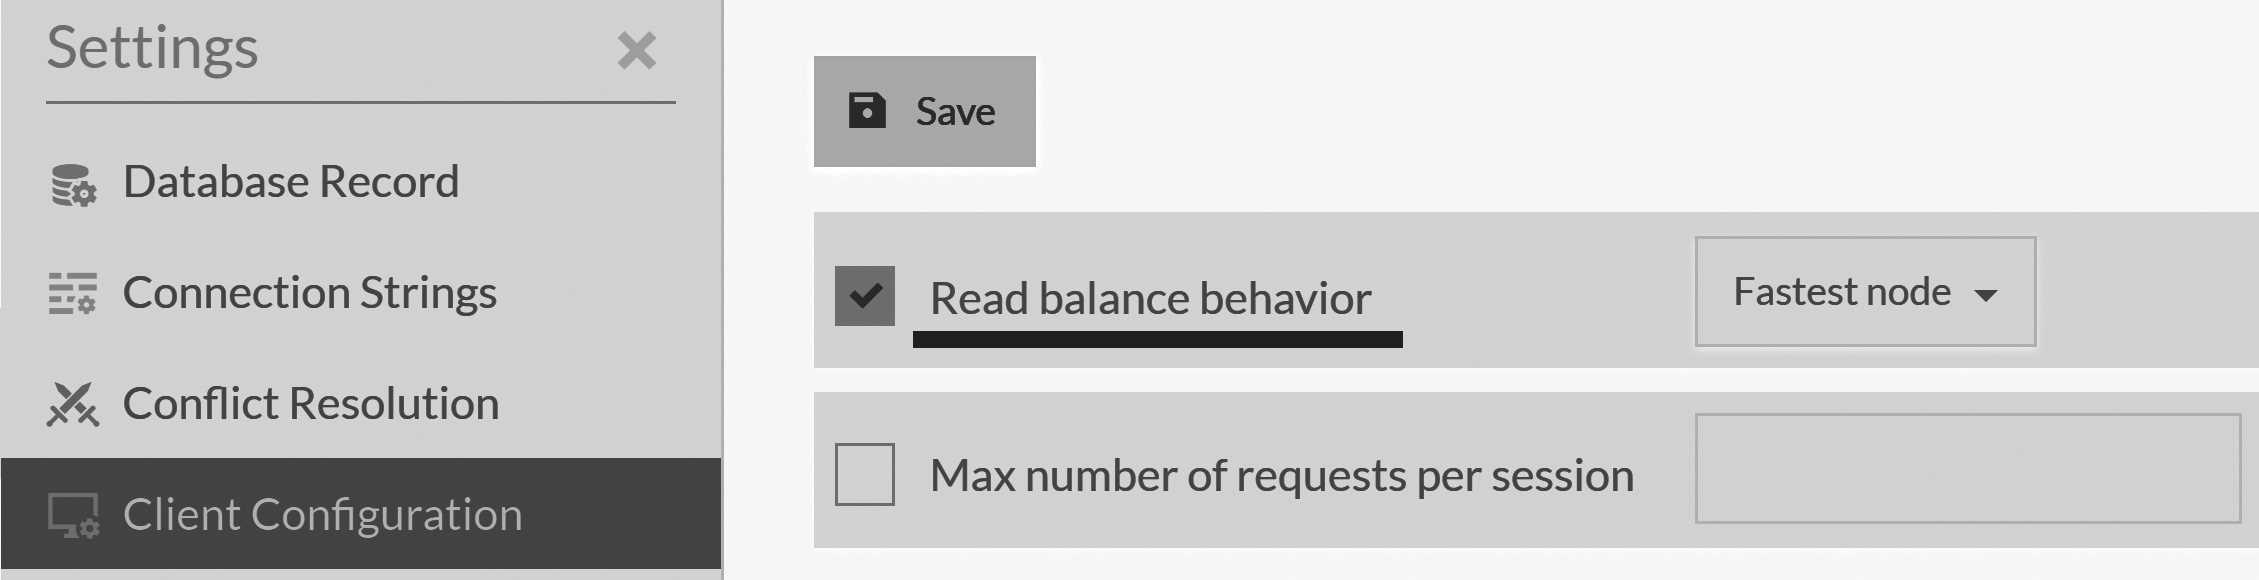
The system administrator can configure such behavior globally, as shown in Figure 6.11, or the client can specify that using the conventions. Updates to the server side configuration will typically be reflected with clients on the next request the client will make (at which point it will learn that it needs to update its configuration). The server side configuration will override any client side setting.
Replication of data in a database group
We've seen that every node in a database group will have a copy of all the data. This is easiest to reason about when you have a single writer node. However, RavenDB doesn't work in this manner. You can make writes to any node in the database group, and that write will be recorded and replicated to all the other nodes in the database group.
How is this done? Each database instance holds a TCP connection to each of the other database instances in the group. Whenever there's a write on that instance, it will be sent to all the other instances immediately. Note that's not done as part of the write operation but in an async manner. If the database instance is unable to replicate the data, it will still accept that data and send it later.
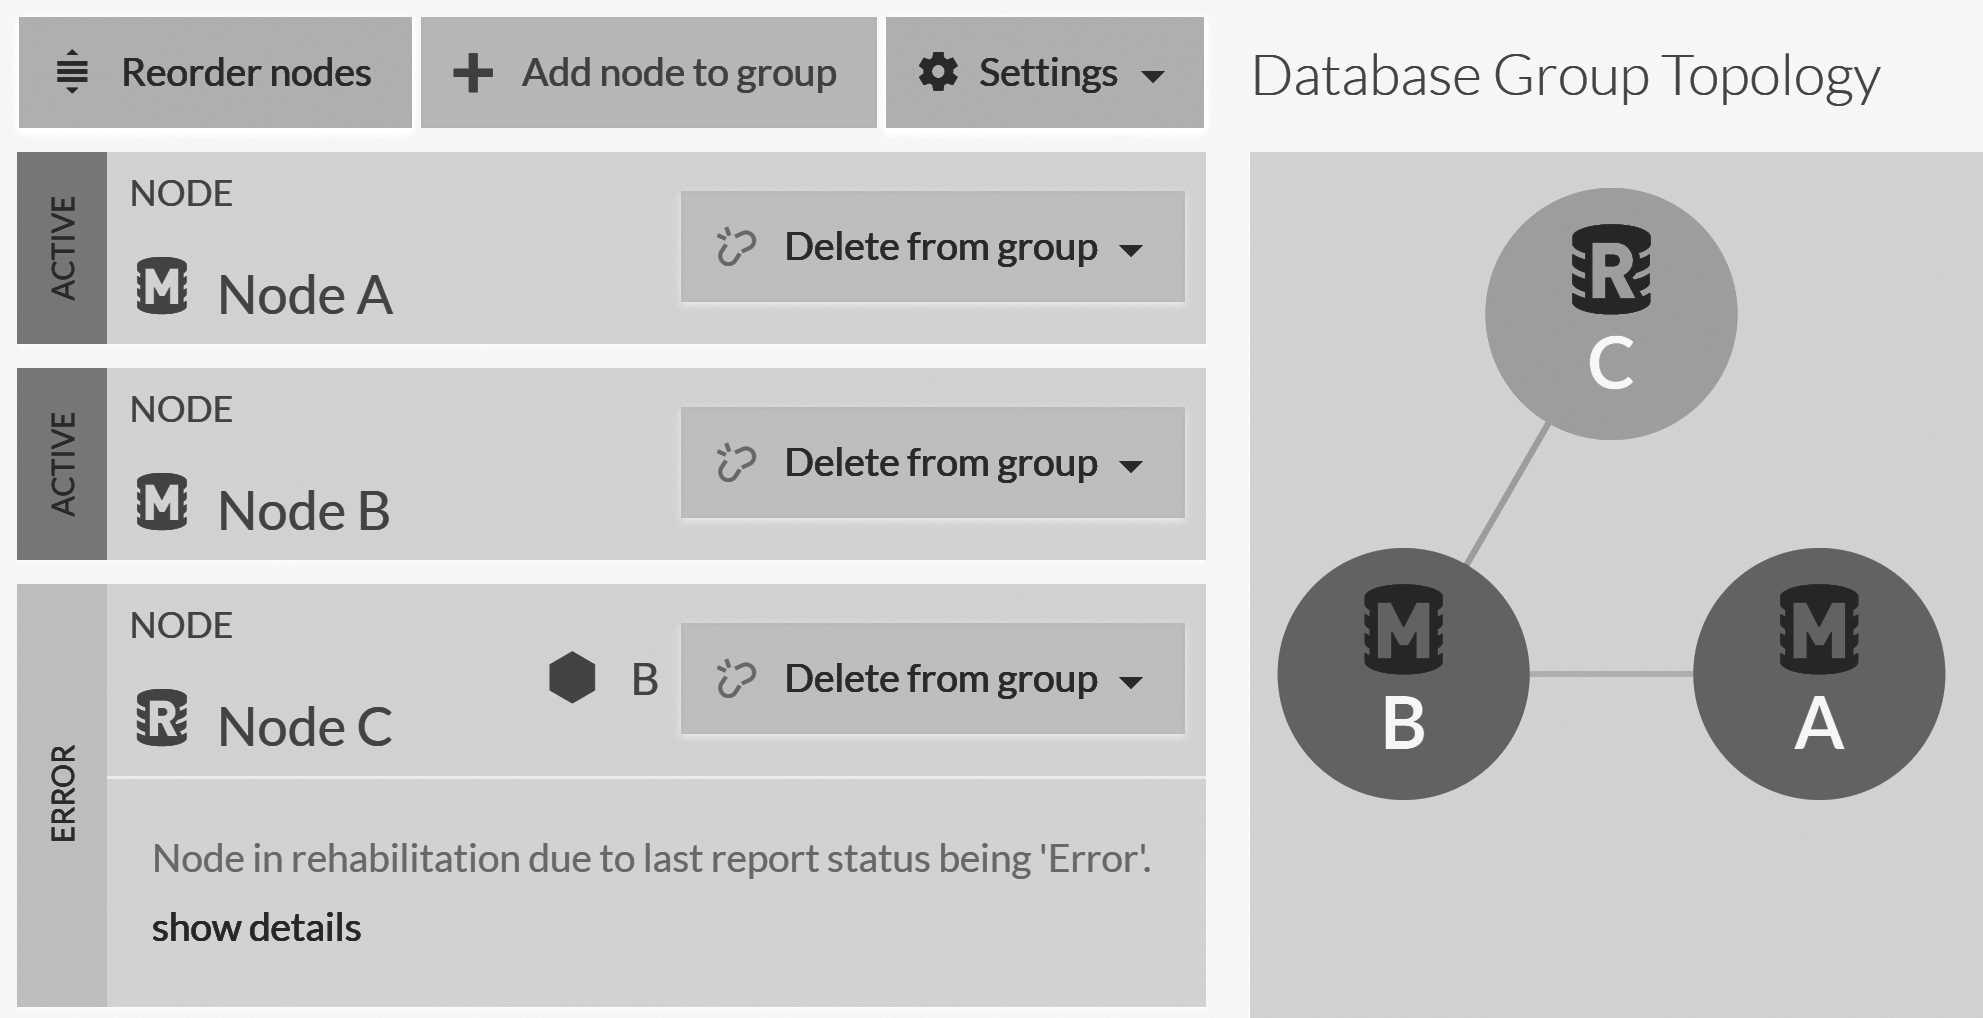
During normal operations, the lag time between a write on a database instance and it being replicated to all the other nodes is usually around twice the ping time between the machines. Since we don't need to set up a connection just for that write, it's already ready and waiting. This also means you can see at any point the connections that a database instance has opened, which is useful when diagnosing issues. You can see an example of that in Figure 6.12.
What about when there are failures? Well, when a node fails for any reason, the cluster will detect that and demote it. When the node comes back up, its database instance will have to wait until it's as up to date as the other database instances in the group. Only then will the cluster let it fully join the group.
In Figure 6.12, you can see that node C is down. The cluster has detected it and designated node B as the mentor node
for node C. When node C comes back again, it is node B that will send it all the changes that it missed, and it will only graduate
to be a full member in the database group when node B deems it ready.
We commonly talk about document replication, but we're actually replicating more than just documents. All the data inside a database is replicated to every database instance. That obviously includes documents, but it also includes tombstones (which is how we replicate deletes), attachments and revisions. The last inclusion deserves a bit of explanation.
The async nature of replication in RavenDB leads to some interesting questions. For example, what happens if you modify a document several times in short order — fast enough that it was modified several times before the document could be sent to the other database instances? In this case, when we replicate the document to the other siblings, we replicate the latest version that we have and skip replicating all the intermediate revisions.
Sometimes, however, you care about each individual change. For that reason, when you enable revisions on your database, we'll also send them to the other database instances. In this way, you can see the full modification history of your documents, regardless of which server was used to write them and of the speed of replication.
Undefined order in a distributed environment
All the database instances are going to end up with the same revisions for the document, but it's not certain that they'll end up in the same order. It's possible that revisions created on different servers will show up in a different order because there's no way for us to determine which came first. Consider it a scaled up version of a race condition. You'll learn more about how RavenDB handles such things in the section about conflicts and change vectors.
Another question that's typically raised with regards to the async nature of replication is how transactions are handled across replication boundaries. This is the topic of our next section.
Transaction atomicity and replication
Transactions in RavenDB are important. Relying on ACID transactions reduces a lot of the complexity that one has to deal with. However, given that RavenDB transactions are not distributed, it's interesting to consider how the transactional guarantees are preserved in a distributed cluster.
Consider for a moment the code in Listing 6.3. It's a simple bank transaction that moves $10 from my account to yours7, which I'm sure will be a delightful surprise.
Listing 6.3 The classic bank transaction example
using (var session = store.OpenSession())
{
    var you = session.Load<Account>("accounts/1234-A");
    var me = session.Load<Account>("accounts/4321-C");

    you.Amount += 10;
    me.Amount -= 10;

    session.SaveChanges();
}
There's nothing very interesting about Listing 6.3 in itself. The interesting bit is what will happen over the network, in this case. This is sent to RavenDB as a transaction and persisted as such, but you already knew that. The key here is that it's also replicated as a single transaction. In other words, all the other database instances will always have both of those changes replicated to them as a single batch, indivisible.
Replication batches
RavenDB isn't actually replicating a single document at a time. When we need to replicate data between nodes, we send a large amount of data at once. The size of the batch and what it includes is decided by RavenDB based on things like the amount of the data that needs to be sent, the number of documents and a few other factors that are implementation dependent (such as the speed of replication).
In most cases, we send everything that's changed since the last successful replication. And during normal operation, we effectively send a replication batch for each transaction. If there are a lot of writes, each batch will likely include data from multiple transactions.
What RavenDB guarantees is that writes made in the same transactions will always be sent to the other database instances in a single batch and won't be broken into separate batches. In other words, we maintain the atomicity property across replication.
This applies to all the changes that you make in a transaction, modifying documents, attachments, etc. They're all going to be sent to the other database instances as a single transaction. There's one caveat, however. Consider the code in Listing 6.4, which transfers money from your account to the tax authority.
Listing 6.4 The classic bank transaction example
using (var session = store.OpenSession())
{
    var you = session.Load<Account>("accounts/1234-A");
    var tax = session.Load<Account>("accounts/48879-B");

    you.Amount -= 3;
    tax.Amount += 3;

    session.SaveChanges();
}
The code in Listing 6.4 will probably sadden you a bit since no one usually likes to pay the taxman. However, it also exposes an issue with
how RavenDB is replicating transactions. In this case, document accounts/1234-A is now involved in two separate transactions.
Let's assume that we now need to replicate everything from Listing 6.3 onward (meaning my transfer of money to you and your payment of
taxes).
We'll further assume that we instructed RavenDB to send the data in as small a unit as possible. When the database instance needs to
replicate the documents to another instance, it will replicate them on a per transaction basis. Starting from the transaction that was
generated for Listing 6.3, we'll replicate accounts/4321-C but not accounts/1234-A. Why is that?
The accounts/1234-A document will not be replicated because, though it was changed in the transaction for Listing 6.3, it
was also changed by a later transaction (the one from Listing 6.4). Since we replicate only the current state of the documents
and, in this case, we configured RavenDB to send the smallest possible batch size, we'll replicate only the documents that were
modified in Listing 6.3 — not documents that were modified in the transaction for Listing 6.3 and then later modified by
another transaction.
This means we'll first have a batch-replicated accounts/4321-C document (my transfer of the money) and then another batch with the
accounts/1234-A and accounts/48879-B documents (your payment to the taxman). A client reading from another instance may then
get an invalid state.
Luckily, everything is not lost. If you need transaction atomicity in a distributed fashion, you have a few options. You can make sure that the documents you care about are always updated together. This will ensure that these documents are always part of the same transaction and sent in the same batch. But this is often awkward to do.
Another option is to use revisions. When you enable revisions on a collection, a revision is written whenever a document is modified. It's written as part of the same transaction, and it flows across replication in the same indivisible batch as any other operation. When RavenDB gets a revision of a document that's newer than the one it has, it will update the document to match the revision. In effect, we'll send the entire transaction in Listing 6.3 as it was so that a client observing a second node can never see a partial transaction.
As you can see, revisions are a very powerful feature, and they're used in more scenarios than might initially be expected. The idea behind relying on revisions to handle transaction consistency is that, in many cases, it doesn't matter. A proper document model follows the isolated, independent and coherent tenets, which usually means you don't need this feature. But when you do, and most certainly it will come up,8 the key here is that you aren't paying for tracking all the intermediate values unless you actually need this.
A lot of RavenDB features use the "pay to play" model, meaning if you aren't using a specific feature, you don't need to pay the performance cost of supporting it.
Change vectors
In the previous section, I mentioned that when a database instance gets a document revision that's newer than its copy of the document, it will update the document to match the revision. This lays the foundation for ensuring transaction boundary consistency across servers. But this doesn't answer an important question: what does "newer" even mean?
The easiest way to answer that question is to take a look at the clock. After all, "newer" is a function of time, and we can just check what time the document and revision were modified. But that doesn't actually work when running in a distributed system. Each machine in the cluster may have a slightly different idea about the time, and clock drift is a serious problem. Beyond that, concurrency in the cluster may mean that operations have happened at the exact same time or close enough that we can't tell otherwise.
This is confusing and can cause quite a headache in a distributed system. In order to deal with this, RavenDB uses change vectors (they are sometimes also called vector clocks) to tell when things happened. A change vector is comprised of the node ID and a sequence number (the etag). Whenever a modification happens on a database, a change vector will be generated. Here are a few examples of change vectors:
- A:1
- B:2
- A:3, B:1
- A:3, B:3, C:5
For the purpose of discussion, A/B/C are the node IDs and the numbers are the per-node sequence number. You can see that, with A:1
and B:2, there's no way for us to provide any order. This is because they're local to each node and there's no dependency between
them.
On the other hand, the A:3, B:1 change vector provides us with more information. We know that it came after A:3 and after B:1. Because
of this, we can tell that it's after A:1, but we can't tell whether it happened before or after B:2. On the other hand, it's clear
that A:3, B:3, C:5 happened after everything else.
In other words, we use change vectors to record the observed state in each node, and we can piece out the timeline from that point onward.
The different nodes in a database group will try to ensure that each database instance is aware of the last etag on each node so they can create a coherent timeline across the cluster. This isn't meant to be a 100 percent foolproof solution, but it's a useful optimization for certain operations. Always having the last etag from the nodes also makes it easier to reason about concurrency in the cluster. You can see for yourself that when you save a document, it will have a change vector entry for the node you saved it on, as well as for all the other nodes in the cluster.
Change vectors and how they come into play are pretty hard concepts to grasp just by talking about them, so let's do some practice. We'll create a
new database called "ChangeVectorTrialRun" on two of the nodes in the cluster. Then we'll go into the database and create a document called users/1.
Change this a few times, and we can observe the @change-vector property in the @metadata. Even though we've only modified this document on a single
node, you can see that the database instance also includes the change vector from the other instance as well. Take a look at this example in Figure
6.13.
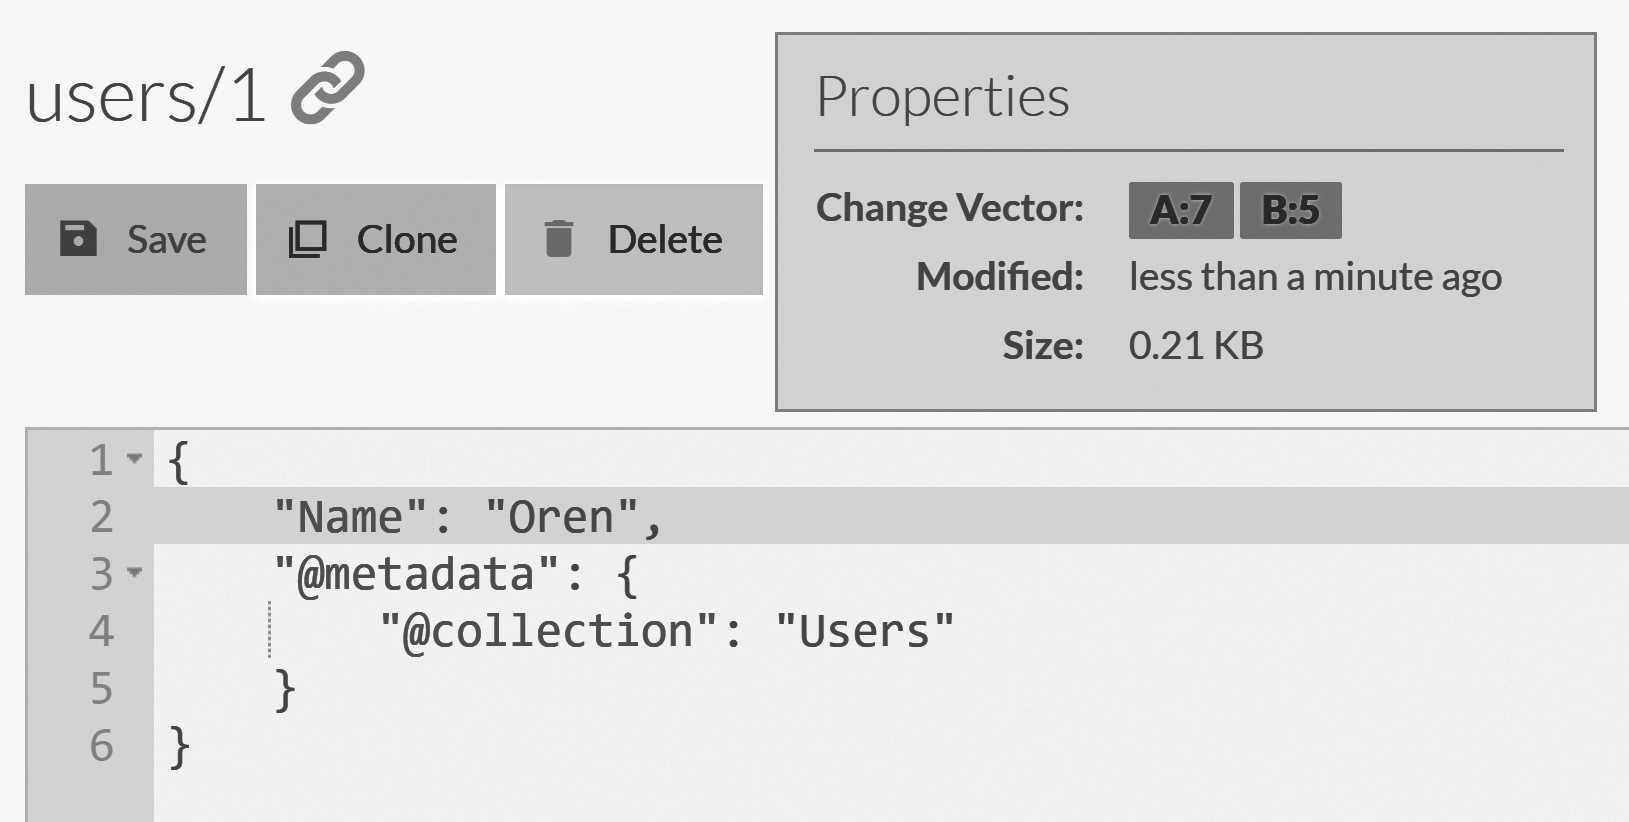
Using this change vector, this document was written at or after etag 7 on node A and at or after etag 5 on node B. We created this document
on node A, so how can we have a change vector entry for node B here? The answer is simple: we know
what the etag of node B was because it told us on our last replication batch. We'll incorporate this information in future change vectors.
Change vectors are incredibly important inside RavenDB (and in many other distributed systems) because they allow us to know, without relying on a shared clock, when things have happened. This turns out to be quite useful in many cases. For example, let's assume that a database instance received a document via replication but already has this document stored.
How would the database instance know if the document that arrived via replication is an old version of the document that we should ignore or if it's a new version that needs to overwrite the existing document? The answer is that it uses the change vector to tell. In this way, even if a document is modified on a different server each time, we can still know whether our version is newer or older than the version we just received via replication.
However, "newer" or "older" aren't the only options that we have. There is also the option of a conflict update.
Conflicts
A conflict occurs when the same document is updated on two nodes independently of one another. This can happen because of a network split or because of several client updates that each talked to different nodes faster than we could replicate the information between the nodes.
Let's consider the simplest case. Say we
have the document users/1 whose current change vector is A:7, B:5, and we modify it on nodes A and B concurrently. On the database instance on node A,
we'll have the change vector A:8, B:5, and on node B we'll have A:7, B:6. In this case, there's no way
for us to tell which version of the document is newer than the other. This is a conflict. In a distributed system, you can either choose to run a
consensus (which requires consulting a majority on every decision) or accept the potential for conflicts. For document writes, RavenDB chooses to
accept conflicts as a tradeoff of always being able to accept writes.
The question is this — how are we going to handle such a case? Let's generate a conflict manually and see how this is handled.
But first, we need to disable automatic conflict resolution so we can observe what is going on behind
the scenes. In the Studio, go to Settings, Conflict Resolution. This is where you let RavenDB know how
you want it to resolve conflicts when they happen. By default, we resolve conflicts in favor of the most
recent version9. You can see
what this look like in Figure 6.14.

Uncheck the option to automatically resolve to the latest version and click on Save. Now we are ready
to create some conflicts. As you'll see shortly, conflicts occur when there is effectively a race in the
cluster between modifications to the same document on different nodes. This is a bit hard to reproduce,
so we'll take the heavy-handed approach and reproduce a conflicts by shutting down nodes and modifying
documents independently on each node. Here's how we'll do it:
- Kill node
B. (It's running on127.0.0.2) You can do that by simply closing the console window that's running it. - Modify the
users/1document on nodeAso its name property will be "John," and save the document. You can see how this will look in Figure 6.15. - Kill node
A. (It's running on127.0.0.1) - Bring up node
Bby executing:
./Server/Raven.Server.exe--ServerUrl=http://127.0.0.2:8080
--Logs.Path=Logs/B `
--DataDir=Data/B - Modify the
users/1document on nodeBso its name property will be "Doe", and save the document. You can see how this will look in Figure 6.16. - Bring up node
Aby executing:
./Server/Raven.Server.exe--ServerUrl=http://127.0.0.1:8080
--Logs.Path=Logs/A `
--DataDir=Data/A
users/1 document after modifications on node B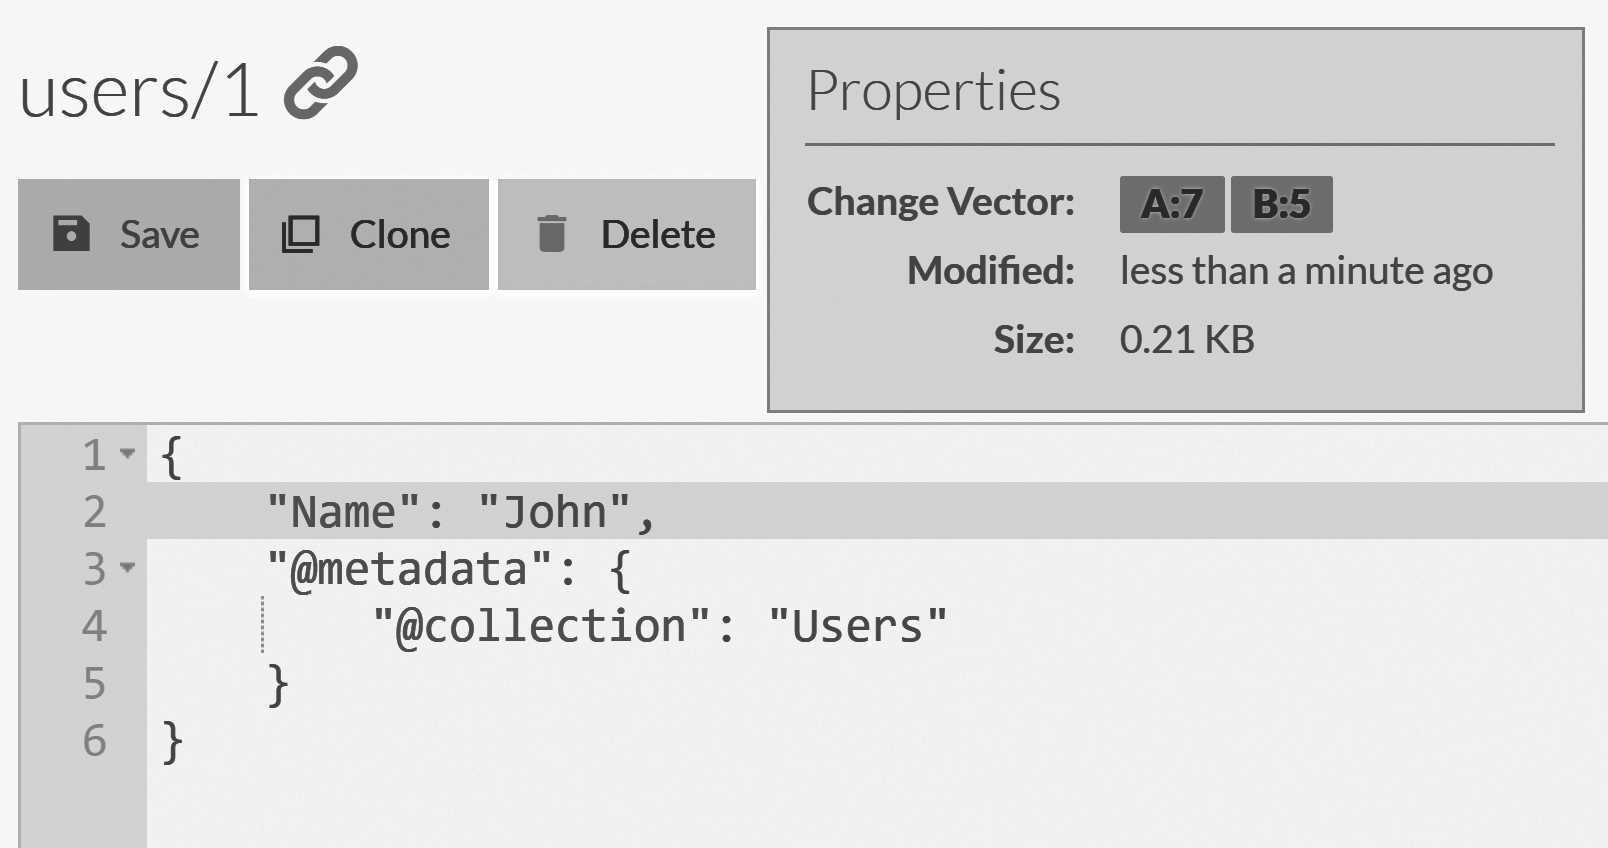
users/1 document after modifications on node A
At this point, an interesting thing will take place. If you watch the Users collection, you'll notice that it's empty and that the
Conflicts entry in the Studio is showing there's a conflict. Go to Documents in the Studio and then to Conflicts, and you'll see the
missing document.
In fact, you'll see two versions of this document, as displayed in Figure 6.17. For developers, the screen shown may look very familiar. It's
showing a conflict just as you would get in any source control system. You can also resolve it in the same manner: by deciding what changes
to accept and saving. Change the Name property to be "John Doe" and click Save.
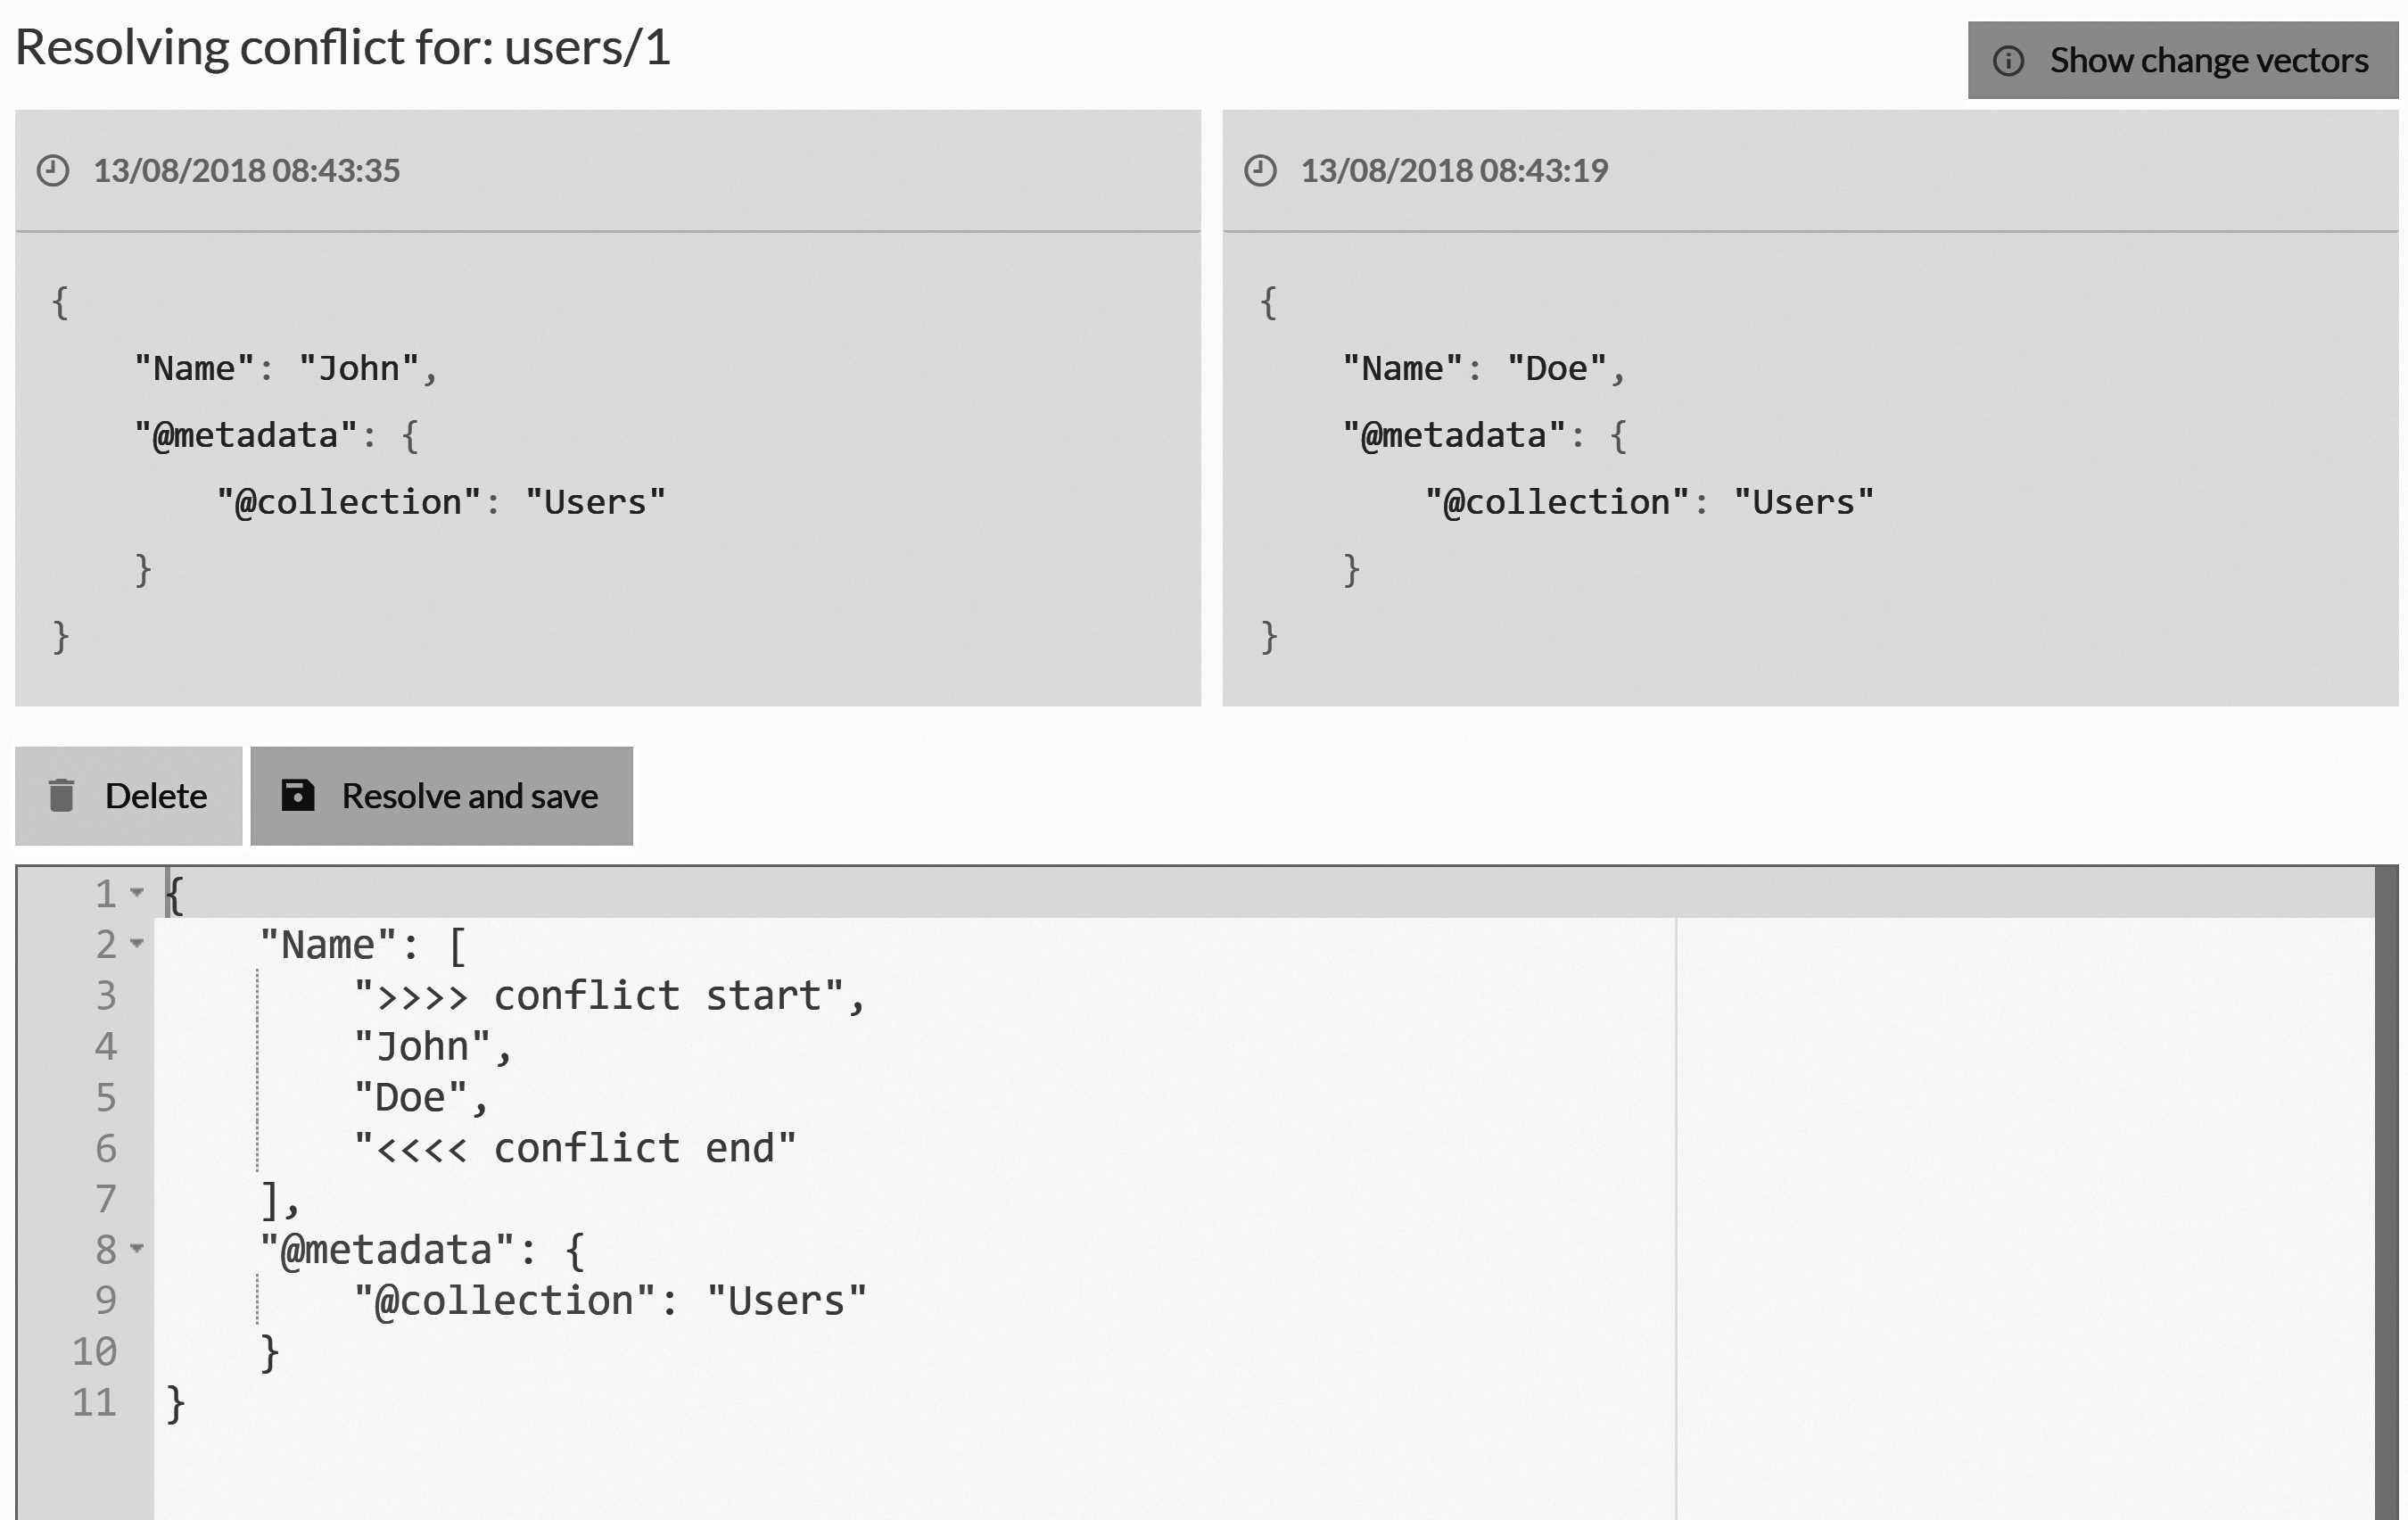
The conflict is now resolved, and you can see the document is back in its proper place — the Users collection.
As you could see, getting to the point where we could reliably generate a conflict was a rather involved process. Conflicts aren't expected to happen frequently. At the same time, production systems have a nasty habit of throwing up a lot of hurdles, even during normal
operations. Conflicts can and do occur in production systems, especially busy ones.
It wouldn't be reasonable to expect a manual intervention each and every time you need to resolve a conflict. Instead, RavenDB has several conflict resolution strategies that you can use:
- If the documents are identical (same change applied on multiple nodes), they can automatically be merged. This also applies if the document was deleted in multiple nodes and we detected a conflict.
- You can specify your own conflict resolution behavior by writing a JavaScript function that applies to all conflicts and produces a merged output. We'll see an example of that shortly.
- You can designate a node whose changes will be considered authoritative, and all conflicts will be resolved in its favor.
- Finally, you can choose to resolve to the latest version based on wall clock time.
The appropriate strategy to use heavily depends on your actual use case. In some cases, just accepting the latest version is perfectly fine. In others, you don't want to lose writes just because they conflicted. Probably the most well known scenario for such a requirement is the notion of the shopping cart.
A user's shopping cart document may have gotten into a conflict, but we absolutely don't want the users to have stuff fall out of their cart just because we had a network hiccup. Consider the documents shown in Listing 6.5.
Listing 6.5 Two conflicting versions of a shopping cart
// on node A
{
    "Name": "Oren Eini",
    "Items": [
        {
            "ProductId": "products/2134-B",
            "Quantity": 2,
            "Name": "Milk"
        },
        {
            "ProductId": "products/9231-C",
            "Quantity": 1,
            "Name": "Bread"
        }
    ]
}
// on node B
{
    "Name": "Oren Eini",
    "Items": [
        {
            "ProductId": "products/2134-B",
            "Quantity": 1,
            "Name": "Milk"
        },
        {
            "ProductId": "products/8412-B",
            "Quantity": 2,
            "Name": "Eggs"
        }
    ]
}
RavenDB, of course, has no idea how to merge such a conflict. But we can teach it. Go back to the Conflict Resolution
view that we looked at in Figure 6.14. Click on the Add button to add a conflict resolution script for a particular
collection. Listing 6.6 has the code to properly resolve such a conflict on the ShoppingCart collection.
Listing 6.6 Script to merge conflicting shopping carts
var final = docs[0];

for (var i = 1; i < docs.length; i++)
{
    var currentCart = docs[i];
    for (var j = 0; j < currentCart.Items.length; j++)
    {
        var item = currentCart.Items[j];
        var match = final.Items
            .find(i => i.ProductId == item.ProductId);
        if (!match)
        {
            // not in cart, add
            final.Items.push(item);
        }
        else
        {
            match.Quantity = Math.max(
                item.Quantity,
                match.Quantity);
        }
    }
}

return final;
The code in Listing 6.6 will merge the two different versions of the shopping cart, resulting in the document shown in Listing 6.7. With a merge script such as the one in Listing 6.6, RavenDB can automatically resolve conflicts as they happen, with no service interruption. The cart in Listing 6.7 has been intelligently merged, so we don't have any duplicate products and we kept the higher number of milk bottles between the versions of the cart that we merged.
Listing 6.7 The merged shopping cart
{
    "Name": "Oren Eini",
    "Items": [
        {
            "ProductId": "products/2134-B",
            "Quantity": 2,
            "Name": "Milk"
        },
        {
            "ProductId": "products/9231-C",
            "Quantity": 1,
            "Name": "Bread"
        },
        {
            "ProductId": "products/8412-B",
            "Quantity": 2,
            "Name": "Eggs"
        }
    ]
}
Not all collections deserve such attention, of course. For some, you'll choose to only get the latest version or define an authoritative source that will resolve such conflicts. When you need to write such a script, the Studio can be a great help. That's because in addition to just defining the conflict resolution script, you can also debug it inside the Studio.
Distributed atomic compare exchange operations
In Chapter 2, I introduced the compare exchange feature (sometimes known as cmpxchg). This feature allows you to perform atomic
compare and swap operations at the cluster level. As you can imagine, this feature relies on the strong consistency available to
the RavenDB cluster via the Raft consensus protocol.
Consider the code in Listing 6.810, which shows how to use this feature to ensure unique username reservation at the cluster level.
Listing 6.8 Using compare exchange to validate unique username in a distributed system
var cmd = new PutCompareExchangeValueOperation<string>(
    key: "names/john",
    value: "users/1-A",
    index: 0);

var result = await store.Operations.SendAsync(cmd);
if (result.Successful)
{
    // users/1-A now owns the username 'john'
}
Because this is a cluster level operation, it goes through the full consensus protocol. RavenDB will only answer to such a command after a majority of the nodes in the cluster confirmed its acceptance. This ensures that the cluster as a whole makes this decision. If you attempt a compare exchange operation from a node that cannot reach a majority of the nodes, the compare exchange operation will fail.
This feature is useful when you want to do highly consistent operations at the cluster level, not just the individual node. As already discussed, concurrency in the cluster is complex. Even when you have optimistic concurrency checks, two clients talking to two different nodes may both succeed to write to a document. RavenDB will quickly detect and flag this as a conflict, with the usual semantics on how to handle this.
In the vast majority of cases, this is what you want. Cluster-wide operations require coordination of the entire cluster (actually, we only need a majority of the nodes). This means that in a 3 nodes cluster, you'll require the confirmation of at least 2 nodes in order for an operation to succeed. With 5 nodes in the cluster, you'll need 3, etc. See Table 7.1 in the next chapter for full details on this.
As a result, you'll usually save the compare exchange usage for things that must be done in a consistent manner. There are usually fewer of these than you would initially assume. Let's look at a more complex example of using the compare exchange feature in RavenDB.
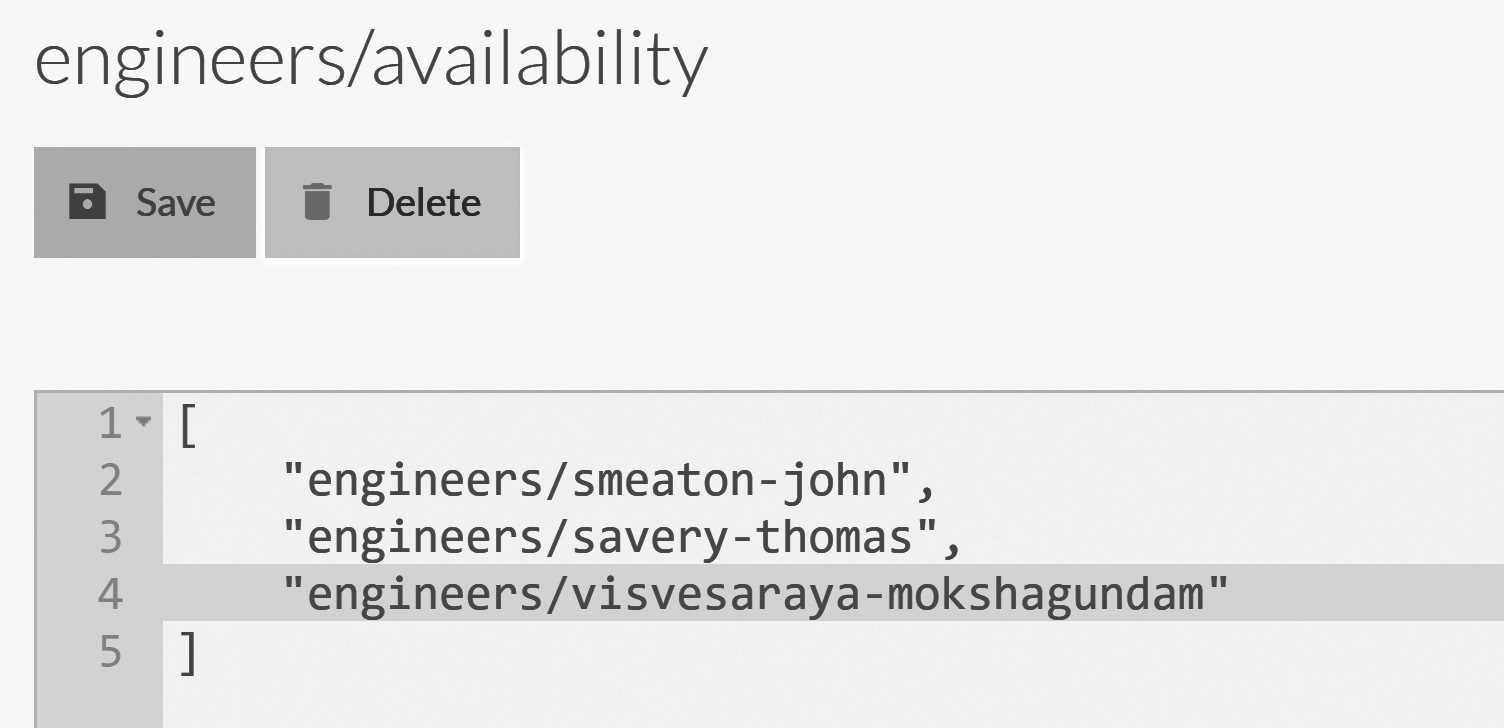
Consider the following scenario. We have a bunch of support engineers, ready and willing to take on any support calls that come. At the same time, an engineer can take only a certain number of support calls. In order to handle this, we allow engineers to register when they are available to take a new support call. How would we handle this in RavenDB? Assuming that we wanted absolute consistency?
Listing 6.9 shows how an engineer can register to the pool of available engineers.
Listing 6.9 Using compare exchange to register engineer's availability in a consistent manner
const string key = "engineers/available";

public void RegisterEngineerAvailability(string engineer)
{
    while (true)
    {
        var get = new GetCompareExchangeValueOperation<List<string>>(
            key);
        var getResult = _store.Operations.Send(get);
        if (getResult == null)
        {
            // empty, so create a new one
            getResult = new CompareExchangeValue<List<string>>(
                key,
                index: 0, // new
                value: new List<string> { engineer }
            );
        }
        getResult.Value.Add(engineer);
        var put = new PutCompareExchangeValueOperation<List<string>>(
            key,
            getResult.Value,
            getResult.Index);

        var putResult = _store.Operations.Send(put);
        if (putResult.Successful)
            return;

        // someone pushed a new engineer, retry...
    }
}
The code in Listing 6.9 is very similar to how you would write multi-threaded code. You first get the value, then attempt
to do an atomic operation to swap the old value with the new one. If we are successful, the operation is done. If not, then
we retry. Concurrent calls to RegisterEngineerAvailability will race each other. One of them will succeed and the others
will have to retry.
The actual data that we store in the compare exchange value in this case is an array. You can see an example of how that would look in Figure 6.18.
Compare exchange values can be simple values (numbers, strings), arrays or even objects. Any value that can be represented as JSON is valid there. However, the only operation that is allowed on a compare exchange value is replacement of the whole value.
The code in Listing 6.9 is only doing half of the job. We still need to be able to get an engineer to help us handle a support call. The code to complete this task is shown in Listing 6.10.
Listing 6.10 Getting an available engineer using atomic and distributed compare exchange operations
const string key = "engineers/available";

public string PullAvailableEngineer()
{
    while (true)
    {
        var get = new GetCompareExchangeValueOperation<List<string>>(
            key);
        var getResult = _store.Operations.Send(get);
        if (getResult == null)
        {
            // no support engineers, wait and retry
            Thread.Sleep(500);
            continue;
        }
        string engineer = getResult.Value[0];
        getResult.Value.RemoveAt(0);

        CompareExchangeResult<List<string>> result;
        if (getResult.Value.Count == 0)
        {
            var del =
            new DeleteCompareExchangeValueOperation<List<string>>(
                key,
                getResult.Index);
            result = _store.Operations.Send(del);
        }
        else
        {
            var put =
              new PutCompareExchangeValueOperation<List<string>>(
                  key,
                  getResult.Value,
                  getResult.Index);
            result = _store.Operations.Send(put);
        }

        if (result.Successful)
            return engineer;

        // someone took an available engineer
        // while we were running, let's try again...
    }
}
The code in Listing 6.10 is a bit more complex. Here we read the available engineers from the server. If there are none, we'll wait a bit and try again. If there are available engineers we'll remove the first one and then try to update the value. This can happen for multiple clients at the same time, so we check whether our update was successful and only return the engineer if our change was accepted.
Note that in Listing 6.10 we use two different modes to update the value. If there are still more engineers in the available
pool, we'll just remove our engineer and update the value. But if our engineer is the last one, we'll delete the value
entirely. In either case, this is an atomic operation that will first check the index of the pre-existing value before
performing the write.
It is important to note that when using compare exchange values, you'll typically not act on read. In other words, in Listing 6.10, even if we have an available engineer, we'll not use that knowledge until we successfully wrote the new value. The whole idea with compare exchange values is that they give you atomic operation primitive in the cluster. So a typical usage of them is always to try to do something on write until it is accepted, and only then use whatever value you read.
The acceptance of the write indicates the success of your operation and the ability to rely on whatever values you read. However, it is important to note that compare exchange operations are atomic and independent. That means an operation that modifies a compare exchange value and then does something else, needs to take into account that these would run in separate transactions.
For example, if a client pulls an engineer from the available pool but doesn't provide any work (maybe because the client crashed) the engineer will not magically return to the pool. In such cases, the idle engineer should periodically check that the pool still contains the appropriate username.
Summary
In this chapter, we've touched on most of the distributed portions of RavenDB. We started by spinning up our own cluster, and we played around with creating various databases on it. We looked at how we can manage a database inside the Studio and how RavenDB is actually spreading a database group into multiple database instances on the various cluster nodes.
We talked about how the client API works with a RavenDB cluster, how we can ensure that a write is replicated to a minimum set of replicas before the server will confirm it and how we can ask the client API to load balance our work among the different nodes in the database group.
We discussed the distributed nature of RavenDB at the cluster layer (consensus, majorities required) and at the database layer (multi-master, can act independently) and how it affects our code. If there is a failure that knocks out half of the cluster, we'll not be able to do cluster operations. But reading and writing on each database will proceed normally, and clients will failover silently to any surviving nodes. Certain operations (creating databases or defining new indexes) will not work until the cluster is in a stable state, but the most common day-to-day operations can proceed with each database instance acting on its own and merging its operations with its siblings.
That behavior can lead to conflicts, and we explored some of the options RavenDB has for resolving those conflicts. You can set up automatic conflict resolution based on a preferred node, select the most recent version, or even provide your own logic to merge conflicting versions automatically. The RavenDB Studio also contains a conflicts section that allows you to inspect conflicts and manually resolve them.
We then discussed transaction atomicity in replication, how RavenDB ensures that all changes that happen in the same transaction are always replicated in the same batch and how we can use revisions to ensure that holds true even for documents that were changed later independently. We looked at change vectors and how they are used by RavenDB to piece together the absolute order of events and know what happened where and when.
The final topic we covered was compare exchange values in RavenDB. These allow you to perform distributed and atomic compare and swap operations and are an important primitive for many distributed operations. RavenDB exposes this directly, giving you the ability to manage distributed state in a reliable way by leaning on the consensus protocol that drives the RavenDB cluster.
In the next chapter, we are going to cover how to design your cluster, how to define your topology for geo-distributed environments, and, in general, how to scale your RavenDB cluster.
-
If you're interested in learning why, I found this answer fascinating: https://www.quora.com/Why-is-a-group-of-crows-called-a-murder↩
-
It doesn't make a lot of sense to have a cluster with just two nodes since we'll require both of the nodes to always be up, in most cases. There are certain advanced scenarios where such topology might make sense, and we'll touch on that briefly in Chapter 7.↩
-
Rachis is the central shaft of pennaceous feathers.↩
-
Of course, we'll be able to create a backup manually. See the discussion about cluster-wide tasks later in this chapter.↩
-
I'm on a garden tools naming streak, it appears.↩
-
[Of course, it's possible that a client has an outdated view of the topology, but there are mechanisms in place to ensure that clients will figure out that their topology is out of date and refresh it.↩
-
This isn't even close to how money transfers really work, of course, but it's a classic example and easy to reason about.↩
-
It's not something you'll use for everything, but in most applications there's one or two places where it can be really useful.↩
-
Note that different nodes may have different clocks. RavenDB doesn't attempt to compensate for this and will use the latest timestamp from the conflicts in its automatic resolution.↩
-
The same code was already shown in Listing 2.21 from Chapter 2.↩