Skip to Navigation
Operational recipes
This chapter mostly consists of walkthroughs of particular tasks that you might need to do when operating a RavenDB cluster. This isn't meant to replace the online documentation, but to complement it. I tried to cover most of the common scenarios that you might run into in your systems. Beyond using this as a reference, I also suggest going through the various recipes to get some insights about how such issues are resolved.
Many of the methods listed in this chapter aren't new; we have covered them in previous chapters. Here they are just laid out in practical terms as a set of operations to achieve a specific goal.
Before we start, I want to mention something quite important. Each of these recipes is meant to be used to solve the specific problem for which it is introduced. These recipes often include deep assumptions about what is going on, and it is not safe to blindly apply these techniques to other situations or without following the exact same procedures listed here.
This chapter is where we learn how to make fixes to the system while it is running. RavenDB was explicitly designed to allow for such things. However, you are still modifying a live system, often when it is already stressed or in partial/full failure mode. The recipes here will help you escape such scenarios, but mistakes can cause hard failures.
Now that I've finished scaring you, let's get to the real meat of this chapter. I included specific warnings for common issues that you might want to pay attention to, and you'll probably conclude that it isn't that scary.
Cluster recipes
The cluster is the workhorse that users of RavenDB rarely think about. The cluster is responsible for managing all the nodes in the cluster, assigning work, monitoring the health of the nodes, etc. Most of the time, you set up the cluster once and then let it do its thing.
This section discusses when you need to go in and intervene. The usual reason for intervention is that you want to modify your cluster topology. The cluster topology isn't meant to be static, and RavenDB explicitly supports online modifications of the topology, so there isn't a high level of complexity involved. But there are some details that you should take into account.
Adding a new node to the cluster
At some point, you're going to want to add a new node to your cluster. Most of the time, you set up the cluster as a whole using the setup wizard, so you might not even be aware how to add a node.
Prerequisites for the new node
I'm assuming that you are running in a secured mode (the only reason you wouldn't be is if you're playing around on the local machine). Running in secured mode means that in order to add the new node, you need to have mutual trust between the new node and the existing cluster. The easiest way to establish this trust is to use a single wildcard certificate for all the nodes in the cluster. Because the new node is using the same certificate as the rest of the cluster, the cluster will intrinsically trust the remote node and accept it. If you don't have the same certificate for all nodes, you'll need to register the cluster certificate in the new node using
rvn admin-channeland then thetrustServerCertcommand.
You'll have to take care of the certificate (it is easiest to use a single wildcard certificate for all the nodes in the cluster, although that is not required), DNS updates, firewall configuration, etc. I'm assuming that all of this has been properly set up ahead of time. There's nothing special about that part of the preparation.
When you start a new node for the first time, it defaults to using Setup.Mode=Initial and will start the setup wizard.
This is not what you want in this case. Take a look at the settings.json file from one of your existing cluster nodes
and use that as the template for the configuration of the new node. You'll have to change the ServerUrl,
PublicServerUrl, ServerUrl.Tcp and PublicServerUrl.Tcp options to match the new node location. Beyond that, keep the
configuration identical. While it is possible to run with different configurations on different nodes, it is not
recommended; too high a variance of some options will cause errors.
Once you are done with the configuration, you can start the new node. Connect to it and you'll see the Studio
as usual, but obviously without any databases or documents in there. This new node is currently running in
passive mode, indicating that it has not yet been determined whether the new node will be joined to an existing cluster or form
a completely new cluster.
A new cluster will be formed if you create a new database or set up client certificates: basically, if you do anything that shows you are preparing this node to stand on its own.
Once you have verified that the new node is up, running and accessible — but remember: don't perform any actions on the new node! — go
to an existing node and head to Manage Server, Cluster and then to Add Node to cluster. You can see how this
will look in Figure 18.1.
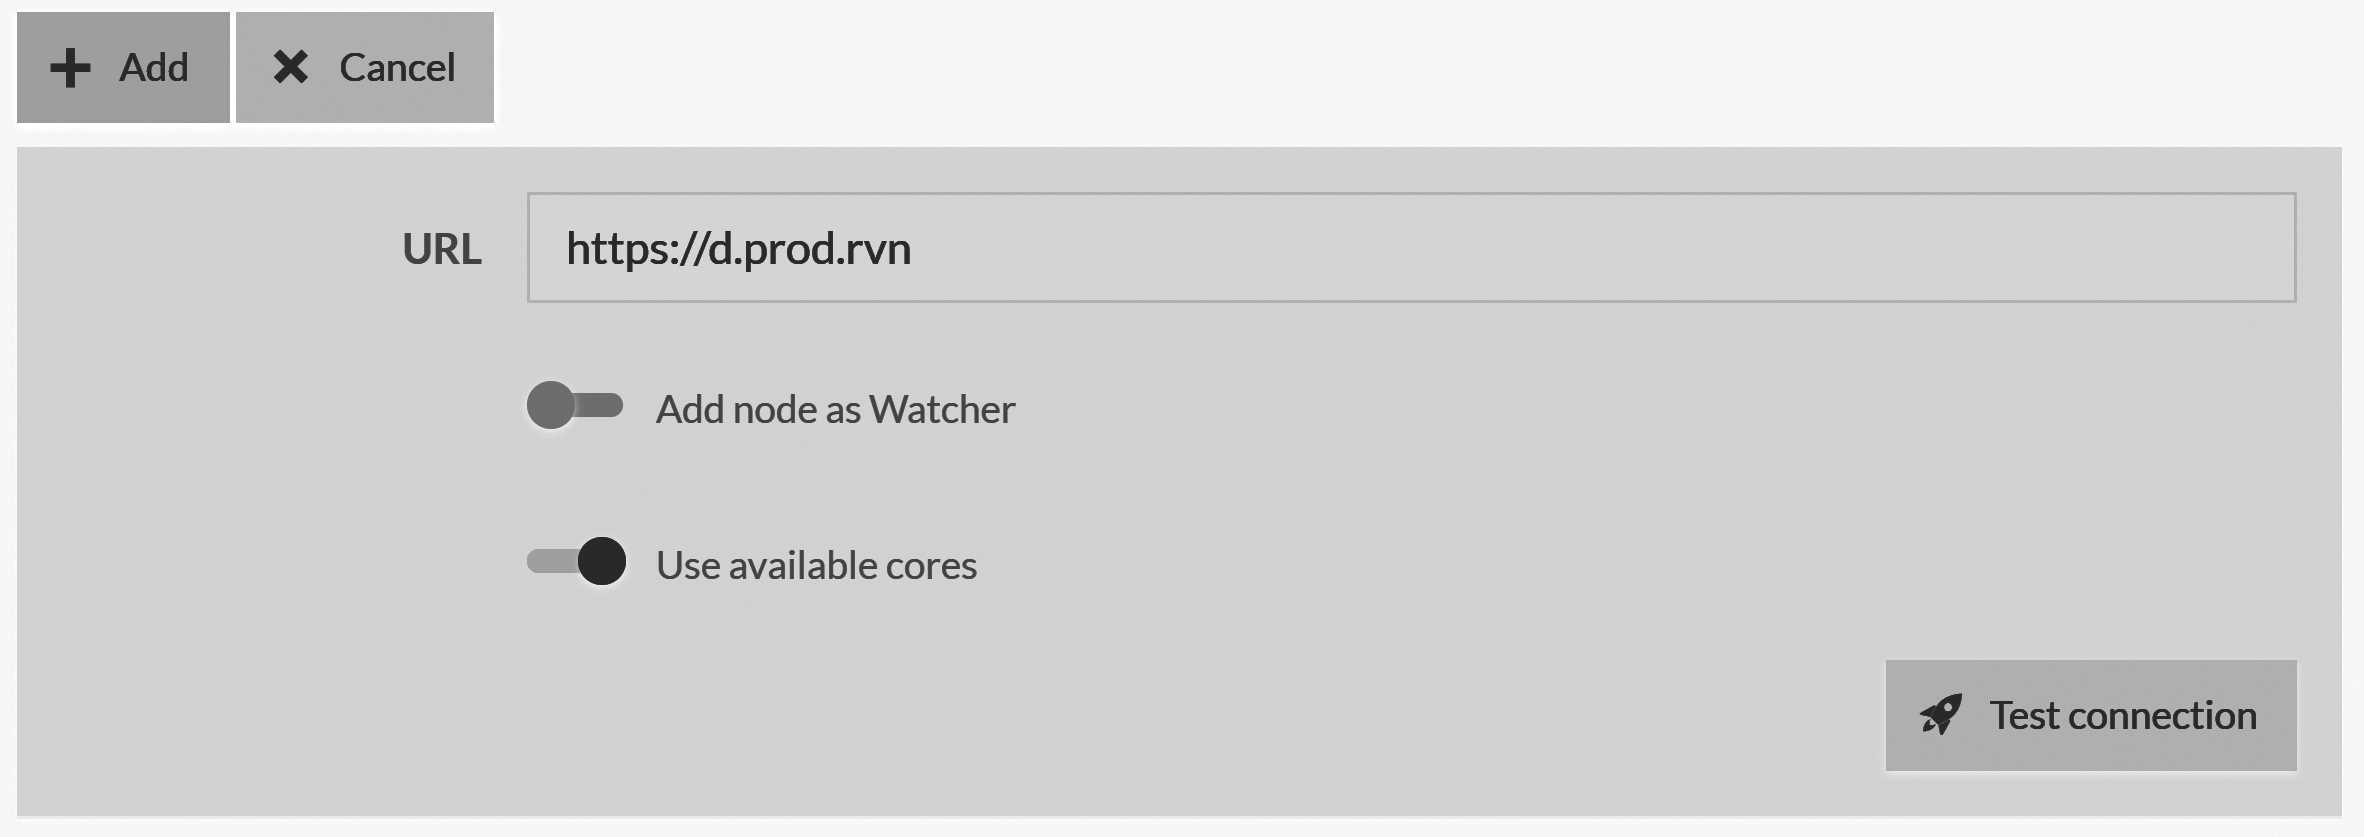
Figure 18.1 shows the new node screen. There isn't much there, because you don't need to do much beyond providing the URL
of the new node to add to the cluster. Once you click on the Add button, the cluster will connect to the new node,
add it to the cluster topology and start updating it with the current state of the system. The node will switch to the Promotable state.
In the Promotable state, the node is part of the cluster in the sense that it is getting updates, but does not take part in votes and
cannot be elected for the cluster leadership. When the cluster is finished updating the new node
with the existing cluster state, the cluster will move the node into the Member state. At this point, the new node will
be able to become a leader and its vote will be counted by the cluster.
Even though the node has been added to the cluster and can potentially become the leader, it is still missing something. It has no databases. RavenDB will not auto-move databases between nodes when you add or remove a node from the cluster. This is left to the discretion of the operations team. New databases created on the cluster will take the new node into account, and the cluster may decide to migrate databases from a failed node to the new node, but these are rather exceptional circumstances.
You'll typically wait until the node is fully joined to the cluster and then tell RavenDB to start migrating specific databases to the new node yourself. Remember that this process is transparent to the client and will not impact the usual operations in any manner.
Removing a node from the cluster
The flip side of adding a node to the cluster is removing a node. The how of this is pretty simple, as you can see in Figure 18.2.
Cluster view; the red trash icon allows you to remove the node from the cluster
In Figure 18.2, you can see the nodes in the cluster view in the Studio. The red trash icon at the top right allows you to remove the node from the cluster. Clicking it will cause the cluster to remove the node. But what does this mean?
At the cluster level, it means that the node will be removed (obviously). Any database groups that contain this node will have the node removed from the database group and the replication factor adjusted accordingly. Any databases that reside only on this node will be removed from the cluster entirely.
At the removed node level, the node will revert back to passive mode. It will still be accessible, but the
databases that reside on the node will be unloaded. You'll need to either rejoin
the node to the cluster or let it know that it should form a new cluster in order for the databases on this
node to become available again.
This is done to avoid having clients or ETL tasks talk to the now isolated database instance on the node that was removed
from the cluster.
Forming a new cluster is a one-way option. After the new node has been moved away from being passive, you cannot add it back to the previous cluster——or any other cluster, for that matter. A cluster can only add empty nodes or nodes that were previously attached to that same cluster.
When a new cluster is formed on the formerly passive node, the topology of all the database groups is adjusted. All database groups that include the current node are shrunk to include just the current node. All database groups that do not contain the current node are removed.
Don't create a new cluster with the old URL
Forming a new cluster on the removed node is fine, but you should make sure that this is done with a new URL. This is to avoid the case of a client using an old URL or ETL task that hasn't been updated. The new cluster will share the same security configuration, and you'll want to avoid existing clients and tasks talking to the newly independent node while thinking they are talking to the cluster as a whole.
All other cluster-wide settings, such as the certificates and database access authorization, remain the same. You should take that into account if you intend to keep the node around after removing it from the cluster.
Migrating a node between machines
Node migration can happen for any number of reasons. The most obvious one is that the server IP has changed, and you need to update the cluster topology. For this reason, among many others, it is not recommended to use raw IPs in the cluster topology. Instead, use proper URLs and DNS to control the name resolution.
This way, moving node C from 10.0.0.28 to 10.0.0.32 can be done simply by updating the DNS of c.prod.rvn to the
new value and forcing a DNS flush. You can do that with machine names, of course, but that would just shift the problem if
you need to change the host machine. A good example is if you set up a RavenDB node on prodsrv1 and you need to move it to
prodsrv3. Since prodsrv1 is used for other services, you cannot just change the DNS.
Use dedicated DNS entries for RavenDB nodes
Avoid using IPs or hostnames for RavenDB nodes. The easiest option is to have a DNS entry for each RavenDB node that can be changed directly if needed. This can make changing the physical topology of the cluster as easy as running a DNS update. This section focuses on how to handle cases when you did not do that.
I'm assuming that you have to move the node by updating the cluster topology, not just updating the DNS. There are a few things you need to do to ensure that the transition is handled properly, starting with obtaining a certificate for the new node URL. Once that's done, the process is simple.
We'll assume that you have a cluster of three nodes — A, B and C — and that you want to move node C to a different machine. The first thing to do is to shut down node C. Then go to one of the other nodes and remove node C from the cluster. You can also do things in the reverse order (first remove node C and then shut it down). It doesn't really matter.
Move node C to another machine, set up the certificate and update the ServerUrl, PublicServerUrl, ServerUrl.Tcp and
PublicServerUrl.Tcp options in the settings.json file. Then go to node A or B and follow the same procedure to add
a new node to the cluster. This node will be re-added to the cluster (while still being called node C). RavenDB will
remember the node and perform all the necessary hookups to make sure that the newly added node returns to its rightful place
in the cluster.
Replacing a node on the fly
What happens if a node in the cluster suffers a catastrophic failure? For example, let's assume that node C had a hard disk failure and went down completely. You restore the machine, but all the cluster data and databases on node C are gone. What's the best way to handle this scenario?
Because node C is effectively suffering from amnesia, the first thing we need to do is go to the cluster and demote it from a full member to a watcher. We'll discuss this in more detail in the next section, but the core idea here is that we want to avoid giving node C any decision-making power (which, as a full member node, it has) until it recovers from its period of forgetfulness.
Once node C has been demoted to a watcher, we can let the cluster handle the rest. Just start up RavenDB again, and since node C has no data, it will start up as a passive node. Because it will be using an existing node URL, the cluster will connect to it and update it with the cluster's current state, including any databases that should reside on node C. The other nodes with databases that also reside on C will start replicating the data back to node C.
In short order, the cluster will make sure that node C is restored to full functionality, has all of its relevant data, is up to speed and can once again be a contributing member of the cluster. At this point, you can promote it to a full member again.
We talked about members and watchers in Chapter 7, but I figure a refresher is probably in order.
Promoting and demoting nodes in the cluster
The nodes in a RavenDB cluster can be in the following states: Member, Promotable, and Watcher. A member node is a fully
functional part of the cluster, able to cast votes and be elected as the leader. Typically, a cluster will have up to
seven members at any given time. A promotable member is one that is currently in the process of catching up with the state
of the cluster and is typically only seen when you add a new node to the cluster.
A watcher is a member of the cluster that is managed by the cluster (assigned work, monitored, etc.) but has no way of impacting the cluster. It isn't asked to vote on commands and it can't be elected leader. Once your cluster grows beyond seven nodes, you'll typically start adding new nodes as watchers instead of as full members. This is to reduce latency for cluster-wide operations by involving a smaller number of nodes.
In Figure 18.1, you can see the Add node as Watcher option, which will add a new node to the cluster as a watcher.
You can also demote member nodes to watchers and promote watchers to be full members. Figure 18.2 shows the Demote
button for node D.
You'll typically only demote a node when you are recovering from some sort of fatal error that caused amnesia, as was discussed in the previous section. Alternatively, you might want to shift the responsibility of the cluster to the newer, more powerful nodes. The nodes in RavenDB are all homogenous; the only difference is the roles they are assigned. Any watcher node can become a member node and vice versa.
Bringing up a cluster from a single surviving node
All the cluster-wide operations (adding/removing nodes) require that the cluster itself be healthy. A healthy cluster is one where a majority of the nodes are able to communicate with one another. There are certain disastrous cases where that doesn't hold. In a three-node cluster, if you lose two of the nodes, your cluster goes down until one of the failed nodes recovers.
However, what happens if the cluster can't recover? Imagine that you have a hard failure on both of your machines, leaving you with a sole surviving node. What do you do? You can't remove the failed node from the cluster because there is no majority of surviving nodes to confirm this decision.
At this point, there's a nuclear option you can use: unilaterally seceding from the cluster. As you can imagine, this is considered to be a rude operation and not something to be handled lightly. This feature exists to deal only with these specific circumstances. It will forcibly update the internal cluster topology on a node without waiting for a majority vote on the cluster and create a new single-node cluster.
This can be achieved only through the Admin JS Console that we discussed in Chapter 16. Go to Manager Server,
Admin JS Console and ensure that you are running in the context of the server, then run the command in Listing 18.1.
Listing 18.1 Emergency command to initiate cluster secession on the current node
return server.ServerStore.Engine.HardResetToNewCluster();
This command will output the new topology ID. You can now go to the Cluster view and see that there is only a
single node in this cluster now and that the current node is the leader. At this point, you'll be able to run
cluster-wide operations, such as adding a new node to the cluster.
A small wrinkle here is that RavenDB validates that a node added to the cluster is either a brand new node or was previously part of the same cluster. Because the node has seceded, it is now its own cluster. This can be an issue if you lost three out of five nodes in a cluster. In this case, you have two nodes that are up, but you don't have a majority to change the cluster topology.
Do not pull the emergency handbrake
Calling
HardResetToNewCluster(), like everything else under the Admin JS Console, is provided with an important caveat. The hard reset will modify the internal structure of RavenDB in a very invasive way. It's meant to be used only in the most dire of emergencies.Before calling
HardResetToNewCluster(), you should verify that there is no other usage of the system. This kind of operation should be done in isolation from outside interference; if not, you might see bad system behavior or unexpected results.
In order to recover from permanently losing three out of five nodes in the cluster, you must cause one of the nodes to secede from the cluster. But when you cause a node to secede, it will form its own single-node cluster. Let's assume that you have only nodes A and B remaining from a five-nodes cluster. We can't just move to a single-node cluster, because each of them will be its own separate cluster. We need to take a slightly more complex series of steps.
On node A, run the HardResetToNewCluster command and note the topology ID that is provided. On node B, in the Admin JS
Console, you'll need to execute the command shown in Listing 18.2 (remember to update the topology ID from the previous step).
Listing 18.2 Emergency cluster secession in favor of a particular cluster topology
server.ServerStore.Engine.HardResetToPassive(
    // the topology id from Listing 18.1 goes here
    "xxxxxxxx-c4d2-494e-bc36-02274ccc6e4c"
);
Listing 18.2 shows the command to secede from the existing cluster in favor of a new one. This will also mark
node B, where this command was run, as passive. You'll need to go to node A (where HardResetToNewCluster was run) and add node B
to the cluster again.
If the live nodes aren't named nodes A and B, by the way, this process will rename them to be nodes A and B.
Which node should be made passive?
In such a disaster scenario, it is not uncommon to have different surviving nodes each with its own specific view of the state of the cluster and the command log. It is imperative that you select the node with the most up-to-date command log to be the one that resets to a new topology.
You can use the
/admin/cluster/logendpoint to check the status of the command log on each of the nodes. The node with the highestCommitIndexand the latest log in theEntriesarray is the one you should runHardResetToNewClusteron;HardResetToPassiveshould be run on the other(s).
At this point, you'll have a two-node cluster and can start adding brand new nodes as usual. This process is only valid for nodes that are part of the same cluster. It is not possible to use this process to merge clusters. In general, this should be treated as an option of last resort.
Database recipes
So far, we've talked a lot about all the things that happen to RavenDB at the cluster level. These are important to understand, but they're not things you'll have to deal with on a day-to-day basis. It is far more common to deal with operations at the individual database level.
To clarify the terminology: a database in RavenDB can refer to a database group (a named database in the cluster, which resides on one or more nodes) or a database instance (a named databased on a particular node in the cluster). We don't usually have to distinguish between them because RavenDB lets you work at the database group - or database instance-level transparently.
We can look at the databases from any node without needing to specify which node we are talking to for each database. Topology updates are handled automatically, and you usually don't care what database instance you are talking to for a particular operation. RavenDB handles all of that for you behind the scenes.
This is all thanks to the fact that RavenDB stores the database group topology on all the nodes in the cluster. This is what allows any node in the cluster to tell a client where to find the database, regardless of if this particular node hosts an instance of this database or not.
Reordering nodes and why it matters
You can see the database group topology in the Studio by clicking on the Manage group button on the Databases page. This will take you to the Manage Database Group page, as you can see in Figure 18.3.
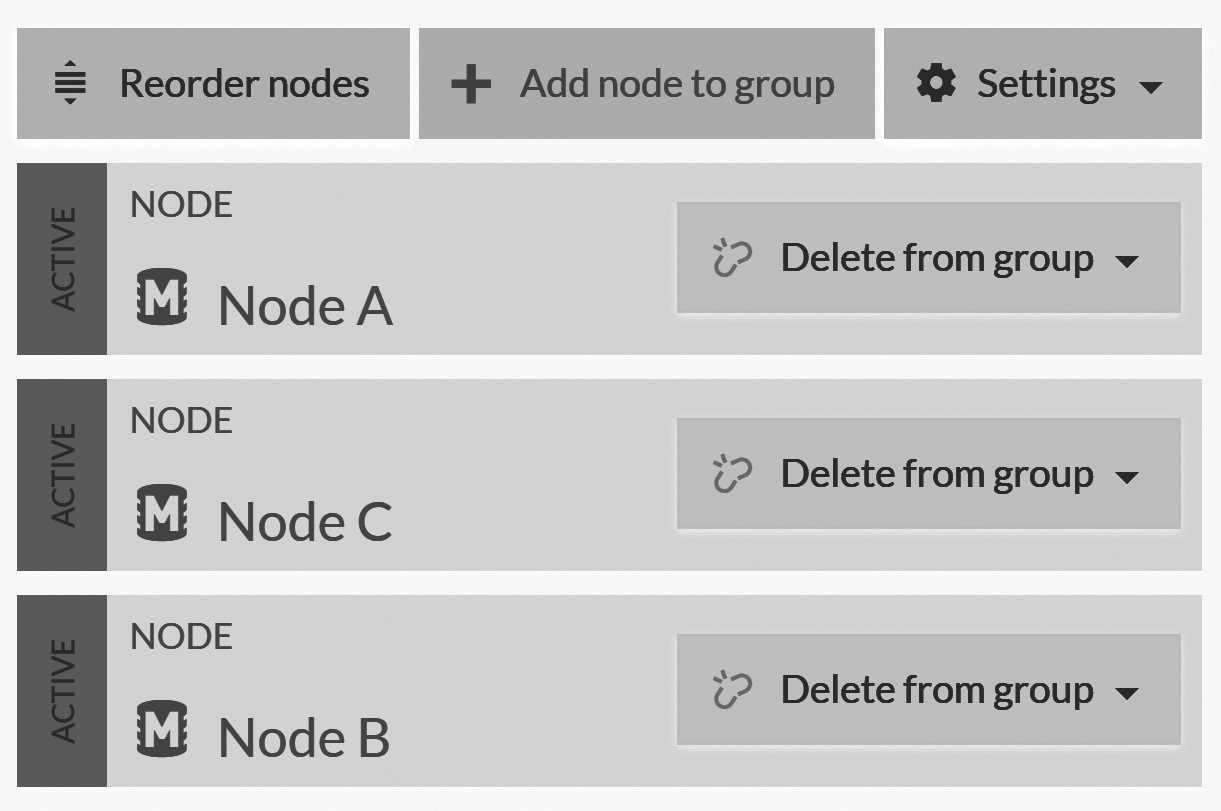
If you look closely at Figure 18.3, you might notice something odd. The order of the nodes there is wrong. It goes [A, C, B]
but obviously it should be sorted alphabetically, no? What is going on?
The order of the elements in the topology matters, and RavenDB allows you to control that order using the Reorder nodes button. But
why is the order of nodes so important? Put simply: this is the priority list that clients will use when deciding
which node in the database group they will talk to.
Usually, RavenDB will manage the list on its own, deciding the order in which clients should talk to the different nodes as well as the other tasks that are assigned to this database group. If the cluster detects that a node is down, it will drop that node to the bottom of the list and alert the clients.
Clients, for their part, will use the list to decide which node to call whenever they need to query RavenDB. If the node they
choose is down, they will automatically fail over to the next node on the list. Note that in this case, both the cluster and the
clients are working both cooperatively and independently of one another. The cluster gives its opinion on the best node to use at
any given point. If the cluster is able to reach a node and
the client isn't, the client can still fail over to the other nodes in the topology.
After the topology of the database groups has changed, the client will update their topology for the next request. This is done by the server setting a header (in the response of a request) that lets the client know the database-group topology on the server has changed. In practice, this means that any change to the topology is usually visible to all clients within a very short amount of time.
That leads to interesting options. For example, you can use this feature to shape the way the clients will talk to a particular node. You can move a node to the bottom of the list to keep clients from talking to it (assuming no round robin or fastest node options are in place). You can also move a node to the top so that clients will prefer to use that particular node.
This is useful if you need to take a node down and want to gracefully move traffic away from it instead of having clients fail (and then recover by failing over to another node in the database group).
Moving a database between nodes
A database instance is the term used to refer to a specific database inside a particular node. Sometimes, for whatever reason, you want to move a database instance between nodes. There are a few ways of doing this, from the easy (letting RavenDB do it for you) to the less easy (when you do everything yourself). We'll discuss the easy way to do things in just a bit, but right now I want to focus on the manual mode.
If there's an easy way, why would you go through the trouble of doing this manually? Mostly because in some specific cases (by no means all of them, mind) it can be faster to do things directly. Walking you through the manual process of moving the database between nodes also gives you good exposure of how RavenDB is actually managing databases internally and may be helpful in other situations.
The way RavenDB is actually managing your databases across the cluster is interesting. At the cluster level, RavenDB coordinates
between the various nodes to achieve consensus on the Database Record. The Database Record is a JSON document that describes
a particular database. You can see it by going into one of the databases, then to Settings, Database Record. Listing 18.3
shows a (simplified) example of such a database record.
Listing 18.3 A (somewhat simplified for space reasons) database record defining a database in RavenDB
{
    "DatabaseName": "Northwind.Orders",
    "Disabled": false,
    "Encrypted": false,
    "Topology": {
        "Members": [
            "A",
            "B"
        ],
        "DynamicNodesDistribution": false,
        "ReplicationFactor": 2
    },
    "Indexes": {
        "Orders/ByCompany": {
            "Name": "Orders/ByCompany",
            "Priority": "Normal",
            "LockMode": "Unlock",
            "Maps": [
                "from order in docs.Orders /* redacted */"
            ],
            "Reduce": "from result in results /* redacted */",
            "Type": "MapReduce"
        }
    },
    "Revisions": {
        "Collections": {
            "Orders": {
                "Disabled": false,
                "PurgeOnDelete": false
            }
        }
    },
    "PeriodicBackups": [],
    "ExternalReplications": [],
    "RavenEtls": [],
    "SqlEtls": [],
    "Etag": 113
}
What you see in Listing 18.3 is what goes on behind the scenes. You have the database topology (the members of the database group), you have the index definitions and revisions configurations and you can see where we define tasks for the database. When I talk about the cluster managing the database, what I mean is that the cluster mutates this document and ensures that all nodes in the cluster have consistent views of it.
The database instance managed at the node level is, to use a very crude definition, just the set of files that make up the data on that node. How does all of this relate to moving a database between nodes? Well, let's see.
Pay no attention to the man behind the curtain
This isn't magic. RavenDB uses the
Database Recordto tell databases where they need to go, and when a database is assigned to a node, the node will create an instance. A database instance is the set of files, threads and in-memory data structures required to handle queries and operations.
The first thing to do when manually moving a database between nodes is to actually remove the database from the original node. You can either soft delete the database (if it exists
on only a single node) or remove it (using soft delete) from the database group. This can be done in the Manage Database Group view
under the database's Settings. You can see how this looks in Figure 18.4.

This soft delete measure leaves the database files on the disk. Furthermore, it also means that the RavenDB server on the original node will close all the file handles and release any resources associated with this database. At this point and at this point only, we can take the database folder and move it to another machine.
Don't make a habit of schlepping databases around manually
It is generally not safe to muck about in the RavenDB directory. That is true for users in general as well as other things like antiviruses, file system indexing, file monitoring, etc. RavenDB has firm ideas about how it interacts with the disk. Interfering with its I/O can cause issues.
In this case, we have started off by explicitly shutting down the database (by soft deleting it). This gives RavenDB the chance to do a graceful shutdown: closing all the file handles and freeing all related resources. This is the only reason it is OK for us to muck about in RavenDB's data directory.
You're going through all this trouble because you want to move the database folder to another machine. This presupposes that you have some way to get the data from one machine to the other that's faster than sending it over the network. This can happen when you have so large a database that it's faster to literally move the disk from one machine to another.
Another scenario is when your "disk" is actually a cloud storage volume. This allows you to detach it from one machine and then attach it to another with relative ease. In this case, moving the data manually might be worth this hassle. Otherwise, just use RavenDB's built-in replication for this scenario.
This is not going to work to clone a database
You might be tempted to use this approach to quickly clone a new database when you want to add a new node to the database group. This will not work because the internal database ID will be the same across multiple nodes, something that is not allowed and can cause complex issues down the road. RavenDB will not be able to tell where exactly a specific change happens, so it will not be able to tell if documents should be replicated to the other nodes or not.
This approach is only valid if you remove the data from the old node entirely so there is just one copy of the database with the same database ID.
Once you have the database directory on the other machine, make sure that it is in the expected path on the destination and
add it to the new node. When updating the Database Record, RavenDB will open the directory and find the pre-existing files
there. From that point on, it will just proceed normally.
Renaming a database
Given the previous topic, can you guess how you'll rename a database with RavenDB? All you need to do is soft delete the database and then recreate it on the same path but with a new name.
There are a few things that you need to pay attention to when renaming databases. Only the database-level data is going to be preserved in this scenario. Tasks and data at the cluster level will not be retained, which includes tasks such as subscriptions, backups, ETLs, etc. This also includes database data that is stored at the cluster level, such as identities and compare-exchange values.
In short, don't do this. If you want to rename a database, the proper way to do it is to back up and restore the database under a different name.
Expanding and shrinking the Database Group
I mentioned earlier that there is an easy way to move a database between nodes. It's quite simple: first expand the database group to include the new node, wait for replication to complete and then remove the node you want from the group.
You can do this from the Settings, Manage Database Group view. Expanding the Database Group to include a new node is as simple
as clicking on Add node to group and selecting which node you want to add. Once that is done, the RavenDB cluster will create the
database on the new node and assign one of the existing nodes in the database group for the initial seeding of data.
The Manage Database Group view will allow you to monitor the status of the initial seeding until the cluster detects that the
new node is up to speed and promotes it to full member status. At this point, you can remove another node from the database group
and the cluster will adjust accordingly.
Given what we've already learned, you'll probably first take the node that is about to be removed from the database group and move it lower in the priority list, then wait a bit to give clients the chance to learn about the new topology and connect to another server. This way, when you eventually do remove the node, no client will be talking to it.
Removing the last node in the group will delete the database
Removing a node can be done as either a soft delete (you keep the files, as we previously discussed) or a hard delete. If the node you're removing is the last node in the database group, the database will be removed from the cluster even if you choose a soft delete. The same rules about the cluster-level data apply as when we talked about the wrong way to rename a database.
A soft delete of the last node in a database group will keep the database-level data intact on that node, but all the cluster data (tasks, identities, compare exchange values, etc.) will be removed from the cluster.
The advantage of this method for the operations team is obvious: very little hand-holding is required. Expanding the group means that RavenDB will handle all the details of moving the data to the other node(s) and setting everything up.
The downside is that it requires RavenDB to do a fair amount of work: effectively read the entire database, send it over the network and on the other side, write out the entire database. This is intentionally handled in such a way that will not impact overall operations too much. The idea is that the stability of the cluster is more important than raw speed.
This might sound like we'ved intentionally throttled things down, but nothing could be further from the truth. We've taken care to ensure that adding a new node won't consume so many resources as to be prohibitively expensive. After all, the most common reason for adding another node is wanting to share an already high load.
Scaling database under load
RavenDB contains several features that allow you to scale your systems easily. Among the abilities available to you are distribution of tasks across the nodes in the database group and load balancing between the nodes.
If you start seeing a very high load on your system, what options do you have? The first thing you sould do is to look at the kind
of client configuration you have. This is available in Settings, Client Configuration, as shown in Figure 18.5.

Client configuration, just like the cluster topology, is defined on the cluster and disseminated to clients automatically. This means
that if the configuration isn't set, the first thing you should do is to set the Read balance behavior to Round Robin and wait a bit. You'll see how clients start distributing their reads across the entire database group.
Changing the load balancing behavior can change system behavior
This may sounds obvious, but if you change the
Read balance behaviortoRound Robin(orFastest Node), you'll change the behavior of the system. Of course this is what you want, so why am I mentioning this?Because this also changes externally observed behavior. A write to one server followed by a load-balanced read from another may cause you to read the data from another server. That can cause you to miss the just written value because it hasn't been replicated yet. This isn't just a "make things faster" setting; you need to understand what this means to your application before setting it.
Under the gun, you may accept the potential of this (likely to be very rare) issue until you can come back from the precipice. But in general, you want to change to this setting with full understanding of the impact it will have on your system. We discussed this setting in more detail in Chapter 6.
If you do have this value already set up and RavenDB seems to be struggling even with the load split among the different nodes of the database group, the obvious next step is to add new nodes to the group. This specific scenario is why RavenDB favors stability over speed when you add a new node. Only one single node in the group will be in charge of updating the new node, and even on that single node, we'll ensure that we send the data at a rate that both sender and receiver can handle without choking.
So while it's possible to scale under load, it's (quite obviously) not recommended. If you have a large database, the initial seeding may take a while. During this time, you don't have any extra capacity; in fact, the replication is actually taking (some limited amount) of system resources. If at all possible, try to scale your systems ahead of time or during idle periods, rather than under the highest load.
If you do find yourself in this situation, remember that because the initial seeding of a new node happens from a single designated node, you can actually add multiple nodes to the database group at the same time and they will be assigned to different nodes. In some cases, this can significantly help with reducing time and increasing overall capacity.
Miscellaneous operational tasks
Beyond managing the cluster and the databases, you also have operational concerns inside particular databases. This section touches on some of the issues that can come up in these cases and will provide you with options on how to resolve them.
We're going to go over some RavenDB features we've already discussed. This time around, we're going to see how these features can be applied and chained together to achieve some really nice results.
Offline query optimization
We discussed RavenDB's query optimizer and its ability to detect changes to the operational environment (such as deployment of a new release of your software with different queries). Under such conditions, the query optimizer will adjust the indexes on the database to better serve the new behavior.
You can do this in production on live deploy; in fact, this feature is explicitly meant to be used in such a scenario. However, in many cases, it is valuable to avoid having the adjustment period take place during live production. Instead, we recommend doing this on the side and introducing the changes to production at an early enough date such that by the time the new code is deployed, the database is already expecting the changes. So, how do you go about doing this?
Use a separate instance of your database (such as the UAT/QA instance) and run the new version of your application against that instance. At this point, I suggest running your load test procedure and encouraging users to click around randomly. Basically, exercise your system to make it query the database.
The query optimizer on the database will analyze all this activity and create the relevant indexes for you. After a while, you'll see that the system reaches a steady state. There is enough information now that all the queries in use are being properly served by indexes.
At this point, go to the database and export just the indexes. This will export any static indexes you have created on the database, but most importantly, it will export any automatic indexes that were created by the query optimizer. You can now take the indexes export and import it on your production system.
This will introduce the new indexes to production. RavenDB will start building them on the fly, replacing older indexes once the indexing is done. You can monitor that process and wait until all the additional indexing activity has completed. Because your application isn't going to be using the new indexes, there will be very little impact while they are being built.1 Once the indexes are done, you can deploy your new version to production knowing that you already taught the database what to expect.
Daisy-chaining data
In Chapter 11, we talked about using MapReduce indexes and their ability to output results to a collection. In Chapter 8, we talked about ETL processes and how we can use them to push some data to another database (a RavenDB database or a relational one). Bringing these two features together can be surprisingly useful when you start talking about global distributed processing.
A concrete example might make this easier to understand. Imagine a shoe store (we'll go with Gary's Shoes) that needs to track sales across a large number of locations. Because sales must be processed regardless of the connection status, each store hosts a RavenDB server to record its sales. Figure 18.6 shows the geographic distribution of the stores.

To properly manage this chain of stores, we need to be able to look at data across all stores. One way of doing this is to set up external replication from each store location to a central server. This way, all the data is aggregated into a single location. In most cases, this would be the natural thing to do. In fact, you would probably want two-way replication of most of the data so you could figure out if a given store has a specific shoe in stock by just looking at the local copy of its inventory.
But for the purpose of this discussion, we'll assume that there are enough shoe sales that we don't actually want to have all the sales replicated. We just want some aggregated data. But we want this data aggregated across all stores, not just at one individual store. Here's how we can handle this: we'll define an index that would aggregate the sales across the dimensions that we care about (model, date, demographic, etc.).
This index can answer the kind of queries we want, but it is defined on the database for each store so it can only provide information about local sales, not what happens across all the stores. Let's fix that. We'll change the index to have an output collection. This will cause it to write all its output as documents to a dedicated collection.
Why does this matter? These documents will be written to solely by the index, but given that they are documents, they obey all the usual rules and can be acted upon like any other document. In particular, this means that we can apply an ETL process to them. Figure 18.7 shows what this ETL script would look like.

The script sends the aggregated sales (the collection generated by the MapReduce index) to a central server. Note that we also added some static fields that will be helpful on the remote server so as to be able to tell which store each aggregated sale came from. At the central server, you can work with these aggregated sales documents to each store's details, or you can aggregate them again to see the state across the entire chain.
The nice things about this approach are the combination of features and their end result. At the local level, you have independent servers that can work seamlessly with an unreliable network. They also give store managers a good overview of their local states and what is going on inside their own stores. At the same time, across the entire chain, we have ETL processes that will update the central server with details about sales statuses on an ongoing basis.
If there is a network failure, there will be no interruption in service (except that the sales details for a particular store will obviously not be up to date). When the network issue is resolved, the central server will accept all the missing data and update its reports. The entire process relies entirely on features that already exist in RavenDB and are easily accessible.
The end result is a distributed, highly reliable and fault tolerant MapReduce process that gives you aggregated view of sales across the entire chain with very little cost.
Disconnect external replication/ETL from a remote source
The bad thing about push-based ETL processes and replication is that sometimes, you want to disable them on the destination side.2 That can be a bit awkward when you only have access to the destination and not the source.
For example, you might want to disable the Jersey City shoe store from the aggregation process we outlined in the previous section. That store has been sold and is no longer part of the chain, so you don't want its reports, but it'll take some time before the new owner's IT staff will get around to replacing the internal systems. During that time, you want to ignore the pushed data from that store.
The obvious way to do that would be to shut down the ETL process at the source, but let's assume that's not an option currently available to you. How do you disable the data push at the destination? The answer is quite simple: remove the credentials of the certificate this store is using. With the credentials no longer being valid, the Jersey City store will fail to connect to the central server and will be blocked from pushing any additional data.
Note that the certificate's credentials are checked during connection setup, not on each individual request. You might need to drop an already established connection to complete the process.
Summary
This is an odd chapter. I wanted to give you detailed recipes and steps for what to do if you run into particular issues in production; adding a node, expanding a database group and moving a node between machines are all tasks you may find yourself doing. At the same time, all of these tasks (and more) are covered in detail in the online documentation.
This chapter isn't meant to replace the online documentation, but to complement it. I intentionally chose some of the most common scenarios and then talked not just about the list of steps that you'd take to work through them, but also the kinds of things you'd need to watch out for and how they play into the overall architecture of RavenDB.
The cluster recipes we have gone over should also help you better understand how the cluster is put together. Beyond simply knowing about the Raft protocol and consensus algorithms, I wanted to give you an idea of what is actually happening within the system. For example, the interaction between nodes as they are added and removed from the cluster gives a lot of insight into what is going on at the node level.
Removing the magic behind what is going on with RavenDB is very important. Having a sense of what's going on behind the scenes means that you'll be able to predict what RavenDB will do and, more importantly, why.
After working through some cluster recipes, we moved on to discuss how databases are composed. It's crucial to understand the notion of the Database Record that is managed at the cluster
level, with each node holding the databases instances that are assigned to it. We looked at how
this can be useful if we want to physically move a database between machines (for example, moving the disk volume
directly).
We also talked about some scale and performance tricks: how to expand your database group and load balance work between nodes. This is something that you should be doing ahead of time, but it's not a perfect world. RavenDB understands and expects that you'll probably be doing this kind of thing under fire, so to speak. Expanding the database group to add more capacity is a controlled operation so as to limit the amount of additional load it generates.
Speaking of things that should be done ahead of time, we talked about how you can take the results of the query optimizer from your load testing machine and apply them to your production systems ahead of new version deployment. This will allow the production cluster to benefit from the experience of the test server. This allows you to smooth the process of introducing new behaviors in production.
We finished the chapter with an interesting challenge: distributed aggregation of data across many physically separated locations using several distinct features in tandem. This kind of usage is pretty common. One of the strengths of RavenDB is its ability to treat features in an orthogonal manner; you can mix, match and combine them to get to some really nice results.
-
Make sure that any changes to the static indexes you make are backward compatible, otherwise queries may fail once the indexes complete and the side-by-side index is promoted to be the active index.↩
-
Push-based in this context refers to the fact that they are defined in the source and they push the data to the destination.↩