Create Map Index
-
A Map index consists of one or more LINQ-based or JavaScript mapping functions that indicate how to index selected document fields, counters, and time series data.
-
In this page:
Edit Index View
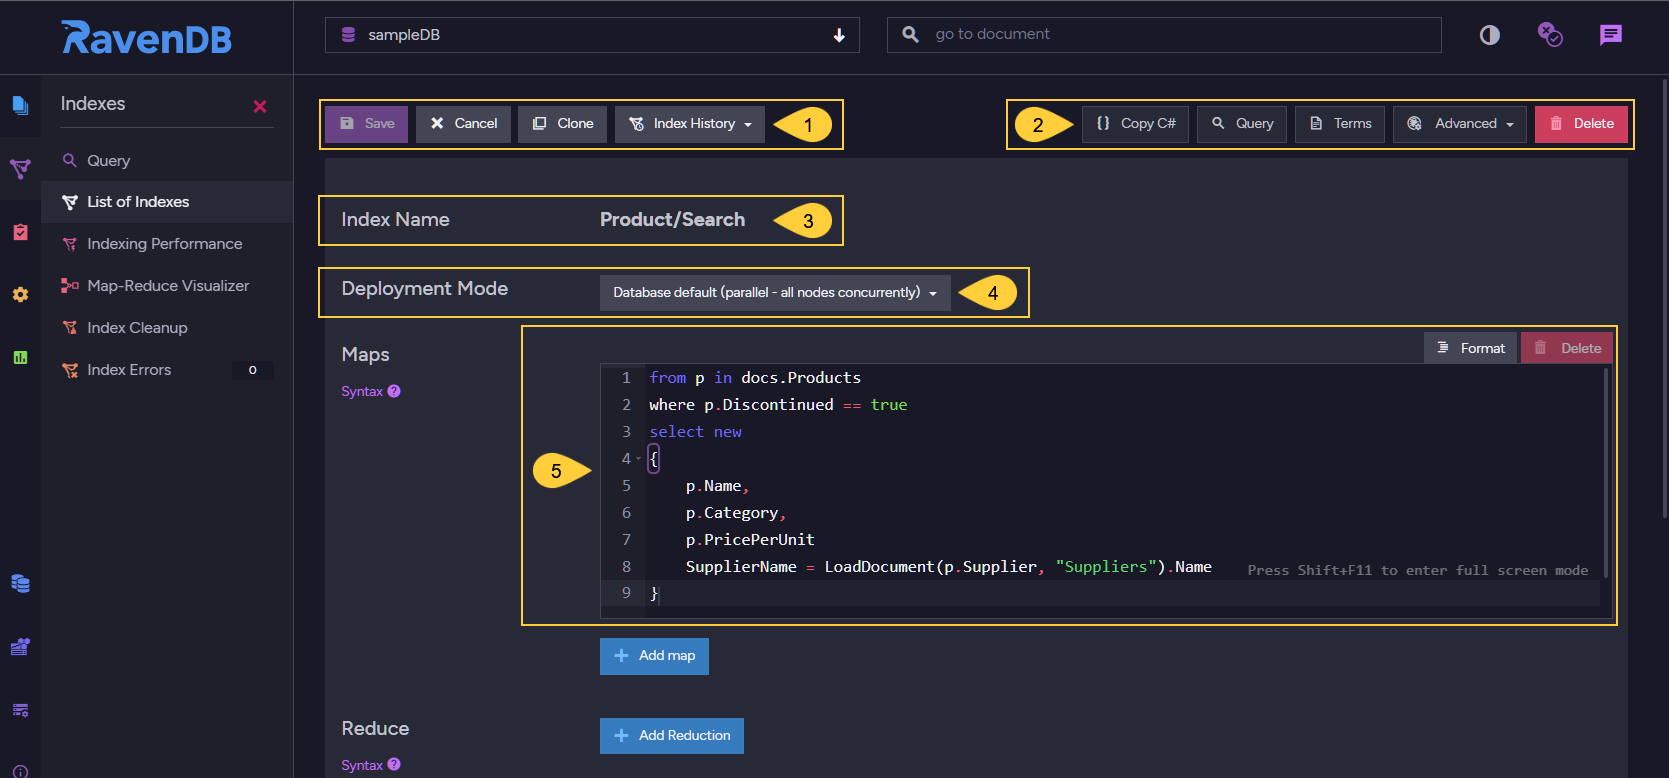
Edit Index View
-
Save - Save index definition.
Cancel - Return to Index List View without creating or changing the index definition.
Clone - Clone this index (available for an already saved index).
Index History - Open the Index History Dialog. -
Options available for an already saved index:
Copy C# - Click to view and copy the C# class that defines the index as set in the Studio.
Query - Click to go the the Query View and query this index.
Terms - Click to see the index terms, see below.
Advanced - Click to dump the raw index or optimize it.
Delete - Delete this index. -
Index Name - An index name can be composed of letters, digits,
.,/,-, and_. The name must be unique in the scope of the database.- Uniqueness is evaluated in a case-insensitive way - you can't create indexes named both
usersbynameandUsersByName. - The characters
_and/are treated as equivalent - you can't create indexes named bothusers/bynameandusers_byname. - If the index name contains the character
., it must have some other character on both sides to be valid././is a valid index name, but./,/., and/../are all invalid.
- Uniqueness is evaluated in a case-insensitive way - you can't create indexes named both
-
Deployment Mode - Select the index deployment mode.
- Database default (parallel - all nodes concurrently)
With this option, the deployment mode will be the Default Mode defined on the database. - Rolling (one node at a time)
The index will be deployed on the cluster nodes in a linear order, one node at a time. - Parallel (all nodes concurrently)
The index will be deployed on all cluster nodes in parallel. - Read more about deployment modes here.
- Database default (parallel - all nodes concurrently)
-
The Map Function of the index.
-
In the above example, the index will go over documents from the
Productscollection and index only documents whoseDiscontinuedproperty is 'true'.
from p in docs.Products where p.Discontinued == true select new { p.Name, p.Category, p.PricePerUnit, SupplierName = LoadDocument(p.Supplier, "Supplier").Name } -
Note: querying this index will provide results only for Products whose 'Discontinued' field contains 'true'. Omitting the 'where' clause and defining 'from p in docs.Products' would have queried the whole Products collection.
-
Each Index Entry created for this index will be composed of the following 4 fields:
Name,Category,PricePerUnit&SupplierName.
The first 3 are taken directly from the document fields, while SupplierName is a calculated index field.
The supplier's name is derived from the Name field that is taken from the loaded supplier document. -
At query time, when querying this index, the resulting documents can be searched on and further filtered
by these Index Fields defined and by the created Terms. See the query results on this index in Query View. -
See more Map-Indexes examples in Map Index defined from Code
-
Test Index
The Test Index interface provides a secluded environment for the execution
of test-queries over indexes.
An index can be repeatedly changed and executed over a size-limited dataset,
for a limited time duration, providing its users with immediate execution results
and saving them the need to save the index first and wait for its execution
over huge datasets in a live environment.
In its folded form, the interface is a floating bar at the bottom of the page, to keep it
available when the index page is scrolled up and down.
When expanded, the interface provides an instant testing environment for additions and
modifications in the index maps and configuration.
- Testing an index does not require saving it first, so changes can be easily made, tested, and either kept or unmade, in testing as well as production environments.
- Indexes created while running test queries are dropped after the test.
- Corax indexes created while running testing queries will not train compression dictionaries.

Folded: Test Index Bar
- Scan limit
Enter the maximum number of items that the index will process, from 1 to 10,000.
Default: 10000 - Time limit
Enter the maximum amount of time for the test execution, in seconds.
Default: 15 seconds - Run test
Click to run the test and expand the test bar to display the results. - Expand test bar
Click to expand the test bar, displaying the index query editor and the result tabs.
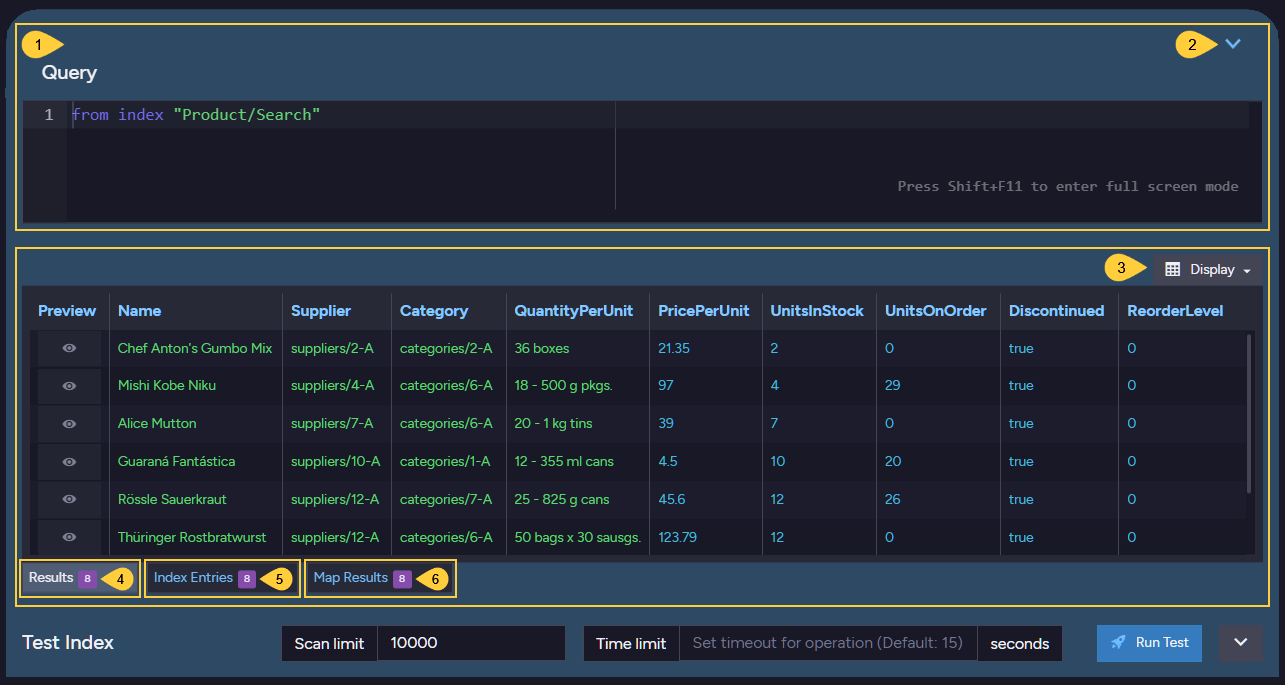
Expanded: Test Index Interface
- Query editor
Initially, the editor displays a simple query over the index.
You can edit the query so it applies any logic that would help you understand the results and improve the index, e.g. make the query display only a selected subset of the index results. - Fold interface
Click to fold the test interface back to its floating bar form. - Display
Click to select which columns to display. - Results tab
Click to display query results. -
Index entries tab
Click to view the values of document properties retrieved by the query.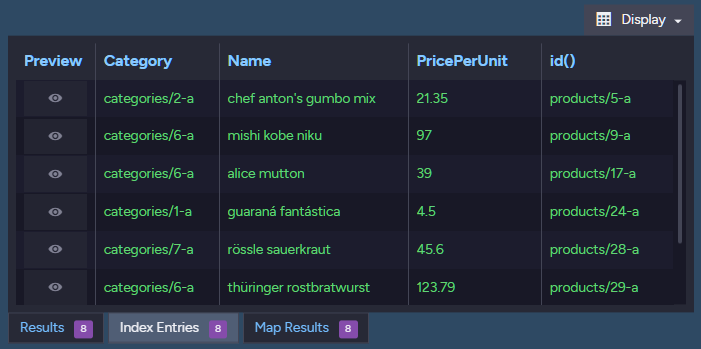
Index Entries Tab
-
Map results tab
Click to view mapped index parameters.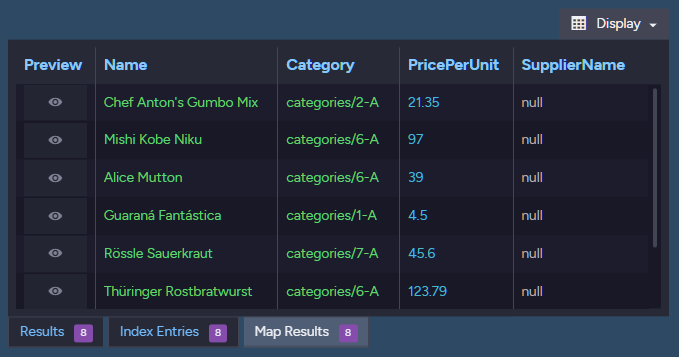
Map Results Tab
Map Reduce Results
When the index includes a Map Reduce section, the test will display the results of this section in a Reduce Results tab.
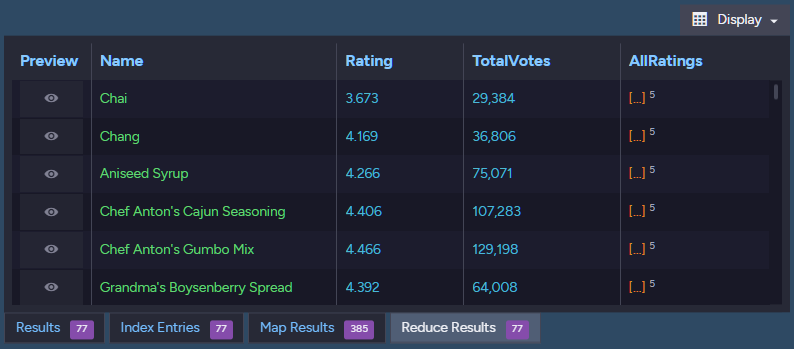
Map Reduce Results Tab
Index Fields & Terms

Open Terms View
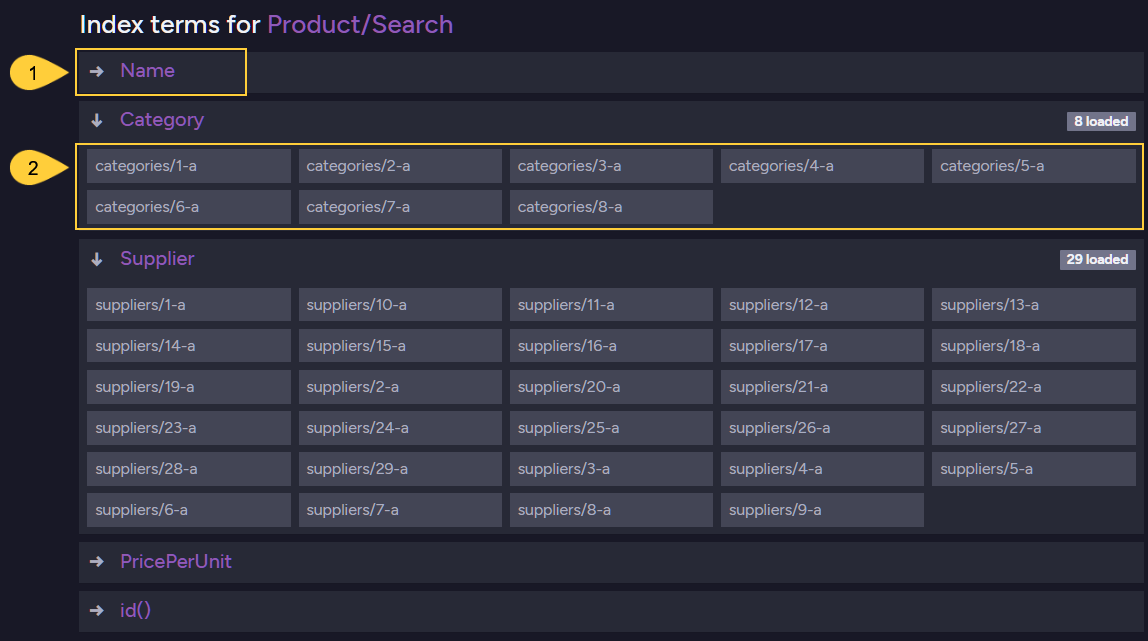
View Terms
-
Index Fields
Click an index field to expand the terms listed under it. -
Terms
Hover over a term to Query the index by this term, Preview the term, or Copy the term to the clipboard.
Terms are created from the value of the field that was requested to be indexed by the specified Field Options.
Index Field Options

Index Field Options
-
Add field
Create indexing options for one document field in the collection this index applies to. -
Add compound field
If the Corax search engine is used, compound fields can be added to optimize specific queries.
This option is for expert users only. -
Add default field options
Use this option to set default field options for all indexed fields.
Add Default Field Options
-
Field name
Click the text box to display a dropdown menu of fields, and select a field whose options will replace the default options. -
Basic options
-
Store
Select Inherit, Yes, or No.
Inherit to apply the default database/server value.
During a query, if Store is enabled, the value is fetched from the index rather than from the queried document.
If the value is not found in the index, it will be fetched from the document.
Storing data in the index decreases reaction time, but increases the index size. -
Full-Text-Search
Set this to 'Yes' to allow searching for strings inside the text values of this field.
The indexed terms are tokens that are split from the original string according to the specified Analyzer.
The Analyzer is set using the 'Indexing' and 'Analyzer' dropdown menus (see Advanced Options below).
The default analyzer is a simple case-insensitive analyzer. -
Highlighting
Set to 'Yes' to enable highlighting.
Requires 'Store' to be set toYes.
In the advanced options, Indexing needs to be set to 'Search' and Term Vector set to 'WithPositionsAndOffsets'. -
Suggestions
Setting 'Suggestions' will allow you to query what the user probably meant to ask about (i.e. spelling errors).
-
-
Advanced Options
Click to display or hide these advanced index field options:
Advanced Index Field Options
-
Term Vector
Term Vectors are used in RavenDB's query feature More Like This, which suggests documents that are similar to a selected document, based on shared indexed terms. I.e., suggest similar catalogs.
A 'Term Vector' for a text paragraph will contain a list of all unique words and how often they appeared.
Set 'full-text-search' on the field (index entry) and define it to have a 'Term Vector'.
Learn more in Indexes: Term Vectors, and in this Blog Post. -
Indexing
This setting determines which Analyzer (see the next option below) can be used.- Exact
Analyzer: 'Keyword'
The text is not split into tokens.
The entire value of the field is handled as one token. - Default
Analyzer: 'LowerCase Keyword'
The text is not split into tokens.
The text is converted to lowercase, and matches are case insensitive. - Search
Use theAnalyzerdropdown menu to select an analyzer.
'StandardAnalyzer' will be used by default.
When a custom analyzer is created, it is added to the dropdown menu.
- Exact
-
Analyzer
This is the analyzer in use, determined either by theIndexingsetting above or (whenIndexingis set to Search) by clicking theAnalyzeredit box and explicitly selecting the analyzer from a dropdown list.
-
-
Delete Field
Click to remove this field from the index.
Add Compound Field
Compound fields are used by Corax to optimize specific queries.
A compound field is always comprised of two simple data elements,
and its content is sorted by the first element and then by the second.
When a query that is based on these two data elements is executed,
it will automatically use the pre-sorted compound field and run the
query much faster.
Read more about this feature here.

Change to Corax
- An index that uses a search engine other than Corax will not be able to use compound fields. Click "Change to Corax" to set Corax as the search engine for this index.

Add Compound Field
- Click to set the search engine for this index to Corax and add a compound field.
- Click to select the first data element for the compound field.
- Click to select the second data element for the compound field.
- Click to remove the compound field.
Configuration

Index Configuration
- Configuration tab
Click to set index-specific configuration options. - Add customized indexing configuration
Click to add a configuration key. - Search engine type
Select the search engine. Have this index inherit the default search engine, or set it explicitly to Lucine or Corax. - Indexing Configuration Key
Paste or select the configuration key that you want to set.
You can set any indexing configuration that has a "per-index" scope. - Value
Enter the new value for this configuration key. - Delete Configuration
Remove this configuration key.
Remember to save the index using the Save button at the top to keep the modified configuration.
Additional Assemblies
Use the Additional Assemblies
feature to enhance Index capabilities with classes and methods taken from libraries.
In the below example, Path.GetFileName can be used by the index map method because the
runtime library System.IO is added as an additional assembly.
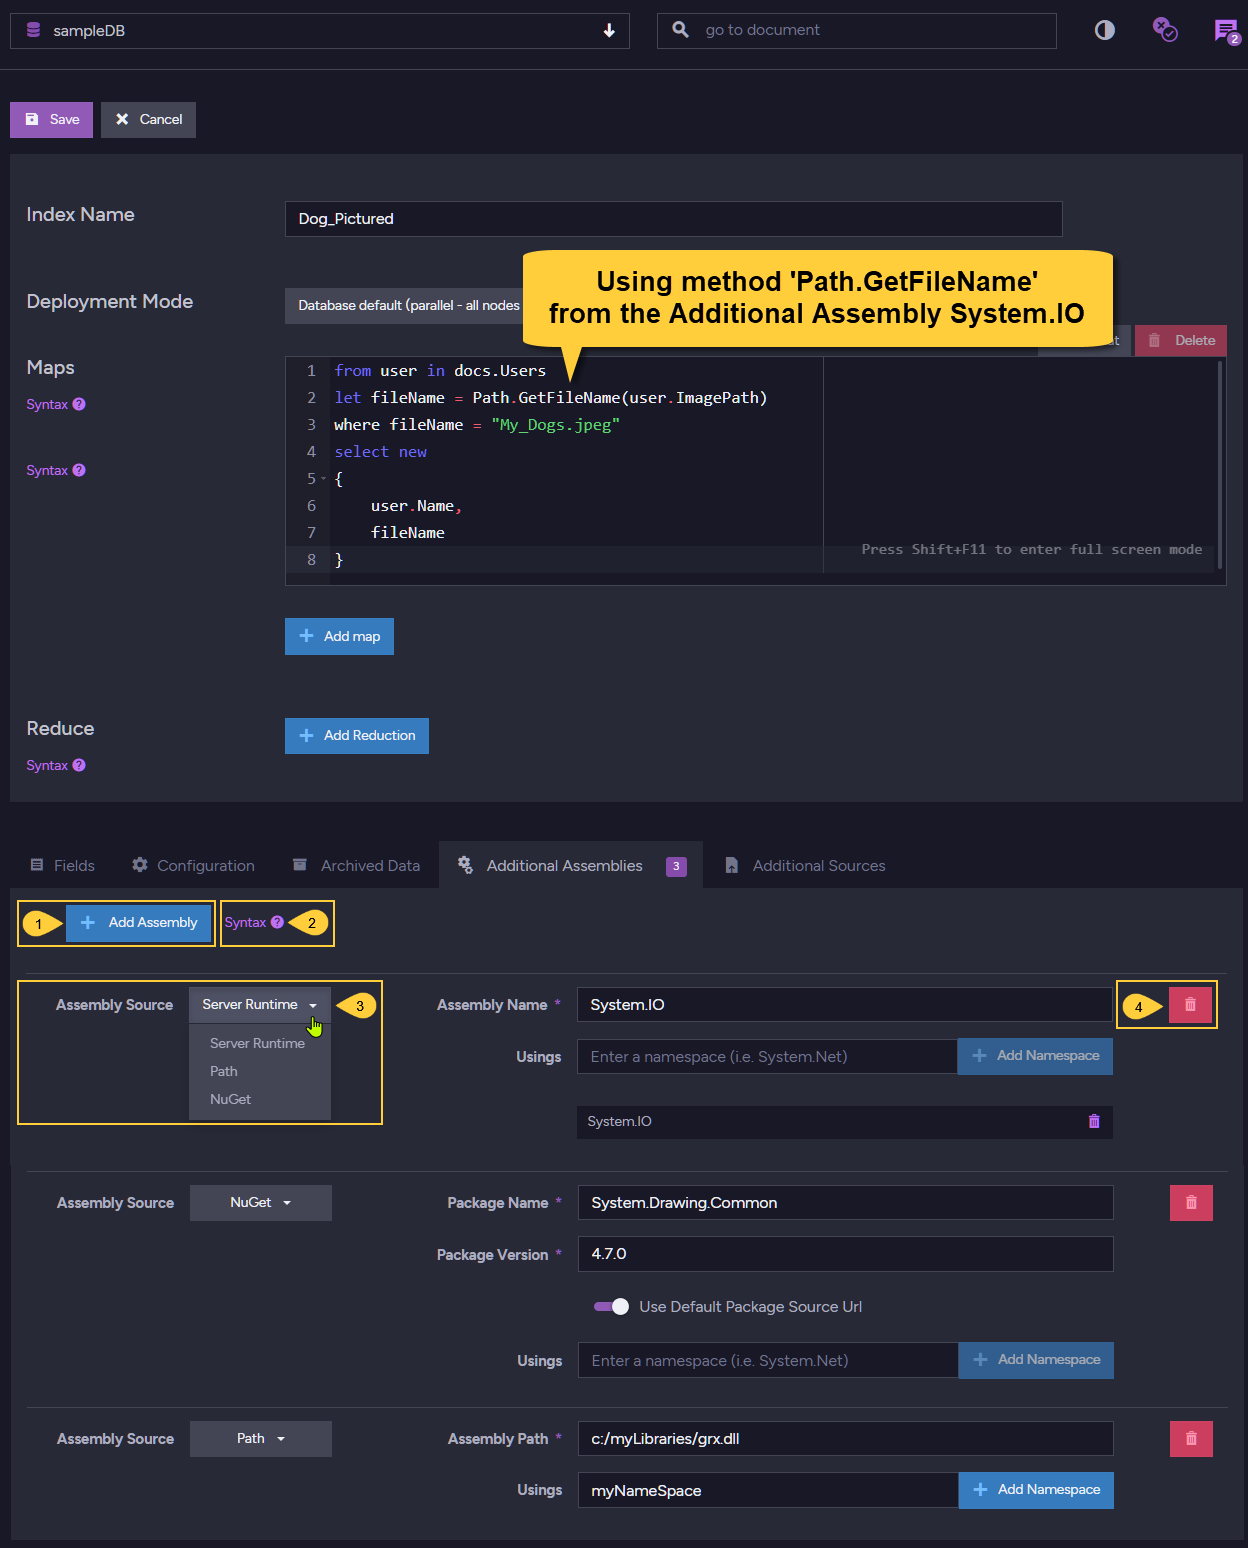
Additional Assemblies
-
Add Assembly
Click to add an assembly source for your index usage. -
Syntax
See syntax samples. -
Assembly Source
Select the assembly source type.
Added assemblies can be -- Server Runtime - a runtime library.
- Path - The path to a library file on your local disk.
- Nuget - a Nuget package.
Note that additional assemblies are allowed to include pre-release packages.

-
Remove Assembly
Click to remove the assembly.
Server Runtime Library

Server Runtime Library
-
Assembly Source
In this example, the assembly is a runtime library. -
Assembly Name
The name of the runtime library you want to use. -
Usings
Optionally, choose a namespace within the assembly. -
Add Namespace
Click to add the namespace to the list ofUsings. -
Namespaces list
The list of namespaces used. -
Remove Namespace
Click to remove this namespace from the list. -
Remove Assembly
Click to remove this assembly.
Nuget Package

Nugat Package
-
Assembly Source
In this case, Nuget was chosen so the index can use classes and methods taken from a Nuget package. -
Package Name
Nuget package name. -
Package version
Nuget package version. -
Default Package Source URL
- Toggle ON to use the package default URL.
- Toggle OFF to provide the URL yourself.

-
Usings
Optionally, choose a namespace within the Nuget package. -
Add Namespace
Click to add the namespace to the list ofUsings. -
Remove Assembly
Click to remove this assembly.
Local Library Path

Local Library Path
-
Assembly Source
In this case, Path was chosen so the index can use classes and methods taken from a local library. -
Assembly Path
Provide a path to the local library file. -
Usings
Optionally, choose a namespace within the local library. -
Add Namespace
Click to add the namespace to the list ofUsings. -
Remove Assembly
Click to remove this assembly.
Additional Sources
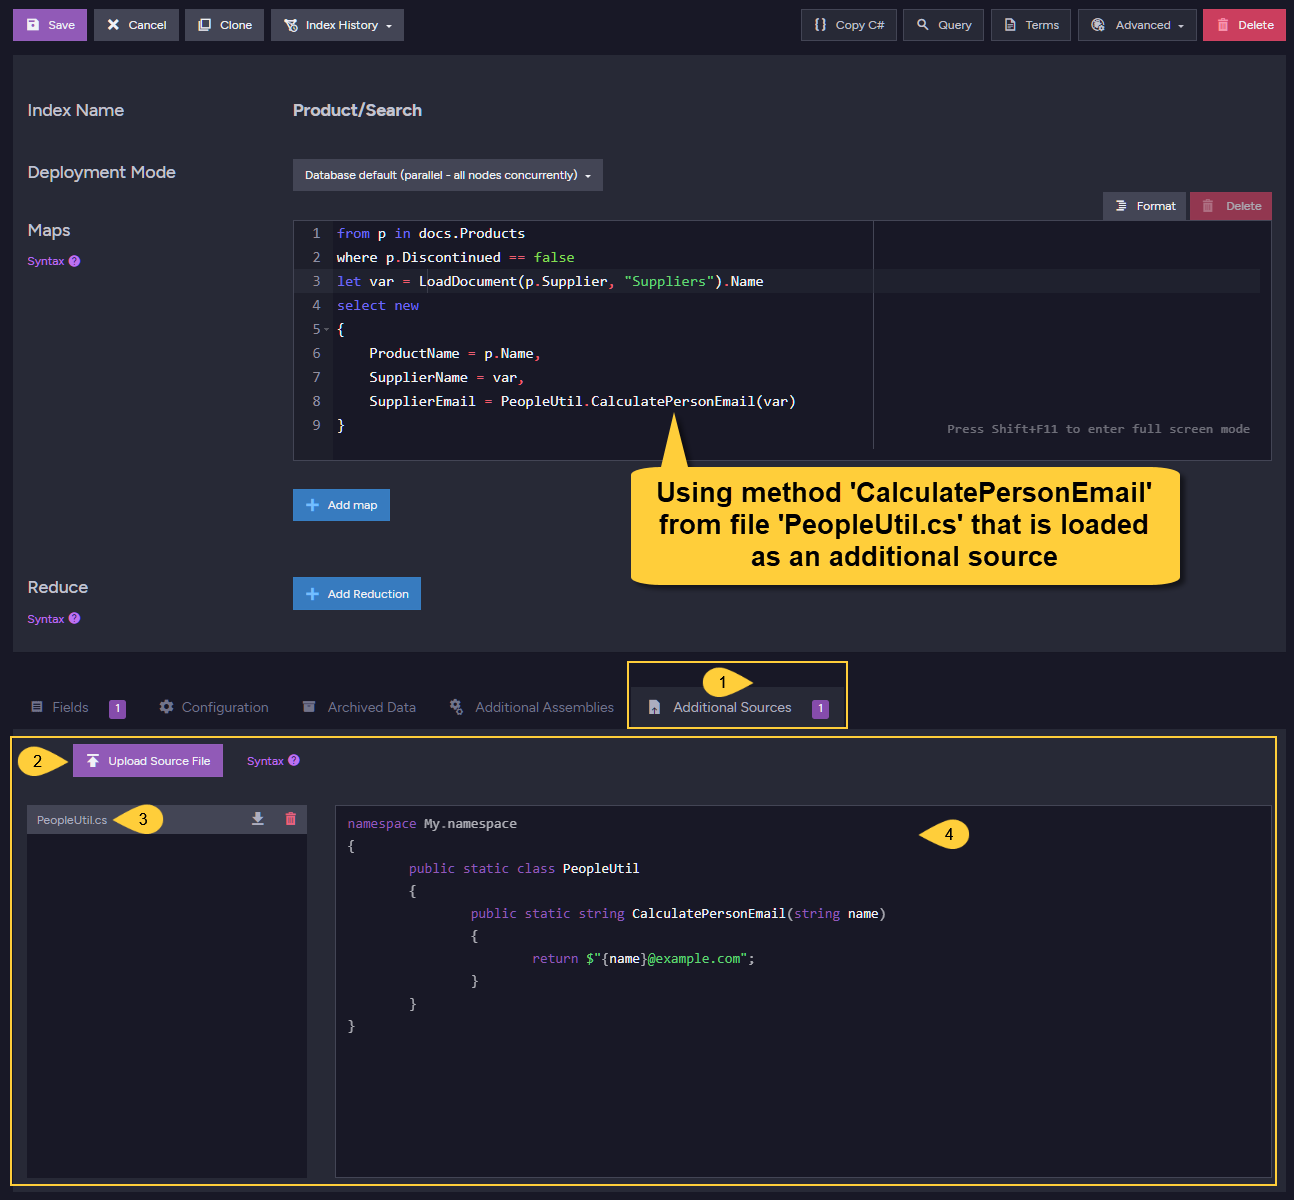
Additional Sources
You can extend the logic of the Map & Map-Reduce methods by referencing classes and methods from additional source files. This enables advanced scenarios since complex logic can be performed during the indexing process.
In the above example, file 'PeopleUtil.cs' was uploaded and method 'CalculatePersonEmail' is used to calculate the index entry 'SupplierEmail'.
- Additional Sources tab
Click to open the additional assemblies tab. - Upload Source File
Click to upload a file from the file system that contains classes and methods you want to use. - Uploaded File
The file that has been uploaded whose contents can be used within the index methods. - Source Code
Read-only view of the uploaded file's source code.
Spatial Field Options
Spatial searches use geographical data. To perform such searches, a spatial index field has to be defined.
The CreateSpatialField() method used in the index definition
below instructs RavenDB to use the document longitude and latitude
properties and create the spatial field 'Coordinates' that spatial
queries can then use.
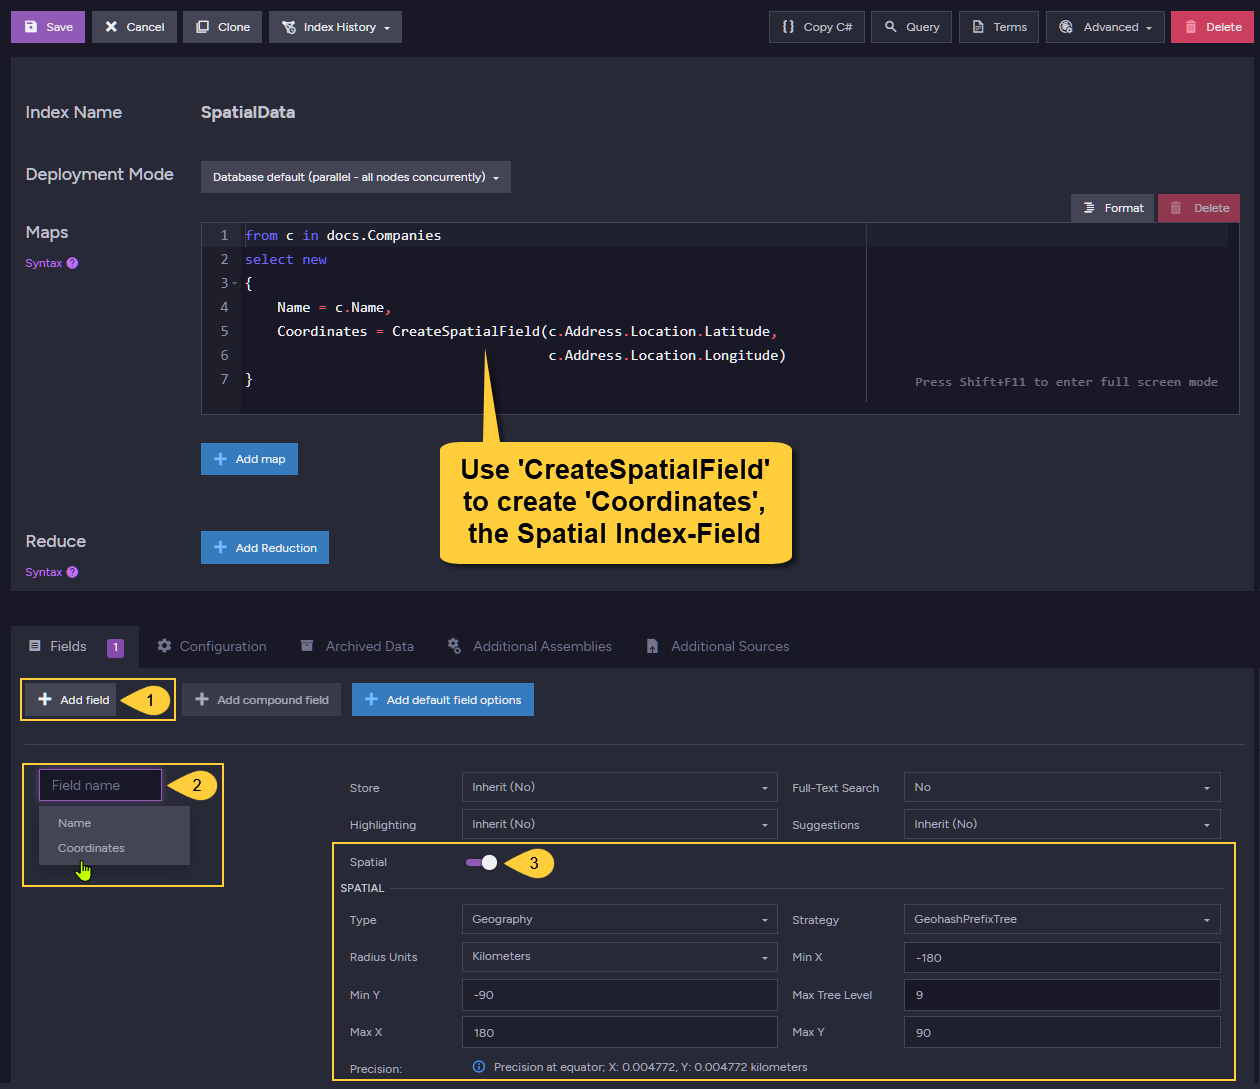
Spatial Field Options
-
Add Field
Create indexing options for the spatial field. -
Field Name
Select the spatial field, in this case "Coordinates". -
Spatial
Toggle on to enable spatial options.- Spatial Type
RavenDB supports both the Geography and the Cartesian systems. - Spatial Indexing Strategy
Strategy determines the format of the indexed term values.
The following indexing strategies are supported:
• Bounding box
• Geohash prefix tree
• Quad prefix tree - Radius Units
Set the units (miles, kilometers) to be used when querying with RQLspatial.circle.
Learn more about querying spatial fields here: Querying: Spatial - Max Tree Level
Control spatial queries precision. - X and Y Min/Max Values
Setting the min/max values for X and Y is relevant only for the Cartesian system type.
- Spatial Type
Learn more about spatial indexes in Indexing: Spatial.