Guides: AWS Lambda (.NET C#)
-
AWS Lambda is a serverless platform that supports multiple languages and frameworks that let you deploy workloads that scale without managing any infrastructure.
Learn more about working with AWS Lambda. -
In this guide, you will learn how to deploy a .NET C# Lambda Handler Function using the RavenDB AWS Lambda C# template that is connected to your RavenDB database.
-
In this page:
Before We Get Started
You will need the following before continuing:
- A RavenDB Cloud account or self-hosted client certificate
-
A local AWS .NET development environment set up
- Recommended: AWS Toolkit for VS Code
- Recommended: AWS Toolkit for Visual Studio
- Amazon Lambda Tools package for .NET CLI
- Git
- .NET 6.x
If you are new to AWS Lambda local development, see the AWS Lambda Developer Guide for how to get up and running with your toolchain of choice.
Create a Local Lambda Function
The RavenDB AWS Lambda C# template is a template repository on GitHub which means you can either create a new repository derived from the template or clone and push it to a new repository.
This will set up a local Lambda C# function that we will deploy to your AWS account at the end of the guide.
Creating a New Repository from the Template
Depending on your environment, there are several ways to clone the template and initialize a new Git repository.
The template repository lists each clone method you can copy & paste directly.
Using npx and the degit tool if you have Node.js installed:
npx degit ravendb/templates/aws-lambda/csharp-http my-project
cd my-project
git init
Using Bash or PowerShell:
git clone https://github.com/ravendb/templates my-project
cd my-project
git filter-branch --subdirectory-filter aws-lambda/csharp-http
rm -rf .git       # Bash
rm -r -force .git # PowerShell
git init
Install Dependencies
After cloning the repository locally, restore .NET dependencies with dotnet:
dotnet restoreBy default, the template is configured to connect to the Live Test instance of RavenDB.
Since this is only for testing purposes, next you will configure the app to connect to
your existing RavenDB database.
Starting the Function
You can start the Lambda function locally using:
dotnet runIf you are using Visual Studio Code, you can also debug the function with F5 debugging.
You will see the welcome screen if the template is set up correctly:
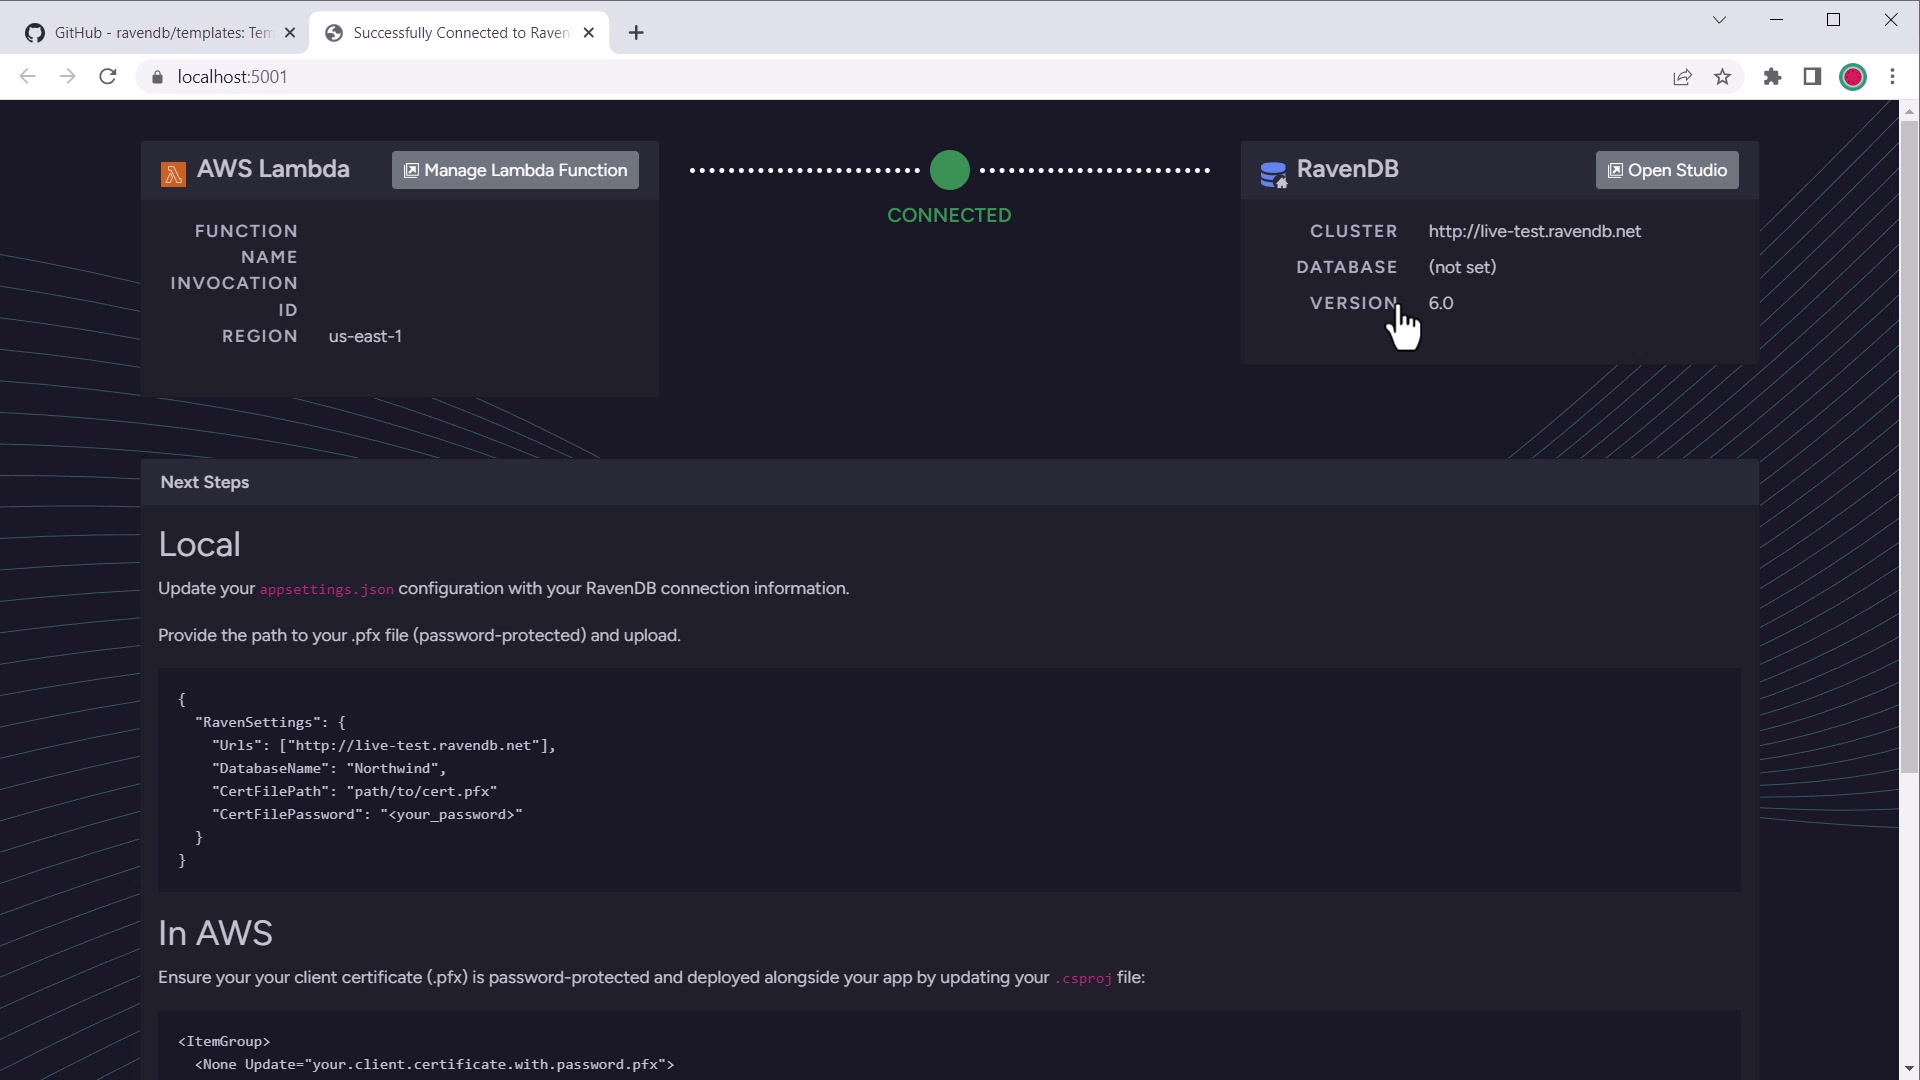
.NET template welcome screen
Install AWS .NET tools
You will need the .NET Global Tools for Lambda installed to perform the deployment steps later.
Install the Amazon.Lambda.Tools package:
dotnet tool install -g Amazon.Lambda.Tools`Or make sure it's updated if you already have it:
dotnet tool update -g Amazon.Lambda.ToolsSet Up Your Environment
AWS libraries, SDKs and this template rely on several environmental artifacts to work.
One is your AWS credentials, stored in ~/.aws/credentials and the other is the default AWS region to use.
Using the defaults file: You can use the template's aws-lambda-tools-defaults.json to set your Functions region:
{
  ...
  "region": "us-east-1",
  ...
}
Using an environment variable: Set the AWS_REGION environment variable in your terminal session or profile.
Learn more about setting up AWS credentials or the default AWS region.
Configuring Local Connection to RavenDB
To configure the local version of your AWS Lambda function to connect to RavenDB,
you will need to update the appsettings.json file with the RavenSettings.Urls
value and RavenSettings.DatabaseName value.
An example appsettings.json connecting to the RavenDB live test cluster might look like:
{
  "Logging": {
    "LogLevel": {
      "Default": "Information",
      "Microsoft.AspNetCore": "Warning"
    }
  },
  "AllowedHosts": "*",
  "RavenSettings": {
    "Urls": ["http://live-test.ravendb.net"],
    "DatabaseName": "demo",
    "CertFilePath": "",
    "CertPassword": ""
  }
}
If using an authenticated RavenDB URL, you will need a local client certificate.
Learn more about configuring client authentication for RavenDB.
Using a PFX Certificate File
To configure the local Lambda function to load a certificate from outside the project
directory, specify the RavenSettings.CertFilePath and, optionally, the RavenSettings.CertPassword settings:
{
  "Logging": {
    "LogLevel": {
      "Default": "Information",
      "Microsoft.AspNetCore": "Warning"
    }
  },
  "AllowedHosts": "*",
  "RavenSettings": {
    "Urls": ["https://a.MYCOMPANY.ravendb.cloud"],
    "DatabaseName": "MyDB",
    "CertFilePath": "../certs/free.MYCOMPANY.client.certificate.without.password.pfx"
  }
}
This will connect to the a.MYCOMPANY.ravendb.cloud RavenDB Cloud cluster using the local certificate file.
The file path can be relative to the .csproj file or absolute.
Do not commit and publish PFX files
It is recommended to only use the PFX file locally, e.g. free.MYCOMPANY.client.certificate.without.password.pfx
and keep it outside your project directory. The template is configured by default to ignore it in Git and to never
copy PFX files to the bin and publish folders.
Using the password-protected PFX file
If you prefer to use the password-protected PFX file, you can store the CertPassword using the
.NET User Secrets Tool.
However, keep in mind that your team will need this secret configured locally to use the PFX file.
dotnet user-secrets init
dotnet user-secrets set "RavenSettings:CertPassword" "<CERT_PASSWORD>"
Loading Configuration from AWS Secrets Manager
The template uses Kralizek.Extensions.Configuration.AWSSecretsManager to automatically load .NET configuration from AWS Secrets Manager to support securely loading certificates instead of relying on production environment variables. This has an added cost but it may scale better for a large team and help you better manage the lifecycle of your certificates.
The configuration will be loaded from AWS Secrets Manager if it exists, otherwise appsettings.json will be used.
Deploying to AWS
At this point, the local Lambda app is ready to be deployed.
There are 4 main ways to deploy your new AWS Lambda function:
GitHub actions, .NET CLI, AWS SDK CLI, and or the AWS Toolkit extensions.
The template has already been set up to use continuous deployment using GitHub Actions.
For the other methods, see Deploying AWS Lamda Functions.
However, we need to do a deployment manually for the first-time setup, such as setting the Function role and policy. Once it is setup, GitHub Actions will automatically deploy on new commits.
Start by deploying your function manually using the .NET CLI:
dotnet lambda deploy-function <FUNCTION_NAME>The function name should match the name of the .csproj file.
The tool will walk you through the first-time deployment:
- Function IAM Role: This can be the name of your function name plus "Role", e.g.
RavenDBTemplateRole - Function Policy: Choose
AWSLambdaBasicExecutionRoleto allow for basic AWS Lambda execution permissions
Create a deployment AWS Access Key
If you do not have code deployment user, create a new IAM user to be used by your GitHub automation (e.g. gh_actions).
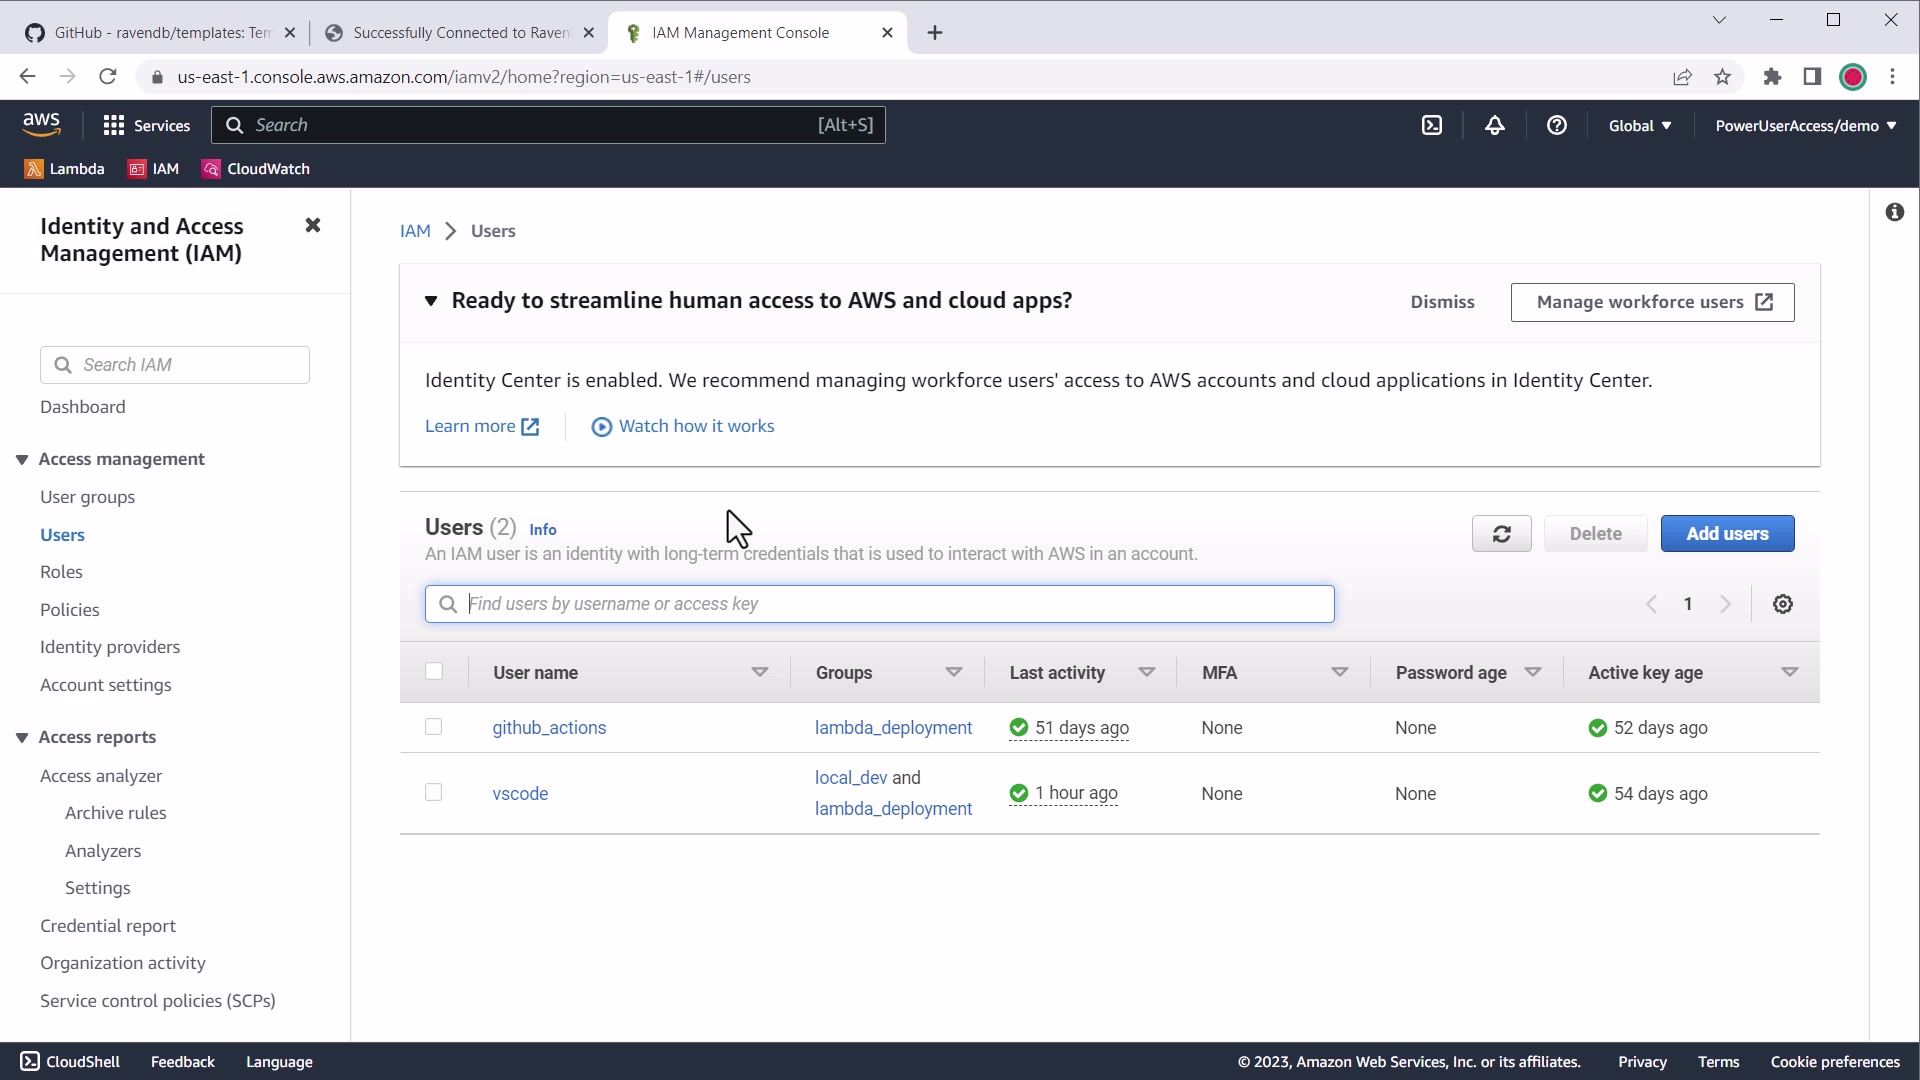
AWS IAM users for deployment
You will need the following security policies (assigned to group or user):
AWSLambda_FullAccessIAMReadOnlyAccess
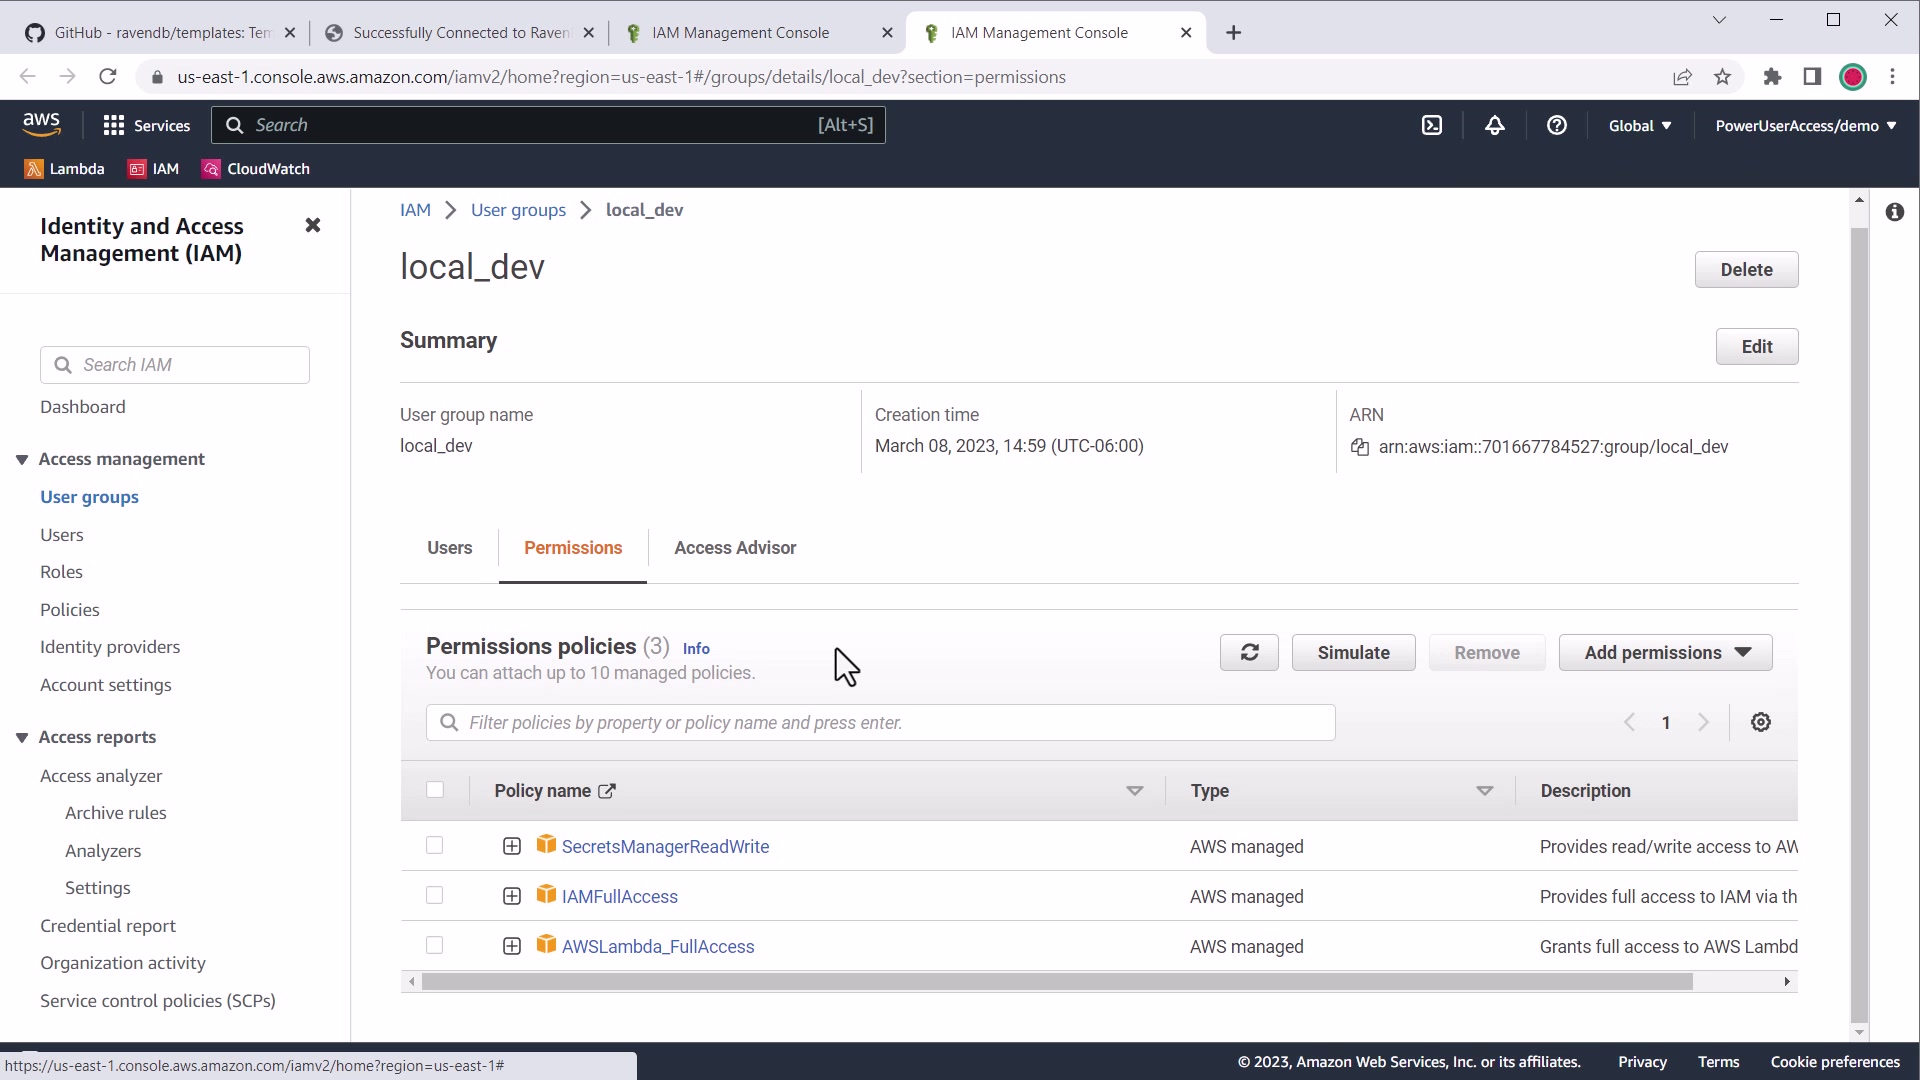
AWS IAM permissions for Lambda deployment
Once you have the user created, create and obtain an AWS access key specific for your GitHub action deployment workflow.

AWS access keys for Lambda deployment
Do not use Root Keys
It is recommended to use a dedicated deployment IAM user with specific access policies for automated deployment
through GitHub Actions.
Ensure you don't store your AWS keys in plain-text on your machine or elsewhere. They are password-equivalents.
GitHub Secrets are encrypted and cannot be retrieved after being stored.
Configure GitHub Secrets and Variables
The GitHub deployment workflow relies on having some specific secrets and variables set.
Setting up Secrets
- Obtain or create an Access Key for the user
- Go to your GitHub repository's secrets settings
-
Add a new secret
- Name:
AWS_ACCESS_KEY_ID - Value: The access key ID
- Name:
-
Add a new secret
- Name:
AWS_SECRET_ACCESS_KEY - Value: The secret access key
- Name:
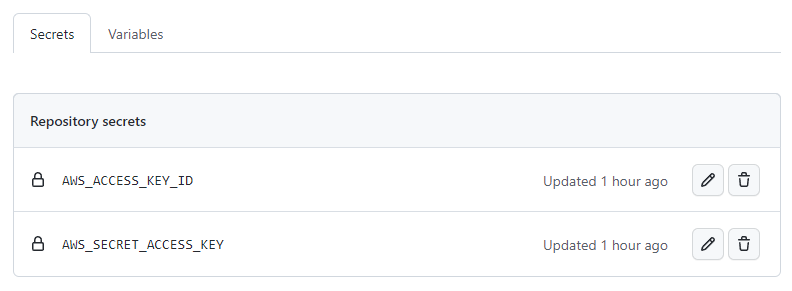
Example of GitHub repository secrets set
Setting up Variables
- Go to your GitHub repository's variables settings
-
Add or modify a variable
- Name:
AWS_LAMBDA_FUNCTION_NAME - Value: The name of your function used in the deploy command
- Name:
-
Add or modify a variable
- Name:
AWS_LAMBDA_FUNCTION_ROLE - Value: The IAM role name of the Function set when you first deployed
- Name:
-
If you are not using the
aws-lambda-tools-defaults.jsonfile to set the region, add or modify a variable:- Name:
AWS_REGION - Value: The default region your Function will deploy to
- Name:
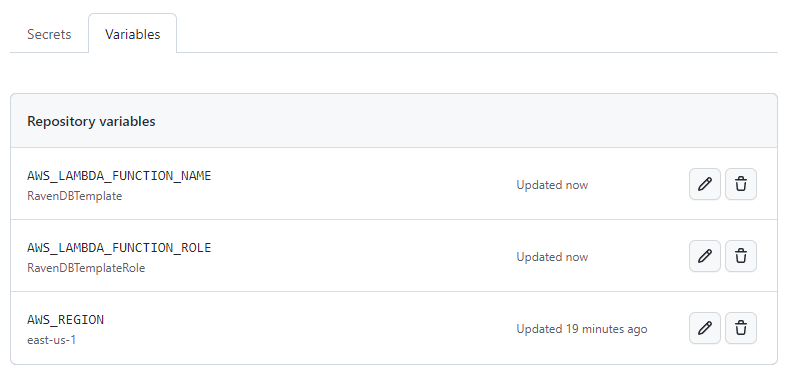
Example of GitHub repository variables set
Trigger a Deployment
Your repository and GitHub action is now set up. To test the deployment, you can push a commit to the repository.
If you have already committed and pushed, it is likely that the Action failed and you can re-run the job using
the new secret variable.
Once deployed, using the default settings, the Function will connect to the Live Test database.
Changing Application Configuration for Production
By default, configuration will be loaded from appsettings.json but it is likely you may have
different configuration needed once the Lambda function is deployed.
Configuring Production Connection to RavenDB
To configure the production version of your AWS Lambda function to connect to RavenDB, you will need to override your app settings through environment variables or, optionally, using AWS Secrets Manager.

AWS environment variable settings
Environment Variable Configuration
The convention to override .NET app settings would look like:
RavenSettings__Urls__0-- Specify database URLs in array format (zero-indexed)RavenSettings__DatabaseName-- Specify database name
You only need to provide the environment variables you want to override in the appsettings.json.
Using a PEM Certificate
You will need to configure the client certificate to connect to an authenticated RavenDB cluster.
If you are not using AWS Secrets Manager, you will need to use environment variables.
There is a 5KB limit on the size of variables, which poses an issue for using certificate auth.
To accomodate this, you will need to set RavenSettings__CertPublicKeyFilePath and RavenSettings__CertPrivateKey.
First, copy your PEM-encoded .crt public key certificate to your project. It is safe to commit
and deploy since it does not contain your private key. The template is configured to automatically
copy *.crt files to your bin and publish directories.
Specify the path to the file relative to your .csproj:
{
  "RavenSettings": {
    "Urls": ["https://a.MYCOMPANY.ravendb.cloud"],
    "DatabaseName": "MyDB",
    "CertFilePath": "../certs/free.MYCOMPANY.client.certificate.without.password.pfx",
    "CertPublicKeyFilePath": "free.MYCOMPANY.client.certificate.crt"
  }
}
You can choose whether to set this in production through the RavenSettings__CertPublicKeyFilePath
or in your appsettings.json file.
The RavenSettings__CertPrivateKey environment variable should be set to the contents of the .key
file from the RavenDB client certificate package.
Example value:
RavenSettings__CertPrivateKey=----- BEGIN RSA PRIVATE KEY ----- MIIJKA...It will look like this in the AWS console:

AWS environment variable settings for PEM certificate private key
The template will automatically decode the value and construct a PEM certificate from these two settings using the .NET X502Certificate2.CreateFromPem API.
AWS Secrets Manager Configuration (optional)
The template uses Kralizek.Extensions.Configuration.AWSSecretsManager to automatically load .NET configuration from AWS Secrets Manager to support securely loading certificates instead of relying on production environment variables.
Learn more about configuring AWS Secrets Manager
Verify the Connection Works
Once the environment variables are set up correctly, your Lambda function should authenticate successfully to your cluster.
You should see a welcome screen like this with the connection information:
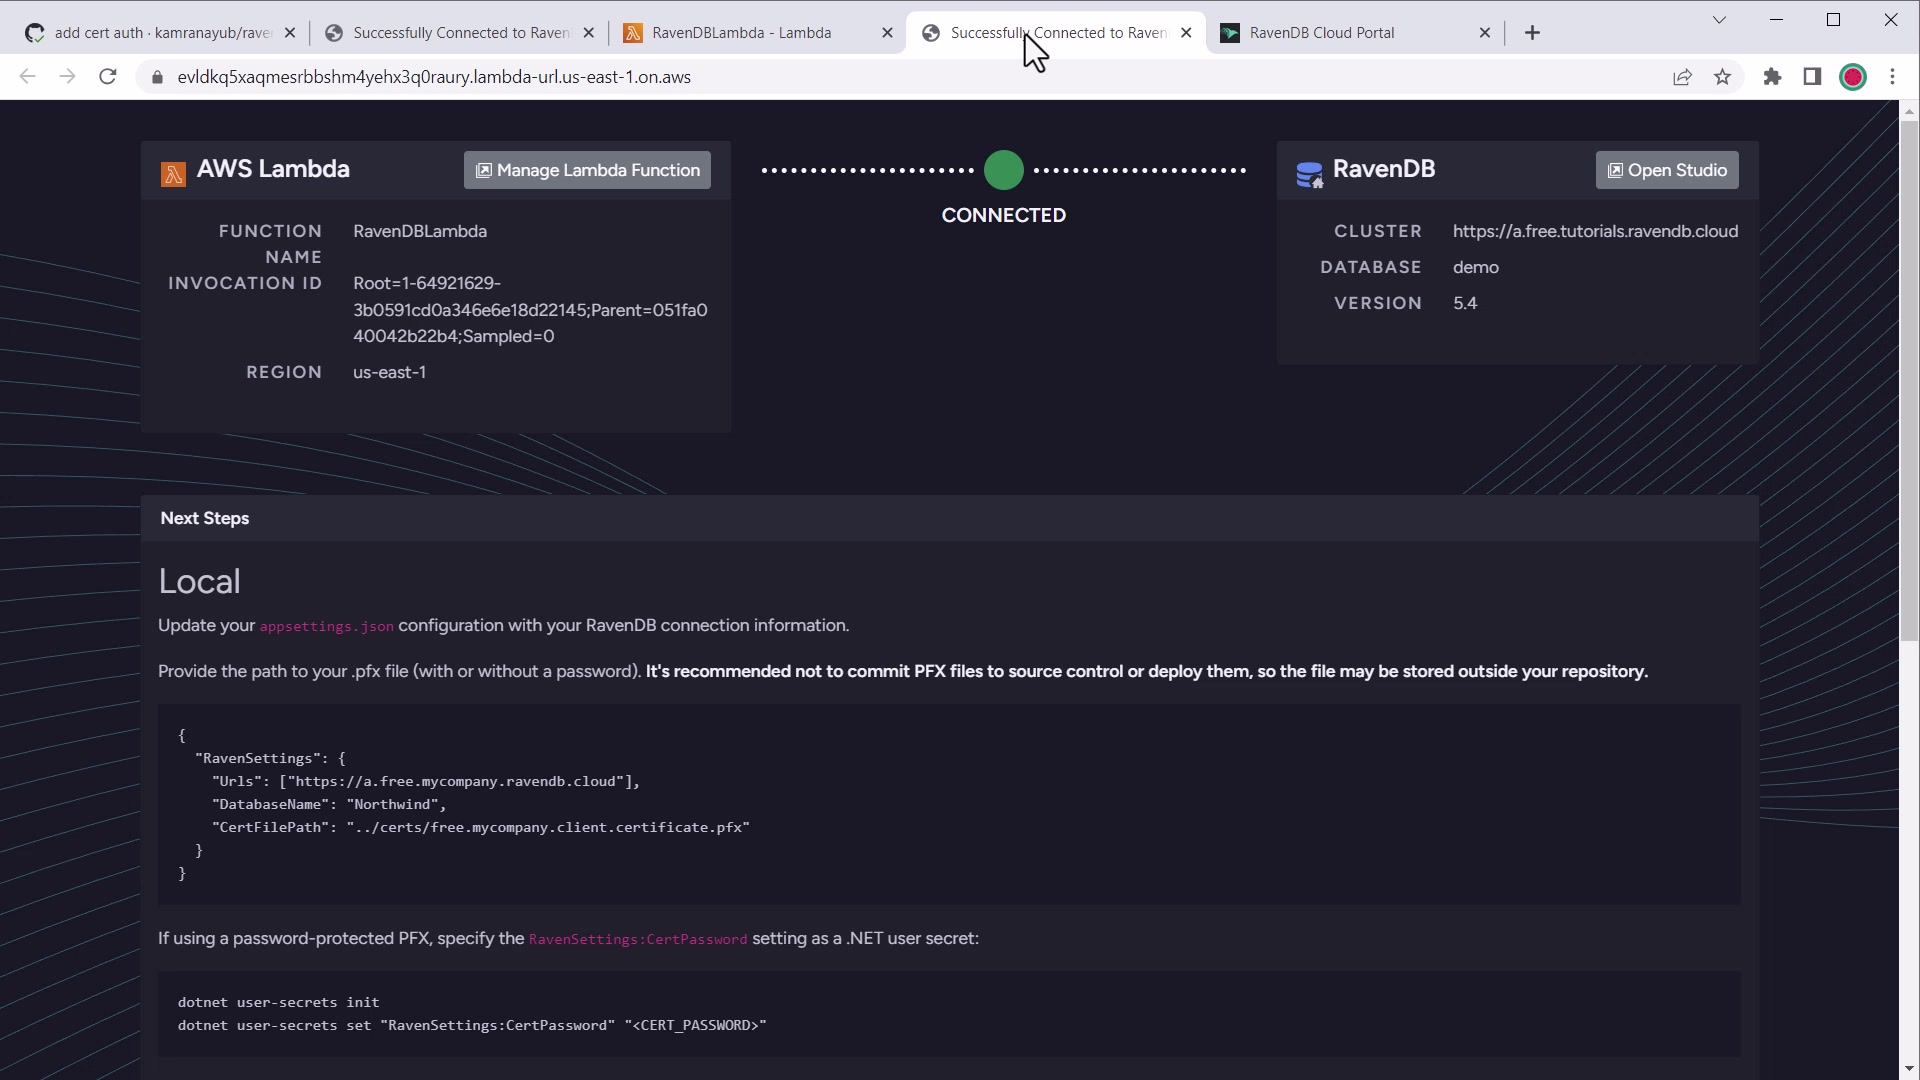
AWS Lambda welcome connected screen
This means your Lambda function is correctly configured and ready to work with RavenDB.
Using RavenDB in the Lambda Function
The template sets up a singleton DocumentStore and dependency injection for the
IAsyncDocumentStore per handler invocation which you can inject into Function classes.
Example: Injecting IAsyncDocumentSession
Pass the IAsyncDocumentSession in the handler function using [FromServices] which is
available from Amazon.Lambda.Annotations package:
using System.Threading.Tasks;
using Amazon.Lambda.Annotations;
using Amazon.Lambda.Annotations.APIGateway;
using Amazon.Lambda.Core;
using Raven.Client.Documents.Session;

[assembly: LambdaSerializer(typeof(
    Amazon.Lambda.Serialization.SystemTextJson.DefaultLambdaJsonSerializer))]

namespace RavenDBLambda;

public class Functions
{
  [LambdaFunction]
  [HttpApi(LambdaHttpMethod.Get, "/")]
  public async Task<string> FunctionHandler([FromServices]
    IAsyncDocumentSession session, ILambdaContext context)
    {
        var node = await session.Advanced.GetCurrentSessionNode();

        return $"Successfully connected to RavenDB - Node {node.ClusterTag}";
    }
}
Example: Injecting IDocumentStore
You can also inject an IDocumentStore to get a reference to the current store instance.
For singleton references, inject using a public class constructor:
using System.Threading.Tasks;
using Amazon.Lambda.Annotations;
using Amazon.Lambda.Annotations.APIGateway;
using Amazon.Lambda.Core;
using Raven.Client.Documents;

[assembly: LambdaSerializer(typeof(
    Amazon.Lambda.Serialization.SystemTextJson.DefaultLambdaJsonSerializer))]

namespace RavenDBLambda;

public class Functions
{

  private readonly IDocumentStore _store;

  public Functions(IDocumentStore store) {
    _store = store;
  }

  [LambdaFunction]
  [HttpApi(LambdaHttpMethod.Get, "/")]
  public async string FunctionHandler(ILambdaContext context)
  {
    // Access _store DocumentStore methods
  }
}
Example: Loading a user
using System.Threading.Tasks;
using Amazon.Lambda.Annotations;
using Amazon.Lambda.Annotations.APIGateway;
using Amazon.Lambda.Core;
using Raven.Client.Documents.Session;

[assembly: LambdaSerializer(typeof(
    Amazon.Lambda.Serialization.SystemTextJson.DefaultLambdaJsonSerializer))]

namespace RavenDBLambda;

public class Functions
{
  [LambdaFunction]
  [HttpApi(LambdaHttpMethod.Get, "/users/{id}")]
  public async Task<User> FunctionHandler([FromServices]
    IAsyncDocumentSession session, string id, ILambdaContext context)
    {
        var user = await session.Load<User>("users/" + id);

        return user;
    }
}
Next Steps
- For more robust certificate handling, configure AWS Secrets Manager support
- Learn more about deployment considerations for RavenDB and AWS Lambda
- Learn more about using the RavenDB .NET client SDK